Baby Changing Kit Tutorial
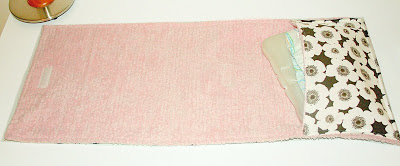 This is a fun and easy project, and really great for a baby gift! Its great for sewing beginners, and probably takes around an hour tops, maybe even less for all you experiences sewers out there. Enjoy!
Finished changing pad is about 12"by 27" long. The pocket holds one hard or soft wipes container as well as one or two diapers.
Materials
½ yard Cotton Print for the outside and pocket
½ yard Chenille, Minky, or heavy Flannel.
(I prefer Chenille because it is nice and thick without having to add extra batting)
Thread
Sew on Velcro
1. Cut the cotton and Chenille fabric into a rectangle 13" x 35".
Lay the fabrics right sides together and pin edges well.
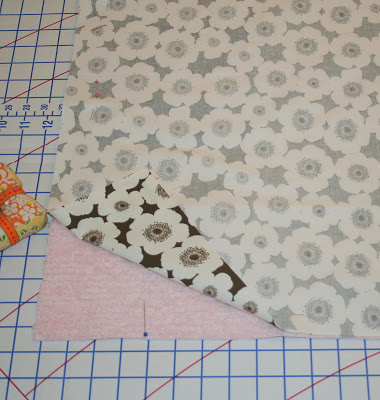
2. Sew edges together with a ½" seam allowance leaving a 4-5" opening on one of the 13" ends, this is so you can turn it all inside out later.
*A ½" seam allowance is important so you can stitch the hole closed with your top stitching.
*Chenille and Minky both have a tendency to stretch a lot. Use a walking foot if you have one, it helps to guide the top and bottom layers of fabric at the same rate. If not don't worry about the stretching, keep it taught so you don't have any large folds, and again pinning well will help.
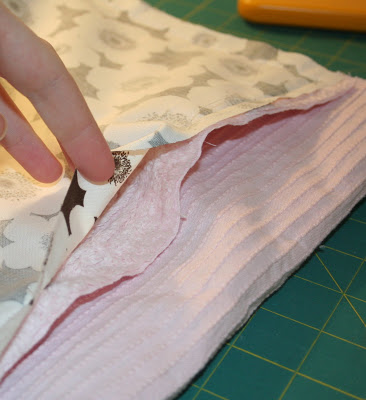
3. Cut excess fabric at corners as shown in the picture to give corners a nice square edge when turned.
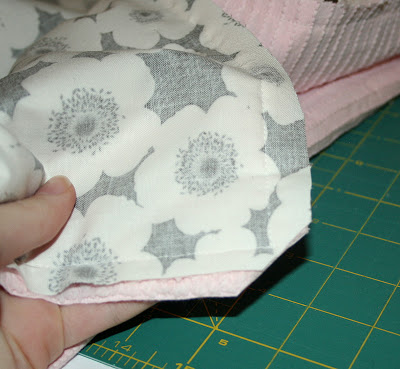
4. Turn right side out through the opening and iron the cotton side only at the edges. Pin your hole closed.
5. Top stitch across the entire 13" end where your hole is, using a ¼" seam allowance. Make sure when you are top stitching that you are using a small enough seam allowance to catch the fabric edges of the hole and sew it shut.
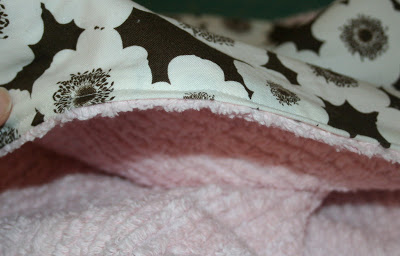
6. Turn the end that you just top stitched up onto the inside 6 ½" to create the pocket. Pin the edges to keep it in place.
8. Your almost done! Now you just have to add Velcro. Put in a wipes container and a diaper so you know how thick it will be. (or something soft like a folded up towel that makes it 2"thick if you don't have a wipes holder and diaper handy) I simply role my changing pad up how I normally would, and then just pin my Velcro pieces in place where I want them and make sure they meet. Sew on Velcro.
* You can also use a long ribbon to make a tie-shut changing pad. Just sew two long pieces of ribbon at the center of one end so that you can wrap the ribbon around the changing pad and tie it. I prefer Velcro because its much faster and easier.
*please use this pattern for personal and gifting reasons only and not for re-sale or commercial purposes.
*please do not copy or reproduce this pattern/tutorial without my consent. Thank you!
*please do not copy or reproduce this pattern/tutorial without my consent. Thank you!


Rannyjean
Allison:
This is perfect, I just purchased some fabric today & didn't know what I would do with it, but with a new grand baby on the way, this will be my next project!
I am having a giveaway on my blog (actually 3), stop by and leave a comment at:
http://quiltingranny.blogspot.com/2009/02/february-sweetheart-giveaway.html
You could win one of the prizes!
I love your blog & thanks for this awesome post!
D*H*L
great tutorial allison! :) i've been wanting to make one of these for our little guy on the way since we didn't have one for lukester. you're awesome, keep it up!
Phyllis
OMGosh - I am so glad I stopped by for a visit. I am going to make one of these tonight if I have enough stuff on hand. My oldest daughter is due with her first baby in two weeks and this would be a great addition to the other things I've made for her.
Thank you so very much!!!
erika~ the inspired mama
what a clever idea :) i have several expecting friends to sew for this year :) i will add this to my list!
your blog is lovely- i found you through that fantastic sew, mam, sew blog thread on flickr!
xo,
erika
Betty J in OKC
I'm in Erika's situation with several pregger friends at work. Thanks for the tutorial!
Pam
This is perfect for a baby shower I have this weekend. Thanks for posting.
Heather
You are so smart. . . such a great design. I love to use chenille for baby things. . . burpies, wash cloths, etc. One more great idea!
Cindra
This is a perfect gift for a couple of the young teachers at school who are having their first baby. I knew I couldn't knit or quilt each one of them a blanket. So, thank you for sharing.
homemade grits
http://homemadegrits.blogspot.com/2009/03/big-reveal-baby-shower-craft.html
Thanks for the easy to follow tutorial! I had a blast making this.
Rannyjean
Allison:
Wanted to drop in and let you know my daughter in law loves this diaper changer & said it was the most useful item she has for the wee one. Keep quilting girl, you are awesome! Don't forget to stop by my blog for more giveaways!
Anonymous
Thank you for this great tutorial. Written well and it turned out so nice. I added it to the hooded towels, burp cloths, blanket, and bibs that I made as a baby shower gift!
Mona L - TX
Leslie
Thank you....What a great idea!
Genevieve
this is so great! thank you so much for the great tutorial on it. i made one and posted it on my blog and linked back to your blog here- http://vievesscrapbooking.blogspot.com/2009/07/changing-pad-and-diaperwipes-holder-in.html
thanks again for sharing!!
Maddledaddle
I have been wanting one of these for ages! Instead (now that mine is potty trained) I'm making them as gifts for friends. AWESOME tutorial and simple idea for a complete sewing newbie like me!
Random Thoughts Tracy
Thanks for sharing this! I just made one for me and one for a friend! Love it!
Rinachiyya
What a terrific project.
I need a baby gift for a boy and am going to make it.It is cute and will come in so handy.
Thanks so much for sharing your wonderful tutorials.
It was lucky day to find your website.
Happy Holidays.
Yoka
Vivi, Vivke, Viviane, oma, mama, bieke......whatever
This is a very nice project. I already made one and the second is practically finished: one for my daughter and one for my daughter in law.
Just take a look at my blog
http://tijdtekort.blogspot.com/
Greatings from Belgium
Viv
Aubrey
Awesome! I'm going to make one to keep in my car!
Megan
I just finished one of these and I must thank you for sharing such an easy-to-follow tutorial! It was fun to make and quick, too!
deepanshu
this is a perfect gift for a couple of the younger who are having their first child. so u please buy a kit of one size diapers .......thanks
KJ
My pal & I posted a mini round up of handmade baby gifts we have tried. This was definitely one of them. Thanks for sharing the pattern.
http://letsgoflyakiteuptothehighestheight.blogspot.com/2010/07/handmade-and-useful-baby-gifts.html
ricky
this is a perfect gift for a couple of the younger who are having their first child. so u please buy a kit of one size diapers .......thanks
Kate
Great tutorial! I made my unborn baby boy a quilt using your Hourglass tutorial. It is one of my favorite quilts I have made. I used the scraps to make this changing pad. I pieced the top and added a layer of batting. It turned out great!
I will be quilting my quilt this weekend! I can't wait to see it finished. Baby will be here in 6 weeks!
Kelly
Love this tutorial! Plan on making one for my grandbaby due in December. I'd love to add this link to my website, Coupons, Crafts and Causes , under my Crafts tab.
Thank you,
Kelly
barncat
Just made my second one of these, thanks so much for the tutorial, it's great!
http://www.flickr.com/photos/26533531@N05/5817791683/in/photostream/
Miracle
We love our miracle babies! Here’s a $5 off coupon from My Miracle Baby.com to celebrate! $5 off your purchase of $30 or more.Use coupon code: COUPON05. This seems to be a great site which offers variety of baby gifts, children's gifts, unique newborn baby gifts including Personalized Gifts, new baby gift etc.
MichelleO
This is such a wonderful and easy project! I originally was going to use this pattern for myself, but I have so many friends and relatives expecting w/in the next we months, I'm going to making a TON of them! Here's a link to the first one I made for a friend's little girl. http://www.facebook.com/media/set/?set=a.2420431922815.128127.1611943252&type=1&l=62b0dbf77a
Thank you so much for sharing this tutorial and please know that many mothers will be receiving a wonderful homemade baby gift!
Eve
Great tutorial! You make it look so easy, though. I used towel for the inside, flannel for the outside, and ended up fighting with it and machine the entire time since thread kept bunching up on bottom. Since I wanted to gift it, I must have ripped out parts at least 7 times before it looked "passable." For the second velcro on the outside of the pocket, I ended up just sewing it by hand since I couldn't fathom how to do it with the machine..
Any tips for an amateur?
KaHolly
Excellent tutorial and so darned clever!! It's heading to my favorite places right now because I have a few new babies to prepare for!! Thanks so much.
B&K Mommy
Thanks for sharing! I used a piece of vinyl tablecloth for the inside so it's wipe-able for any messes! And I sewed a button on and used a ponytail holder to keep it shut. I've been wanting to make something like this for a while, just needed the inspiration to get going!
Magnolia
Found this on Pinterest and sewed for the first time last night. Probably the first time a project has gone right the first time for me! Thank you so much for posting! :)
joe Dirt
These articles and pictures are adorable! They have helped give me inspiration on my sewing patterns for babies It has become my new hobby!
Christina Nishimura
Great idea- I've just finished making two- one for myself, and one for a friend.
Easy, cute and practical. What a great combination!
Marci
I love it. Thanks so much for sharing. Chenille is my favorite!
Hosneara Begum
I enjoyed reading your articles. This is truly a great read for me. I have bookmarked it and I am looking forward to reading new articles.
online tutoring
Claire- theSITSgirls.com
I was given one of the expensive, store-bought versions of this at my baby shower. After 3 months, it had a hole along part of the stitching. :( I couldn't bring myself to spend $40 to replace it. I could totally have made myself one for $5 though! Thanks for sharing!
http://www.thesitsgirls.com/get-paid-blogging
maria
Its a nice gift for baby and mom. Thanks for sharing such a technique.
send gifts to Pakistan
Louise
Thanks for sharing! I had so much fun making this!
Melissa
This was simple and great! Thanks!!! For the changing pad portion, I used the plastic type material used for the outer liner of cloth diapers. I am excited that it will be extremely easy to clean.
Gayle Reed
Thanks for the pattern! I was wondering what to make for a new grandnephew on the way, this will make a wonderful addition!
Jami Jo
Super easy and fun. I used ribbon for a wrap around tie instead of the velcro. Turned out cute!
Celia
I'm glad I found this site. Perfect to make for my first grand baby, and I can use material I already have on hand. Thank you!
TinaR
I just made one of these last night for a friend! I ended up using a laminated cotton instead of the minky fabric so it is easy to clean and I also wanted it to be a little wider so I also added two 9.5 flaps to both sides! It came out so cute and was such an easy tutorial! Thank you!
Lisa Costlow
Very nice pattern and easy to follow. I used minky, first time working with it. After sewing one side with the minky up I had an extra inch and a half at the end. So I switched to the other side with the cotton up to see if there was a difference. Big difference, virtually no stretching. If using minky I recommend sewing with the cotton fabric side. If I make another one, this is what I will do. My changing pad turned out great anyway. Can't wait to give it to my daughter in her baby shower basket of goodies.
K. Ross
I don't understand where the pocket comes from.
K. Ross
Oops! Didn't see step 6.
Crystal
I hope its ok to print this. I would like to make ot for my sister. They are having their first child.
Helen Diels
I've been making the diaper changing kit for the past 10 years for friends and family, church members, missionaries, and for gift baskets to be donated. Never have I found a gift that's more appreciated and, so I've been told, more useful. It's so easy to make and is very inexpensive - especially with a 50% off JoAnn coupon. Thank you for sharing this tutorial.
Martha Evans
If you add a layer of Oly-Fun fabric inside, it becomes water proof.