Hello Cluck Cluck Sew readers! my name is Vanessa and i'm the gal behind the blog V and Co.
i'm super excited i'm so happy that Allison asked me to share with you my table cloth skirt tutorial. shall we get started?
 what you will need:
a zipper and
zipper foot for your sewing machine
your favorite skirt (preferably an A-line skirt)
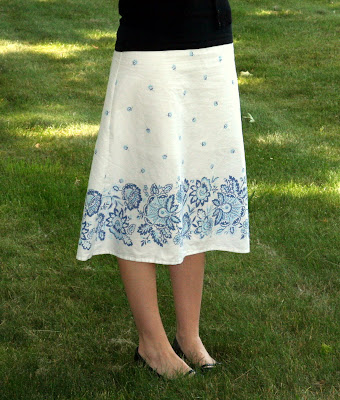
a table cloth (the one featured is a martha stewart table cloth found at K-Mart)
 so many of you liked my other skirt i just made out of a table cloth that i was wanting to share how for all of you to make one for yourselves.
here you go:
make sure you wash your table cloth before you start this project. we don't want it shrinking on you after you've made it to fit you perfectly.
 take your skirt and fold it in half like so.
 fold your table cloth just enough for it to be the width of your half folded skirt.
 either eye it or measure it but you will cut out your front panel of your skirt by outlining ½" bigger than your skirt you are using as your template. cut out your front panel.
 next you are going to cut out one panel (of the two) for the back.
 so that they are completely even, place right sides together the panel you just cut out for the back side of your skirt, and cut out your second panel for the back side of your skirt.
 next you will take the two back side pieces and place them right sides together, and sew from the bottom up with a ½ inch seam allowance. leaving aprox 7" at the top undone (this is where your zipper will go.)
 once your back skirt panel is sew (leaving the 7" opening on top) press with an iron your edges flat open and continuing all the way to the top.
 measure 1"from the top and this is where your zipper top will be.
 pin your zipper all along (the 6 inches that is left opened) make sure the zipper is facing away from you. and at the bottom of your opening (like ¼" lower than your opening) place a pin sideways so you can see where you will need to cross over your zipper
also notice how i place my pins (the ones pointing up so that i can easily pull them out as i go sewing down my zipper, and the other side pointing down because i continue to sew once i cross over, in the other direction)
 using a zipper foot, sew down one side (pull pins out as you go) make sure you are sort of close to the inside of your "teeth" of the zipper.
 when you get to the needle that indicates where the end of your zipper is suppose to be (the blue needle i put sideways), sew over the zipper, back stitch a few times to make sure you make enough of a "barrier" so your zipper will stop.
next you want to sew up the other side still close to the zipper. when you get to the top make sure you back stitch. and cut off the extra zipper part on the bottom.
 the hardest part of the skirt is now done.
 to sew your front and back together, place right sides together pin the sides to match up. sew your sides up using a ½ inch seam allowance.
 once you've sewn the skirt sides, press your seams open on either side.
 go the the top of your skirt and fold over your raw edge once, aprox a half inch
 and then do it again like so. press down with iron.
 sew all around the bottom.
 then do the same for the top.
go to your hem area and do the same thing.
 this one was made from the martha stewart christmas table cloth found on clearance at k-mart .
thanks allison for letting me come over for a while. come and check out my tutorials and ideas on my blog!
we'll talk soon!


fiberdoodles
It's so cute ~ I love it! Thank you for sharing with us :0)
emedoodle
Adorable! I just did the same thing using a thrift store sheet, only cheeting an putting that zipper on the side seam to make it even easier. You sure can't beat having a new skirt in half an hour using things that were nearly free! :) I'll have to keep my eye out for table clothes!
Jennifer S.
Wow - I'm going to be busy this afternoon I guess :)
Jennifer
What a wonderful idea. They turn out so pretty. Thank you
Catherine
I've loved that skirt for a long while now. This IS the year I will finally make one. Thanks for sharing again, V! :)
Jenny
Thanks for this! What an awesome tutorial.
ljc
Oh No!! Why did you give me this wonderful idea?! I have enough on my plate!
Ducks and Rabbits
Cool! This is a great tutorial to use to make my first skirt!
Anna
gosh, now I have to make one!!!
Kate
Really neat idea! I'm going to be on the look out for discount tablecloths!
Rinachiyya
Thank you very much for the tutorial.
Love that skirt and will be looking for some great material or table cloths.
Thanks so much for sharing.
Rachel@oneprettything.com
Oh I love it! Thanks so much, I'll be linking.