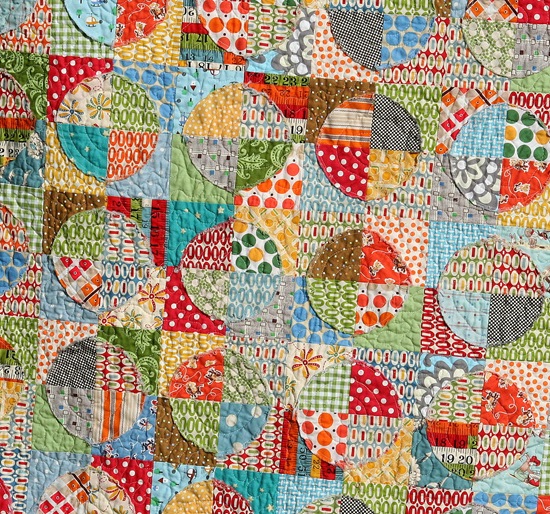
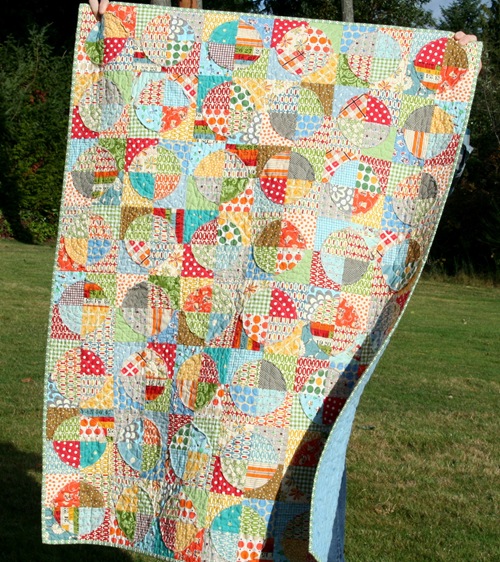
This is a easy quilt but a little more time consuming than some of my others. This finished quilt measured about 42"x 56" give or take a couple inches. Its easy to make this whatever size you want…just cut more or less blocks. I used about 30 different fabrics for mine, but some of them were just one or two squares. Use a big variety, I would recommend no less than 10 different fabrics so laying the blocks out will be easier.
-
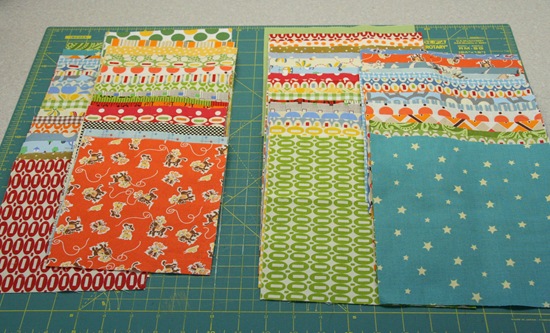
Cut 48 – 8" squares from your background fabrics.
-
Cut 48 – 6.5" squares from your circle fabrics.

-
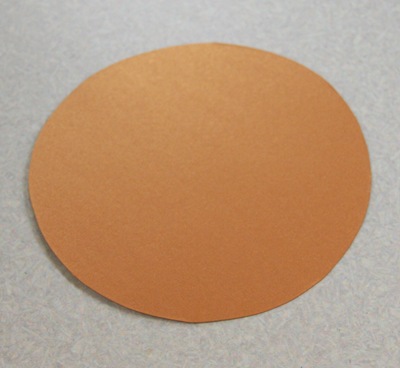
Now using cardstock, trace a bowl or something that is about 6 ⅛" or 6 ¼" in diameter. Cut out your circle.
-
Now you can place your template on your 6.5" blocks and trace around the wrong side, I used a fabric marker but any light washable marker would work. After you’ve traced your template you can stack four or so squares to cut through at the same time to make it go faster, just make sure you pin them well.

-
Cut all 48 circles out this way until you have a nice little stack.

-
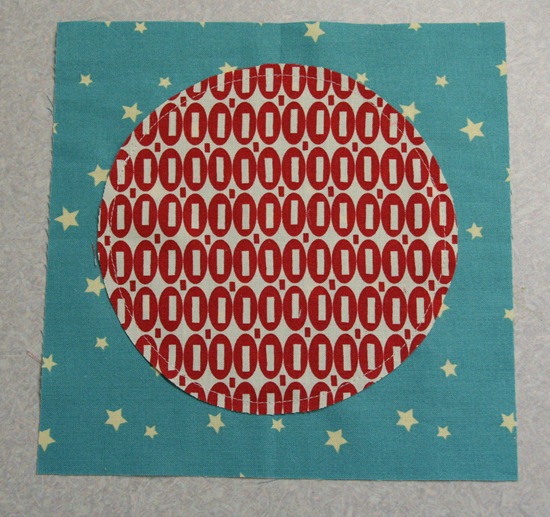
Now place one of your cut circles on an 8" square. I eyeballed the middle of mine, but you can fold the 8" block in half each way to find the middle if your really ambitious.
-
Then pin, and sew ¼" around the circle. Leave at least ¼" because the edges will fray!
-
I didn’t use any fusible material before I sewed my circles on and they went on just fine with no creases, just make sure you go semi- slow and pull the creases out as go.
-
Now repeat with all your blocks until each 8" block has a circle sewn to it. The matching up of background fabric to circle fabric took me FOREVER!
-
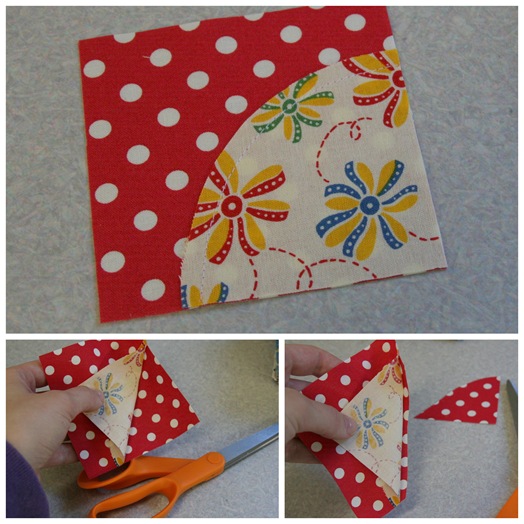
Now cut your 8" blocks in half each way. Again you can do 2 or more at a time to make it faster.

-
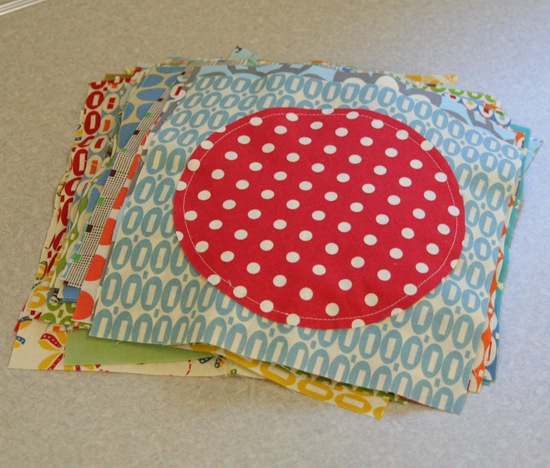
Now the fun part…..not really it takes forever. This part is optional, but as you can see through the first picture, on some of my squares you could see the background fabric showing through the circle fabric. So, I cut all the background bits out from behind the circle. I did it in front of the TV and in no time they were done.
-
Once you’ve got all those bad boys done you start arranging your blocks. I did this on my design wall ( piece of flannel pinned to the wall…fancy, I know ) and it took forever because there are so many small blocks. I just went row by row adding colors here and there, mainly concentrating on spacing out my bright reds and big prints so they weren’t all clumped.
-
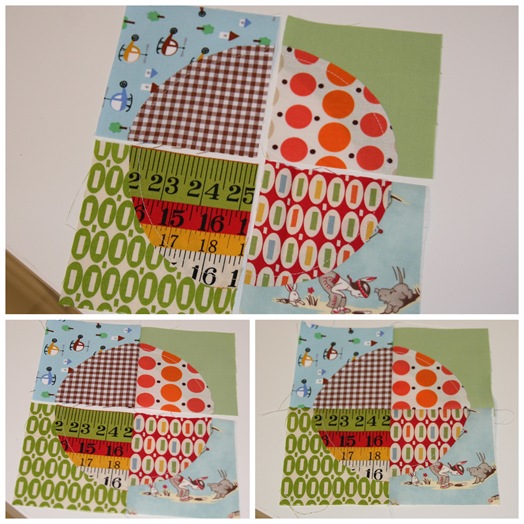
Once you have them arranged how you like you can start sewing them together. I sewed them together as blocks like in the pictures below, and then sewed them together into rows.
-
And there you have it, once you get your blocks sewn together it will look like this:
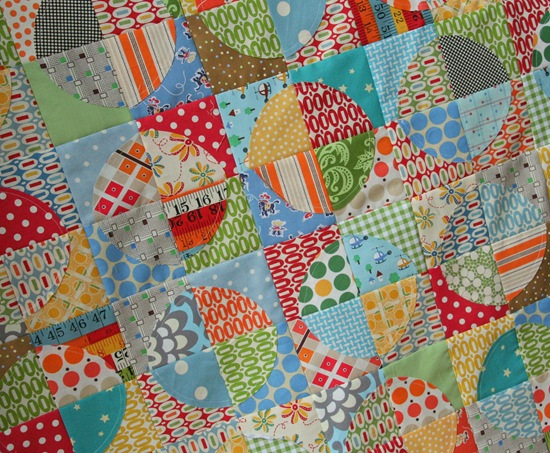
Enjoy!
**And because I know I’ll get asked…the fabrics from this quilt were mostly from American Jane by Moda ( from the Wee Play & Building Blocks line which are discontinued…sorry!), some Katie Jump Rope by Denyse Schmidt, a couple squares by Amy Butler from her Lotus line which just was re-released, and a few other random fabrics.
** Also I've had questions about how the raw edges hold up. I'm not an expert but I have been told by someone who knows what they're doing...that because these raw edges are cut on the bias into the circle shape, they won't fray or unravel. After I washed this quilt I had no threads I had to cut that had unraveled, so I guess its true!
**I didn't figure out the fabric requirements of this because I used so many (about 40 different) fabric prints. But off the top of my head I would say you need about 3-3.5 yards total for the top. Definitely don't rely on that number, but its at least an estimate for ya.


Priscilla
I thought it would be trickier than that - thanks for the tute!!
And I love how you quilted it too :o)
Wendy
Yes, me too - thanks for the great directions, what a fun quilt!
missbmckay
That is so adorable. I'm going to try it with some odds and ends. It looks so horribly complicated, but if I'm reading right, sound very doable for me.
One Shabby Chick
Me three - great tutorial :-)
Blue Is Bleu
So cute! And less tedious than I thought.
Nanci
Allison,
Thanks for this tutorial, I'm going to have to try this one and you've made it so easy to follow along.
craftnosis
thanks for the tutorial! I really love the way your quilt turned out. I think I like it so much that the fabrics I have been gathering for a different quilt will now be used to make this one :)
S. Anderson
Thank you so much for sharing! That's awesome! I can't wait to try this.
Jane
Love your color/fabric choices on this quilt and thanks for sharing the tutorial. I'm wondering about the raw edges...won't it eventually ravel past the stitching line & come apart?
why not sew?
Thanks! I love the blue with cream stars.
Katy
totally and utterly amazing. Love it! Thanks for the tute too!!!
Tina
Wow, that is so cute! I can't wait to try it!!
Emily
My mother and I want to make a quilt together, and when we saw this, we knew this was the one! I can't wait to get started. Thank you SO MUCH for the tutorial. :o)
Mama Pea Quilts
A great tutorial . . . thanks for sharing. And so true, looks much more complicated than it is. What a wonderful way to use up bits and pieces of leftover fabric, if one chose to go that way. And if it is truly USED by a little one, it will never show any stains!
Goddess in Progress
As always, great tutorial! This one is going in my bookmarks folder, for sure. :-)
sara@augustfields
wow. this is an amazing quilt! i love it!
kelly lautenbach
every time I get a glimpse of this one my heart beats a little faster... it's just perfect! :)
Chelsea
I love this! I can't wait to try it. I've been dreaming of circle quilts for a long time, but didn't want to do actual piecing (it looked to time consuming) so I'm very excited that you posted a tutorial!
Nicole
How cute!!! I can't wait to give it a try!! :)
Katie B.
Thanks so much for this tutorial! I'm putting it on my list for sure.
jglitter
Thank you!!!!!!!!!!!!!!!!!!!
Amy
this might be just the project to get me back to my sewing machine... thanks!
Purple Quilter Queen
A...DOR....A...BLE! Love this quilt! Thanks so much for the tutorial too! I'm so making this quilt for the next baby quilt project I've got coming up. Thanks so much!
Natalia
Darling quilt and tutorial! Thanks for sharing!
angela
duh - im such a stupid head!! i was trying all night to figure out how to do the circles squares so that they looked perfectly put together like yours!! i cant wait to try this..i think it may be my first real quilt!!
Trisha
Wonderful quilt with an easy assembly. I think the arranging fabric would take the most time for me too!
Emily
I'm curious - how much yardage did you need for this? And do you happen to know how many different fabrics you used?
tracey
Thanks for posting! Like others have said, I thought it would be way harder then that. I have a few Christmas fat quarters that i wasn't really sure what to do with, but i think i might try a pillow to start with and see where I end up!
Treasuresofjoy
I am SEW going to try this I LOVE it!!!!
Melanie
Thanks for the info! I think you get a lot of wow for the effort on this one. The end result is so cute! Just what I need...another project I want to make! :-)
Heidi
Wow that is easier than I thought! Thanks so much for showing us how to make this great quilt. I am going to try it out soon!
Robin
Woot! I'm excited for this tutorial. I've been thinking about this quilt since your last post about it. Now I know even could do this quilt- or at least not be afraid to try it:)
A.
THANK YOU!!! I'm really excited about this one!
Kimberly
Fab.U.Lous.
And no curved seams!
I Love Baby Quilts!
Another gorgeous quilt I can't make! I really need to look into getting a machine someday.
RosaMaría
very clever! thanks for sharing!
Vanessa Monet
great tutorial! I am sure I'll be trying it out sometime for one of the baby quilts I have to make for baby nieces and nephews on the way!
love the bright, super, scrappy cuteness!
Robin (rsislandcrafts)
I love all these colors. I've been cutting out I Spy fabric for a circle quilt. I think I will cut out other fabrics to make something like this. I love the mix of colored backgrounds and circles.
Chancy
Thanks for the tutorial! It definitely sounds easier than it looked.
Barbieann
pretty cool, I neat way to use up some of my huge pile of scraps. A definite one for me to do.
Jennifreckles
I'm excited to try this, too!
amandajean
LOVE. IT. Thanks for the tutorial!!!
CJ
YOU ARE A GENIUS!!! I thought this was going to be curved piecing and sewing and WOAH!! I think I could do this! Did everthing always line up right?? It looks like it. I WANT ONE! Or maybe two or three! On my list, now to gather fabrics.
CJ
and Thank you very much for sharing this.
Pink Little Ladies
That quilt is so cute! Maybe I will need to make one of those... as soon as I finish that quilt along I started forever ago!
Michele
Can we all say "Rock Star?" Thanks for a great tutorial. I was sewing circles today! I love projects that get me out of laundry!
Mama24Monkeys
I just really wanted to say I love your projects. I am so glad I came across your blog a few weeks ago. thanks for sharing!
Rebecca
I LOVE this! How much did you need of each fabric?
Aimee
Another great looking quilt - thanks for taking the time to put together a tutorial!
bingo~bonnie
so smart! to use the trimmed off quarters to form the smaller circles!!
thanks for the tutorial! I want to make one of these one day! ;)
love your bright fabrics too!!!!
Happy Weekend & Love from Texas! ~bonnie
bingo~bonnie
forgot to say - I think it's the perfect size for her... will fit toddler bed great with lots at the end to give a good tuck under the mattress to keep on the bed at night - and then later at school - it is a good size for taking for naptime ;)
Love from Texas! ~bonnie
Crystal Hendrix
I really like that quilt!! I will definately need to make it! Thank you so much for doing it!
Gin
Thanks! This is gorgeous!!!!!
Marianne
Love it and definitely going to try it. Thanks!
Crisa
You made may day today with this tutorial ... it is simply great.Thanks,
Marit
The quilt is lovely, thank you for a great tutorial!!
; )
upstateLisa
gorgeous!
Rinachiyya
Love this quilt and can't wait to make it. Thanks so much for sharing.
I need to shop for material.
Can you tell me how much I would need please if you know?
Thanks so much for the tutorial.
lalepop
Whoa! This is cool! I think I can actually do this.... I'll add it to my list of projects to try.
And, great colors and patterns!
katrina
Came here for the SMS giveaway, but this tutorial is AWESOME! Thanks for sharing. I'm going to make this for the next baby quilt I need to do. :)
Sarahby
Great Tutorial...That quilt is really stunning it's going in my designs to try folder for when the right fabrics come along :)
Suzanne
woweee woweee wow!
erica
I like this technique! I might have to try this after the holiday quilting is done.. Thanks for the tutorial...
Diane
Wow ! Thanks so much. I thought this would be much harder... the way you explained, this is doable for me. Thanks!
Tasha
I just love this quilt. I am logging this one in my "I want to make this quilt" file in my head. It would be perfect for one of my boys. They would love it and I would be happy every time I saw them snuggle up with it too. Hmm. You have me really wanting to make it. How come your list of things is so long when you find the best projects? I will put it on my blog so I don't forget about it or lose the pattern. Thank you for always sharing patterns. You make AMAZING things! I {heart} your blog!
Renee
it's gorgeous and looks much harder than your instructions indicate it actually is. Maybe one for my to-do list!
Pumpkin Head Baby Co
Love this quilt! When you quilted it which did you do first? The circles or the rest?
Rachel@oneprettything.com
I love it, it's gorgeous! Thanks so much, I'll be linking.
kermiefrg
Amazing! It's gorgeous!
Sarah
that-quilt-is-A.W.S.O.M.E.
I cannot wait till I make one for my son...
mandylifeboats
how did u quilt it?
Laurie Sheehan
This is AWESOME! Thanks for sharing!
renae
Wow! This is amazing :)
MusicalMommy
Hey check out my blog too! It's just for Mommies!
http://momlaloblog.blogspot.com/
Jes and David
Thanks for the tutorial. I used it to make a Christmas quilt! I've linked to it here. http://virginialovin.blogspot.com/2010/01/inspired.html
Angela
Oh my goodness! I've been eying tons of circle-based quilts on flickr thinking, "oh, that would be too hard for a beginner like me", but with this tutorial, I think it will be plausible! Amazingly clear photos and instructions! Thank you!
AllyB
Thank you for posting this. I can feel my stash decreasing already! Best wishes to you and your new little baby boy.
clarissa
This is so neat. I can't wait to try this. Thanks for your tutorial.
jrhelge
I made this quilt a long time ago, such fun. It is also called "Bullseye". I used neutral fabrics in the background and then the rest of the colorful circle (bullseye) prints jumped vividly. The frayed edges on the circles really look nice too. Loved making this !!
The Fibers of Life
I'd like to add my hearty..."way to go"...to all the other comments. I think I might actually be able to accomplish this one. It's great and the fabrics you used are so HAPPY.
Thanks,
MaryLou
The Fibers of Life
I'd like to add my hearty..."way to go"...to all the other comments. I think I might actually be able to accomplish this one. It's great and the fabrics you used are so HAPPY.
Thanks,
MaryLou
happeningswithLana
Love this quilt! I am just getting interested in quilting and hope to find time to try some. Thank you for sharing.
kim taylor - - - the sassy crafter
I love it! I've made a few quilts in my time but I've always steered clear of circles because I was scared of piecing curves. This is perfect -- a quilt with circles but no curves to piece! I might just have to try out the technique and make a quilt for my new twin nephews. Thanks!
Sarah
Great tutorial.
I am going to be making one of these very soon. Just love the fact that I don't have to piece the curves.
I am just trying to decide on the fabrics I want to use.
thanks for sharing.
panamamama
I adore this quilt! I have yet to start one yet, but this might be the first... so cute!
Mari
What a lovely quilt ! I think I may have to do one. Thanks for charing.
Shawn
Hi Allison, I made another raw edge circle quilt inspired by you..(THANK YOU)..take a look if you have time,happY weekend!
BoogaJ
I love this! Just my kind of piecing -- no fussy bits, but all of the beauty. It is a gorgeous quilt and I may have to try it myself. Thanks for sharing this!
Larissa
wowee. wow. WOW. REALLY love this quilt and love the method. I have been shopping the design for my first quilt and this has just gone to the top of the list. It's beautiful, great job. Found you via Whip Up!
Megan
Great, GREAT quilt. Can I ask how you quilted the finished product to the leave the circle edges raw?
m.szumski
HI
I loved this quilt. I had some old 9 patches I had not used yet. they were made from fabrics of the 60s and 70s. I also had a bunch of fat quarters I had not used up yet. So I cut the circles and sewed them to the 9 patches and cut in 1/4s and layed them out. Still laying the pieces out and will start sewing together this weekend. Loved the idea and I think it looks great. It created another pattern of 4 patches and it is crazy.
When I sew it together I will send you a pic
thanks for the great tutorial.
cathy
lemonwoodclock
i LOVE this. i will definitely be making a few of these :)
KristyMN
Wanted to thank you for the great tutorial! I just finished this as my first ever quilt! You can see mine at my blog: http://tinkerknits.blogspot.com/2010/08/pictures-as-promised.html
jenn
i just made one of these as my first quilt too! posting it in my shop today! http://www.makemineblue.etsy.com Thank you so much!
Victoria Haveman
what did you trim the quilt with? and what did you put on the back and also did you add anything in between the back and front for extra warmth or no? Thank you so much for posting this! I'm having a baby this winter and am making this quilt for him or her!
♥ Carine Calé ♥
Thank you veru much!!!!
Best Regards,
Carine Calé
Smithatron
I love this quilt and your tutorial, you make it seem such a fun thing!
Dana
Would this be too difficult to do with 4 inch circles? I have just discovered many, many circles already cut by my Granny and have been looking for something to do with them besides make 5,000 yo-yos. She already has at least 400 of those already done! :) Anyway, I love the exposed raw edges! Just wondering if Granny's circle size would make it too "fussy" to work with.
Karin
I just got a FQ bundle of Wee Play - and am thinking possibly this is the quilt I want to make with it.... this is just a wonderful quilt, LOVE it. Decisions decisions!
Canadian Kristin
Okay, you totally made this look do-able!!!! Thank you!
Question: Why did you cut the bits from behind the circles? To eliminate bulk? If you didn't cut them out, I guess it would make potential bunchy stitches unless you stitched the cut quarters, yes?
Willing Hearts - Busy Hands
Thank you sew much! This makes a difficult looking quilt very simple. I have begun one in Thimbleberries fabrics, though I'd love to do one in the fun fabrics you used in yours. Here is a link to my progress. http://busyhandsquilts.blogspot.com/2011/01/my-new-years-day-project.html
Mrs. Hearts
Erin Jackson
Thanks so much for a wonderful tutorial. I am on my way to making my first quilt. I made mine slightly smaller than this one but finished piecing it tonight. Kinda nervous about the quilting part! Check it out here
https://picasaweb.google.com/ejdilworth/Quilts#5570435402588069938
Eileen
I can't stop looking at this quilt! I keep coming back to it over and over again! I just love it! I can't wait to make one! :)
Lindley
Thanks for the tutorial. When I saw it, I knew I had to make this quilt for my little boy.
Here's a link to the finished quilt: http://wesslayfamily.blogspot.com/2011/02/wyatts-quilt.html
apathetichousewife
Ooh - I was pointed here by lovely ladies from the Melb quilt guild meeting yesterday. I'm tackling a similar one inspired by this. Any tips on how to sew the circles on neatly? I've trialled 2 but they're a bit puckery: I'm wondering if I should use my walking foot? Increase or decrease the foot pressure maybe?
Tyra @ SilverLily Sews
I love this quilt! I made one for myself and posted it over on my blog herehttp://silverlilysews.blogspot.com/2011/03/for-baby-nellie-or-lil-nel.html if you want to see it. I must admit though I was wishing I still had a stash of American Jane Recess prints like yours used. LOVE your blog and love this tutorial!
Andrea
Just found this and will be making it as my second quilt... haven't started or finished the first one (for my daughter), but it's in the planning stages...then this beauty for my son!
Donna
wow that is so colorful - I love it!!
Erin Jackson
I finally finished my version! I only wish I had made it larger!
http://www.utdoghiker.blogspot.com/
irishijazi
Hi
I loved yours and i have a question
Do u recommend using transparent,embroidered cloth for circles and not cut the under quarters before stitching again?
Thank u for all what u show and teach
Leena Salleh
thanks so much for the tutorial..I thought it would be harder from the first look...thinking this is going to be the traditional way Drunkard's Path...but you made it so easy and I want to Fast 5 back home to start right away...thanks
Kari
Oh my goodness - thank you for the tutorial. What an amazing quilt and such a fabulous tutorial!
Whim Of Iron
Loved this. I made much smaller squares and made my first full size quilt!
<hillofthehawk@blogspot.com
Valéria M. Orosco
I was inspired by this tutorial to implement a project! I loved the colors! Visit my Blog http://www.retalhomania.blogspot.com. Thank you!
LN
Awesome!!!! Love the bright colors and wonderful tutorial. I am planning to make a fan quilt and your tutorial takes the scare out of circles! Thanks!
Victoria Haveman
I made this for my son and based his nursery on it! Thank you for your tutorial!! I also made him a sprocket pillow to match! After 3 girls it was so fun to decorate for a boy :)
here is a link to a photo
http://vhpictures.blogspot.com/2011/07/zacharys-quilt.html
Suzy Sews
So how big did the quilt end up? Love it by the way!
commonthreads
Finally able to dig into this project soon. I'm thinking of making a twin-size version of this. Am I right in assuming that the finished block size is 7" (start with 8" block and subtract 1/2" for the center seam and 1/2" for the size seam).
Thanks for the tutorial!
Rockester
I did two of these "bullseye' quilts about 7 or 8 years ago in extra large twin to almost double bed sizes for my kids to take to college and they really did use them. They do fray a bit around the circle when washed and dried but in a good way. It doesn't hurt the quilt overall and makes it more cozy actually.
Tracy Johnson
I swore I would not start another project till I got something done, oh well, I never expected to keep that promise. LOL Got my circle and squares cut out today!!! Sewing tomorrow. I invested in one of the circle cutters by Olfa and it works wonderful in cutting out all those circles.
Jacque Dunn
I am new to your site and I love it! I have always wanted to make a quilt with circles and you gave me the knowledge and inspiration to do just that! Thanks!
Chenille Cottage
Oh what fun! I can't wait to make this up using my American Jane collection.
Blessings and thank you so much for sharing!
Carolynn
Bungalow Boutique
I just found this quilt, and I think it is just gorgeous! I've already bought the fabrics and cut out the square. Can't wait to get sewing! Thanks for great tutorial.
Catskill Quilter
Marsha (Quilter in Motion blog) mentioned this wonderful quilt in her Friday Finds today, and it is spectacular! I am toying with the idea of piecing a bunch of 4-patches, and then appliquing circles on them --It would be faster, but I would lose so much of the scrappiness! Your directions are clear and easy to follow.
Vanessa Odom Machen
I have a very old quilt top (approx. 65 years old) with this circle pattern, however, instead of a single corner piece, the maker used various scraps in a crazy fashion. The quilt top pieces are hand stitched together. When I got the top about 20 years ago, several of the seams were coming apart so I mended them. I added a border. I plan to have it quilted this year as a gift for one of my grandsons.
margaret
just found you and this quilt, love it will have a go and making a fw blocks, thanks
Lyric
Marvelous and so groovy that you shared. Definitely bookmarking. As I believe in paying it forward I have also Pinned this quilt.
Cheers,
Lyric
http://www.sewandcro.com
Mrshippiewolf
I just finished mine! It has taken me a few months because it was last on my priority list since it is actually my quilt and not for anyone else. I love it. Thank you for the tutorial, it was easy to follow.
Lois Mongosa
I would love to make this quilt. when you quilted it, did you quilt over the raw edges? I can't tell from the photos
westernwilson
Is this the same as a Drunkard's Path block?
Allison
No, a drunkard's path block is pieced, and usually in halves, this is just a circle that is cut and raw edge appliqued on.
brandysmom
I love love love this!!! It's so much fun!!! I don't like doing traditional applique and this is perfect!!! I'd love to show it to my retired quilting friends this winter in Florida. Hopefully we can swap squares for great variety. I've been following you for years and I just love your creativity. Thank you so much for sharing!
Pam Miller
Would a layer cake be enough fabric to make this adorable quilt?