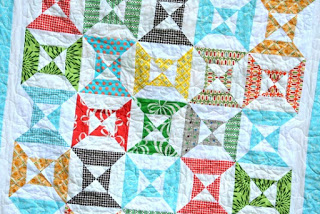
First off…things always look better in my head than they do typed up, so please try one block and see how it works for you before cutting up all your fabric. Also, if your a perfectionist this method might not be for you, some of your points and seams won’t perfectly match up…but it will take you about ¼ of the time of other methods. Enjoy and let me know if this works for you!
Cut a piece of heavy weight card stock into a square 8" big.
-
To figure out how to make different block sizes: Figure out the finished block size you want, say…5" so you add an inch to that and cut your template 6" square. Now you’ll have to figure out how big to make your strips. So divide 6 in half ( the size of your template) …so you want your finished double strip after its sewn to be 3". Now the tricky part is figuring out how big to make your strips including the seam, my seams are usually .5" ( ¼" + ¼") so add that to 3" (how big your finished strip should be) Which leaves you with 3.5" which you divide in half and that’s how big to make your strips….. 1.75" wide. That sounds right in my head but beats me if it will really work! Try one first just in case!
-
If you want to make this with a Jelly Roll, you would cut your template 9" square and it would leave you with a 8" block. But again….I haven’t actually tried it so make sure you try it before cutting up all your fabric!


![IMG_0881_thumb[1]](http://cluckclucksew.com/wp-content/uploads/2009/10/IMG_0881_thumb1.jpg)
![IMG_0883_thumb[1]](http://cluckclucksew.com/wp-content/uploads/2009/10/IMG_0883_thumb1.jpg)
![IMG_0886_thumb[1]](http://cluckclucksew.com/wp-content/uploads/2009/10/IMG_0886_thumb1.jpg)
![IMG_0887_thumb[1]](http://cluckclucksew.com/wp-content/uploads/2009/10/IMG_0887_thumb1.jpg)

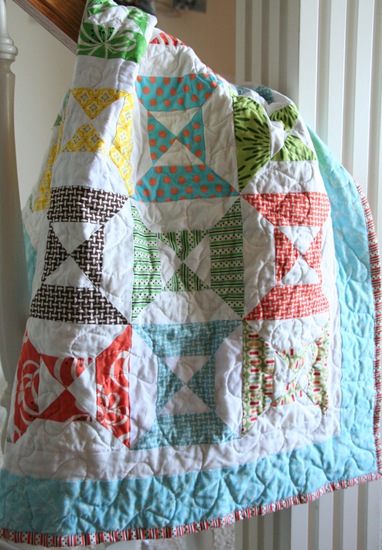


Chris
Oh my GOODNESS! How easy and looks so hard!! Thanks for taking the time to share your "smarts"!! Love the quilt too! :)
Wendy
Can a layer cake do the same
Allison
Yes! I think Missouri Star Quilt Company has a video on it on Youtube.
Rory
On my to do list....near the TOP!! Thhanks for this!!!
Michaela
SHUT. UP. Why didn't I think of this??? ; )
This is the best tutorial ever!!! I love it, thank you thank you!
Laurel
That is a great tutorial! Makes me want to try it SOON. :) Thanks so much for sharing!
Blue Is Bleu
Good grief! Your way's SO much easier!!! Bravo! I'm going to have to try this very very soon :)
Kandra
Great idea! Now to figure out all that math for 12.5 in blocks!!!
Trisha
Cute quilt! Nice and easy way to make these blocks. Looks like fun!
~Michelle~
*slaps head* duh, this is so super easy! thanks girlie :)
~Michelle~
oh, and I sense a bunch of double hourglass quilts making waves in blogland in the upcoming weeks ;)
Natalia
Very cute!!
Mary
This would be great as a jelly roll pattern!!
Petit Debutant
*standing ovation* totally aweesome tute! thanks for sharing!
angela
Thanks so much for sharing! I love that block, but hate all that extra piecing. I will be making some of these for sure!
patsy
I am totally trying this!!
thanks so much for sharing-
I love it :)
ktquilts
Yay! Sounds like fun. I will be doing one of these...as soon as I finish some UFOs!!!LOL!!!
Blessings,
KT
Stacey
Wow, That tutorial is fantastic. Such great pictures too. Now I need to make a quilt like that too. I guess I will add it to my "Bucket List"
Stacey
Driving Miss Stacey
Sew Far Sew Good Quilt Shop
Jamie
I can't believe how simple you made this! This one will definitely be the next to try.
Aimee
You are a genius! Thanks for sharing. I have wanted to do one but was afraid of the other methods. Thanks!!
Heidi
WOW!! I can't wait to make this quilt!! Thank you so much for the tutorial.
Michele
Can I say brilliant? I guess so!
Jackie
Great quilt and tutorial! You made it make sense. Thanks!
Giddy for Paisley
Wow! That seems way to easy, I guess I will have to try it now :)
Karen
Gorgeous quilt and great pattern! Can't wait to try it!
soggybottomflats
Allison, you are a Goddess...and my hero! Thank you for making my day...week, fine, the whole month! Have a merry month, Elaine
amy smart
Very, very nice. Bravo.
scrapworking
Fabulous! And I love the colors you used. THANK YOU!!
larry7pokey
Thank you for the tut, and I love your work! always makes me want to try a new quilt. Hey, and I 'square-up' every project I do, always happier with the finished project!
Isa
Great tutorial.
Thank you!!
essie
this is a really useful and clear tutorial. i am bookmarking it - thank you! :)
Suze
Great tutorial! It's easier than it looks.
Kristi
Now I've got a project for the fabric I've been saving to make a quilt for my daughter. I love it--thanks!
Zarina
Thank you so much. One of the thousands of patterns planning to do but no idea (well not exactly googled it) how is the construction.
Andi
What a great tutorial and a gorgeous quilt.
Thanks!
:-)
The Calico Cat
Out of curiosity only, how do you do this the hard way? (This is the only method I had heard of.) BTW I own an acrilic (sp?) template/ruler that works the way your card stock template works... I use it for setting triangles when I make on-point quilts.
True Blue Nana
What a fabulous tutorial. I could not go to sleep last night without trying it and it works perfectly!! Thanks so much
Sara
Thank you so much for posting this! I am so going to try this!
Quilts on Bastings
Thanks for the tutorial - it is a lovely quilt.
Leslie
this is great!! thanks for working so hard on this. i want to give it a try right now....except there are a thousand other things to do, so maybe a little later.
Emily
Oy my goodness! (*slap on the forehead!*) How easy, Thanks for figuring this out and sharing.
el chinijo del patchwork
Thanks a lot for this great and easy tutorial. Best regards from Canary Islands (Spain)
Jo
This is fabulous, gave it a go tonight and I just love them. Thanks so much!
sally
Thanks a ton for the tutorial. I think I may actually have the guts to give it a try.
Heather
This is a great tutorial! Thanks for doing it up for us. I'm actually glad that your seams don't match and your blocks aren't perfect. Mine never are and i sometimes feel like I'm the only one. Everyone else's quilts always look perfect. It's nice to know I'm not the only imperfect one. :)
Ariel
Woot woot!!! Thanks for an awesome tutorial!!! I'm SO glad there's an easier road. LOVE it!
Firefly
Oh I want to try this out now. It looked so complicated all put together, but with your tut, it looks like something I can manage :) Thanks!
Anonymous
Wow, you did make this look easy. I had to laugh after reading your tutorial because I remembered that you thought of this while in the shower. That was some shower! Thanks for very clear directions.
Lise
Great tutorial. I'm brand new to quilting, and it makes perfect sense. I can't wait to try it!
Lara
Thanks a MILLION dude! Now while i still have wanda's BSR i'll have to make one!!! Miss you, no one will go with me to the Country Living Fair...I just might go by myself.
Sandra
Thank you for sharing and my to do wish list is growing and growing....;)
Melissa
Alright! Thanks for sharing - great pattern. One of these days I'll get to quilting again...
Mikol
So cute, I love the colors you used in your quilt. Thanks much for the how to.
Anonymous
Oh this is great! Thank you!! I'm going to make this at quilt retreat. And it's nice to see that your points don't always match. Makes me feel better. Your quilt is awesome.
Amy
bernie
THank you thank you!! This is a great tutorial! You're so awesome to share it!
mindingmomma
thank you for making this so simple to follow, i love it and hope to make one, someday!
Alicia
Thanks for the tutorial!
amandajean
thank you, thank you, thank you!!!
i am so going to try this...the quilt is adorable!
twin fibers
Love it! Thank you, I'll have to try it soon!
tasha
i hope i can give it a try someday...the tutorial was really easy to follow! darling quilt!
Jeanne
Thank you for sharing this tutorial! I will definitely give it a try soon.
Your quilt is wonderful.
I Love Baby Quilts!
Makes me want to buy a machine! I could never do it, i'd cut off all my knots and be there forever. Drat!
edeenut
What an easy block! I had to do this right away after seeing your how to post. I just blogged about it on my blog. Thanks for the tutorial!
Happy Find
WoW! I love your tutorial! Thank you for sharing!!!
Ariane
I love this tutorial. So great!!! Thanks for sharing.
Maricou
I am very please to let you know that you've been awarded the Kreativ Blogger Award on my blog
http://lamachinacoudre.blogspot.com/2009/09/kreativ-blogger-award-merci-trudy.html
Marie-Noëlle
jette
I did know this method. Just didn't have the arithmatic (is that a word??) skills to figure out how to do it! So thank you for showing me - and others! :-)I'm going to try it as well!
Jette/Denmark
Ariel
Okay! This tutorial gets an A++++! I tried it last night and it's just as you said...MUCH easier than the first method of double hourglass I had in my head! Thanks, Allison!
beccy
Thankyou so much for this! I've been looking for a cheer-me-up project that wasn't too taxing for my exhausted brain but would keep me busy. This is perfect - it's easy, looks great and is speedy enough for quick-ish results but will still keep my hands busy.
Sarah Star
I just tried this with 2.5" strips--I cut the template from a 9" square, got 8 block quarters from a strip set, and when my blocks were sewn together, they ranged from 7.75-8", so I just trimmed them down to 7.5".
I've been looking for a pattern for my Hello Betty Retro jelly roll, and this is officially it! Thanks!
kelly jeanie
This is perfect!! I was looking for something to do for my daughter's toddler quilt. I can't wait to get started on this.
Goddess in Progress
Just thought you should know I just made this tutorial and it was GREAT! Came together easily. I did 2" strips, so the template was a 7" square. Blocks were about 6 1/4", so I trimmed them to 6" (unfinished). Love it!
Liz @ teeny tiny quilts
Nicole
Allison I loved making this quilt!! I just finished it and thought you might want to see a picture of my finished product.
http://curlymommycrafts.blogspot.com/2009/12/homespun-holidays.html
Thank you again so much!!
Anja
It works fantastic!
I just tried it out on one block and everything fits just right!
Thanks for the brillant tutorial!
I love your quilts!
Coyote Quilts
Great way to make this block, but I would substitute Kaye Wood's Starmaker 8 ruler for the templates which would make it even easier....
Anja
I did it!
Thanks for the fabulous tutorial!
You can see the result on my blog!
Anja
mandylifeboats
when i first saw the quilt; i thought oh no, i hate half square triangles, but hey there are none to make; it's perfect, i love it, i can't wait to get started. thank u for the great tutorail.
RaeLyn
Thank you for this AWESOME tutorial! It was a cinch, thanks to your fabulous instructions, measurements, ideas, etc. Here's a link to the finished product. (http://byesboos.blogspot.com/2010/04/double-hourglass-quilt.html) Thanks again!
savvy stitch
You make this look really easy--thanks! This looks like a great project for a jelly roll!
lss922
I never get tired looking at this quilt. So simple to do and wonderful to look at. Choice of colors are great!
Jude
Great Quilt! Thanks for the great instructions.
Debbie
I'm working on this one right now with Pure :) Thanks so much for the tutorial. I'm going to use it as a raffle for a fund raider for Big Brothers and Big Sisters!!!
Kate G
Awesome! Just finished mine and it looks so great! Thanks for putting this together. If you want you can see mine at http://katerannie.blogspot.com/2011/04/blue-green-and-yellow-double-hour-glass.html
Roslyn
Neat trick!
Sis-O
Love! Thank you. Always so much to do so little time. Love every opportunity to cut corners and have a beautiful result.
Darlene
http://barnes-girl.blogspot.com/2011/11/side-trips.html
Finally making this beauty! I am going for a twin size !! Your tutorial is the best, thank you.
Esther
I have a question: if you used two colors -- say, white and orange -- and you followed these instructions, but assembled the triangles into two types of squares: one with the four triangles making a white square on the inside and another with the four triangles making a white border...(do you follow me?) I think you'd end up with a pattern looking like the orange quilt (which I LOVE and I don't even like orange that much). Would this be easier than the way you assembled the orange quilt?
I don't know why this question preys on my mind so much. Thanks!
Deanna
I just started this quilt because I found a 5.00 jelly roll at tuesday morning. I did not use a common fabric as you did in your tutorial. I am afraid it will look WAYYY too busy when I start putting the blocks together. Would it look too weird if I sewed a sashing border to the blocks? any feedback would be fantastic.
Terri
I mentioned your blog and this tutorial in my post about the block that I made using Double Hourglass. Your tutorials are easy to follow! Thank you.
Schulz Family
Hi. I made this quilt and added a tutorial on my blog - linking to your site regarding how to do the ironing for this project. I found the ironing made all the difference in the world. You can see it on http://www.madewithmytwohands.blogspot.com
Cathy
I love your tutorials. This quilt is so fresh and sunny. Missouri Star Quilt Co has another method to make something similar. I always like learning quick tricks.
BTW the word inseam only refers to the inner seam on a pair of pants, usually interchangeable with someone's inner leg measurement or crotch to ankle. It isn't used interchangeably with a regular old seam. Thought you might like to know. It kinda throws some funny imagery into your quilt tutorial!
Dorine
I love the simplicity of your tutorieals!! Excellent job! Thank you!
Tanya
I had to make these for a block swap recently. I just loved the simple but very attractive quilt they made. I shared it with my Bitch & Stitch Group....They all loved it to. We will all be starting one at our first get together for 2013. Thanks for the great tut.
Cheers Tanya
Kinga Izabella
Thank you so much for the great tutorial! I´ve made two blankets, and i´ll make more! I love this pattern, and this way to sew it! :)
Have a nice day!
Tspoon
Found this by accident as I was looking for that something I needed for a quilt I am planning this morning. This is it!! Thank you.
Heather's Haven
Thank you so very much for taking the time to write this tutorial. I'm a visual learner and really appreciate this.
Heather
Primitive Friends
The Etsy shop has closed that you have listed at the top, for the templates. I wonder if she's selling them some place else? Would love to try this pattern for a baby quilt, but making templates from card stock, they tend to keep getting smaller as I use them!
Stamp With Perrywinkle
I would like to know where I could possibly get the triangle templates. The Etsy shop you mentioned is no longer open. Any help would be greatly appreciated. I am unclear about the size of the triangle templates you are using. What is the start of the square? I've read it over and over and can't seem to see where you state the size of the original square?
timpson77
I divide the 6" ÷ 3 = 2" for a finished double strip. Learned this when I was first learned to quilt many years ago (I've been sewing/quilting for 62 years) - it works every time! Thank you so much for the tutorial! I had it saved until PC crashed and then came across an old PDF that I could not open. This time it's not going anywhere! God Bless!