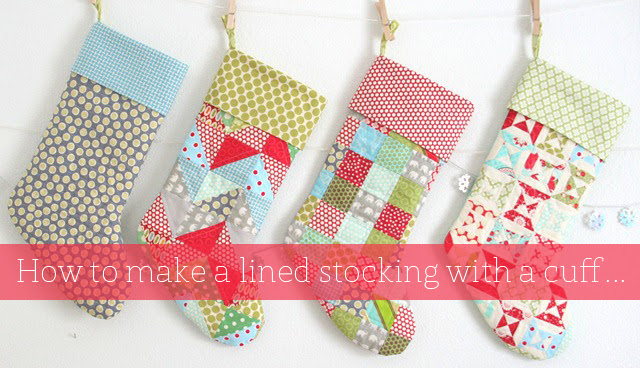
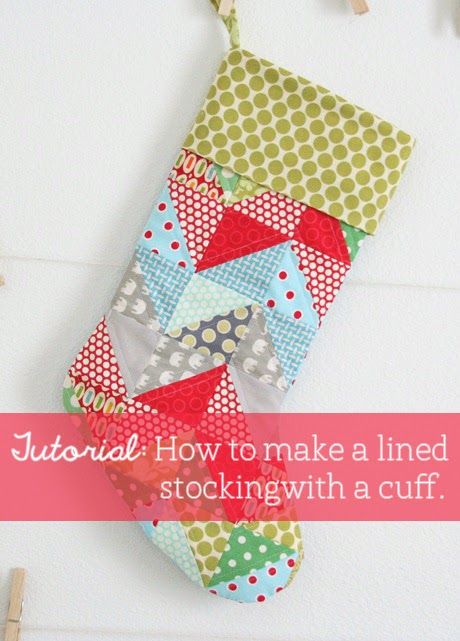
Ok so this took me 2 days of staring at a stocking to figure out. My mind just doesn’t work in the turn it inside out then right side in then right side out and do the hokey pokey kind of way. So here’s a quickie tutorial mainly for my own sake so I remember how. This tutorial is only for how to finish the stocking...not make the quilted front and the pattern for the actual stocking. To get the stocking shape, I traced a store bought stocking from Target. ;)
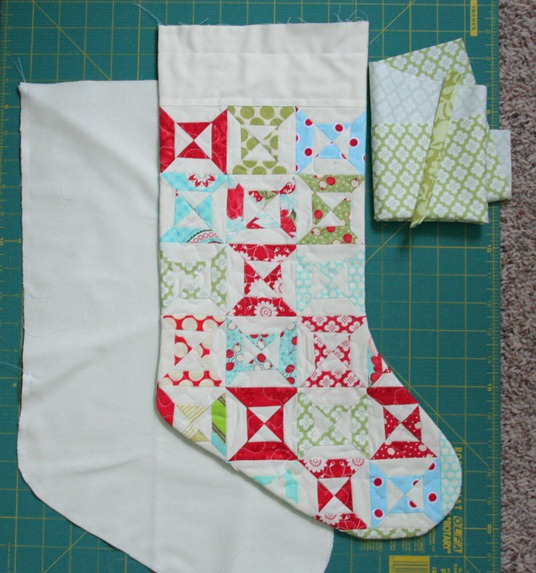
Start with:
- the outside of the stocking, already sewn together with the back and turned right side out. (the front of my stocking is quilted with batting, the back has no batting)
- the lining of the stocking sewn together ( leave a 3” hole in the side for turning!) right sides in.
- fabric for the cuff
- a sewn tab of fabric for hanging tab
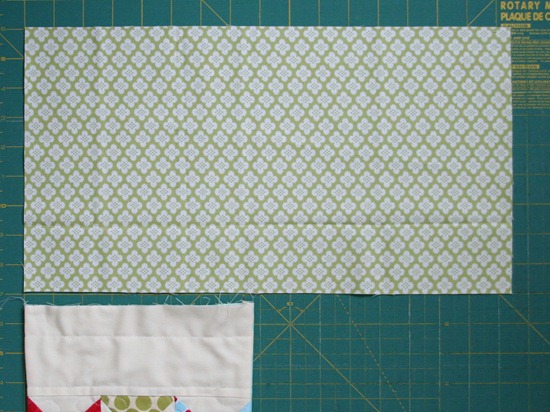
To figure out how wide to cut your cuff fabric….measure the width of the top of your stocking, double that number and add .5 inch for the seam allowance. For the length of the cuff I cut my fabric 9”…to give me a 4.25” finished folded cuff. So this piece was 9” x 16.5”
Sew together the 9” ends of the cuff piece, use a ¼” seam allowance.
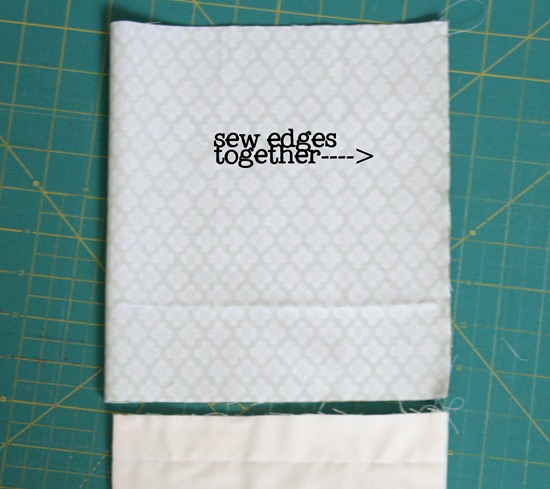
Turn the cuff right side out so its folded at the bottom and raw edges are at the top. It should make a tube you can stick the stocking in.

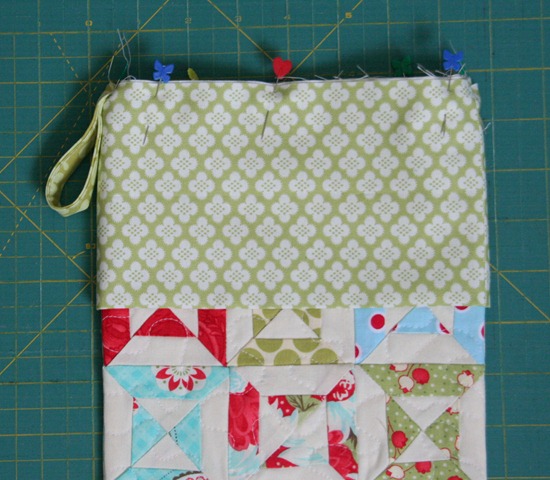
Stick the cuff on and around the top of the stocking, match the raw edges and pin. You can pin the tab onto the side now also.
Stick the whole thing into the lining. The stocking and lining should be right sides together.
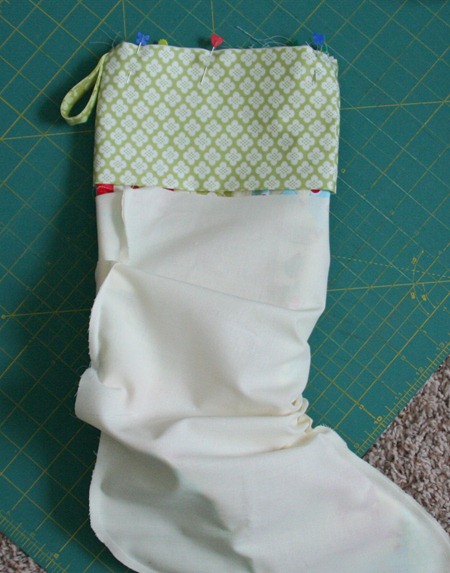
Pin all of the raw edges together at the top (lining, 2 cuff edges, and stocking edges).

Sew all the way around the top. Make sure you catch all the layers (lining, cuff edges, stocking).

Turn the whole thing right side out using the hole left in the side of the lining.

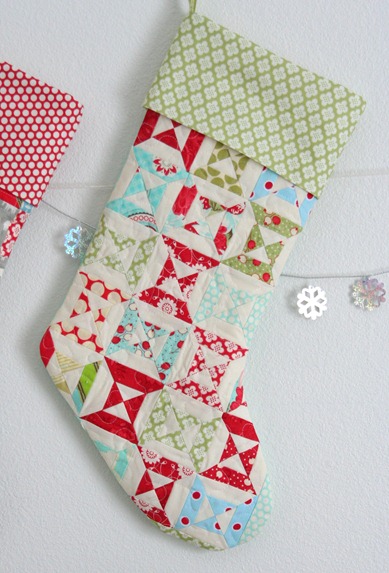
Finish turning it inside out and sew up the hole in the side of the lining. Stuff the lining inside the stocking and fold the cuff down. Press the edges as needed.

When you’re done you’ll have a nicely lined cuff and stocking with no raw seams showing.
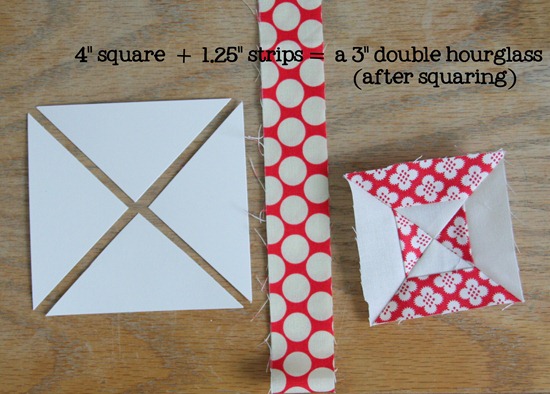
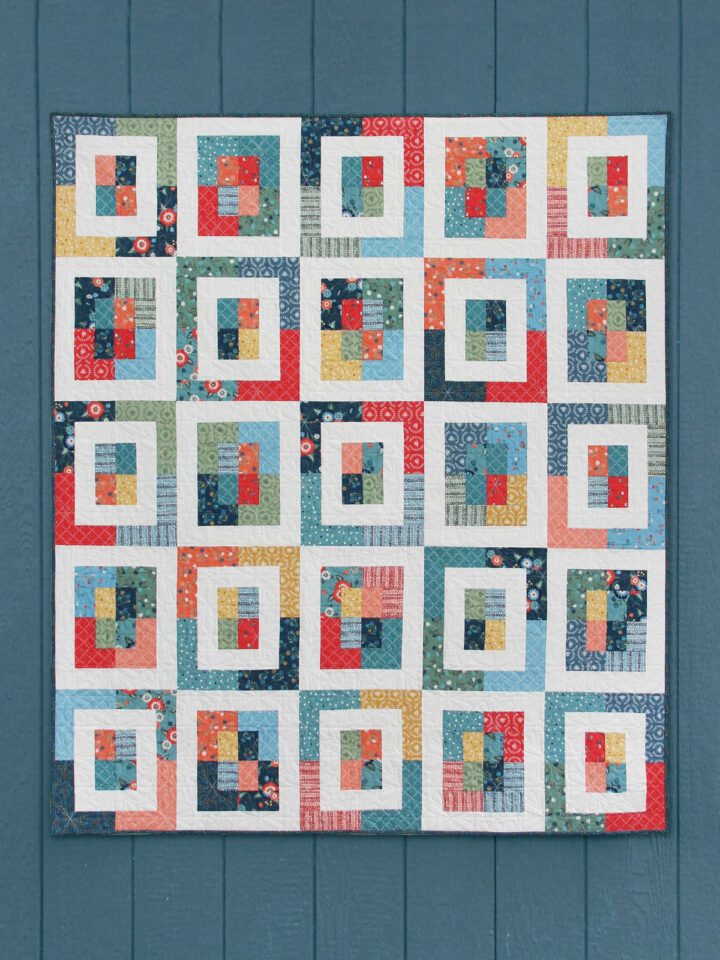
If you want to make these little double hourglass blocks I used my tutorial but changed the sizing of the template and the strips shown below:


Dena
Love your stocking. What a great way to highlight the blocks. Thanks for the tutorial!
Jessica
I follow your blog, but never realized you have this tutorial until I procrastinated making our stockings because I couldn't figure out the lining/cuff situation, and went googling for a tutorial, haha!! Thank you so much for posting this!!
Allison
I'm so glad it helped you!!!
Bonnie Wilson
Hi...I used your tutorial before for a pet stocking..I had the darnest time figuring out how to embroidery a name on the cuff and have it be the correct side up. I did it once, but forget how...any tips?? LOL
Allison
It's been so long since I've made one...I have no idea off the top of my head! But I would just do a practice run with the cuff, and only use pins and see which way it ends up. Good luck!
Darlene L.
I found this other tutorial online that explains how to embroider the cuff. Looks like it has been a while since this comment was posted but thought I would still respond in case others are struggling with this. Here is the website: https://www.u-createcrafts.com/easy-quilted-christmas-stockings-by/
Thanks for this great tutorial, Allison! I found it thru Flamingo Toes blog "25 Adorable and Free DIY Stockings".
Seams Inspired
I am SO happy you did this tutorial! I have to make a stocking for a friend's pet, and was trying to wrap my head around it. Thanks for all the pics. Beautiful stocking! :o)
Stephanie
I checked out that pattern from Thimble Blossoms yesterday and noticed that she used some batting in the middle. I was thinking about leaving it out (less bulk means more room for presents!) and it looks like you didn't use any. Do you feel like the stocking has enough body? Thanks for this great tutorial!
inday_adin
This is beautiful! Thanks for the tutorial.
Adin B
Liz @ LivingMySweetLife
Thank you!! I need to make 2 of these for a newly engaged couple!!
Stephanie
Awesome tutorial!!! Thanks so much for sharing your hard work. I have some Wee Wonderful Christmas elves that I embroidered 2 1/2 years ago that are waiting to be turned into stockings...this is giving me the push i needed!! :)
Bobbi
Thank you so much! I stared at tutorials yesterday and I get so confused with RST-jargon (without touching the actual project). Your photos were just enough detail for me to figure it out. Can't wait to make a stocking for myself. :)
Pinkadot Quilts
Love the stocking and your colors are great too!
Elizabeth D.
Awesome!! Great tutorial, I will definitely be bookmarking this for next year :)
AllieKatMom
Love this, thanks a ton!
Krista Hansen
You are pretty smart to figure that out. It was beyond me. Thanks so much!
Bonny
These are gorgeous! So nice to create us a tutorial:)
natasha | sohobutterfly
Amazing!! I never would have figured that out in my spatially challenged brain.
Chris
I'm still mystified by your tiny hourglass squares. Wow.
Amy
Beautiful stocking!
Dawn W
Absolutely darling! Makes me want to re-do all of my plain Christmas stockings and make them quilted ones.
Jenny G
Thanks so much for posting this. i've wanted to make stocking for years. I think I might be able to now...though I have a feeling they won't be nearly as cute as yours:)
Christie, Describe Happy
Thanks for putting this is a way that I feel like I could tackle a stocking fairly easily! Now, I just have to decide if I want to make them for this year or next... hahaa!
Suzanne Daniel
Thank you so much for all your hard work thinking this through so I didn’t have to. It was really challenging and I’ve been sewing for YEARS. Thanks again!
Lindsay Jean
That inside-out, three-dimensional thinking is always the hardest part of projects like this. Thanks for the photos!
MiaDolce
Beautiful stocking!! I think I'll give our mantel a facelift next Christmas, and quilted stockings will be the centerpiece!
Diane
adorably cute! this one is my favorite of the 4 stockings... those double hourglass blocks are darling.
PunkiePie (Jen)
that's exactly how I did mine! I'm glad I was on the right track. :)
Mrs. Doodle
Awesome!!!!! Thank you:) making mine tonight! I showed my husband your stockings and he loved them and said I HAD to make our girls some:))))
Mystica
Very nice tutorial.
I have a giveaway on my blog - a gift card sponsored by CSN Stores. please do come and enter!
Judy
You are so kind and thoughtful to provide us with another great tutorial and without a fee. You have given me many inspirations and I thank you. I wish you many blessings at this Christmas time and I look forward to being with you in this coming year.
Chole
What have you done! You made this absolutely awesome stockings and you posted tutorials!! Wahahahaaaa. They are so gorgeous that now I will have to make them!! Have to! Have to! Have to!! And I already have my sewing table piled with unfinished projects.
I haven't drooled over a tutorial for a long time. Absolutely awesome stockings. Ok, going to make them NOW :D
Chole
Nicole
So. Freaking. Cute.
Sandy
So sweet...thanks so much for sharing!
Bobbi
thank you for the tutorial!! i made one last night and it was a BIG help! i used some red corduroy for an added touch on the top.
annieb
Thanks for the tutorial- it all makes sense now...like your new banner, too.
canuckquilter
Thank you! Much tidier than what I cobbled together last year!
Michelle
Lovely stockings, thank youfor the tutorial, maybe after xmas I can work on for next year.
VickiT
Wonderful. Thank you so much.
Leslie
Very cute stocking!!
I have to say you posted this tutorial at just the right time!! I am like you and have a hard time figuring out which way to place things to flip and sew and all of that. I tend to need the seam ripper close by for projects like this. I have been really obsessed with wardrobe refashion ideas and recently got a brainstorm to make my own gray boots from wool felt...I wanted them lined and to have a cuff. I have debated for the last couple of days as I have been putting the boots together how I would go about it all. I just happened to type lining and rolled cuff into Google, thinking I would never find what I wanted and voila', up came your post and it was EXACTLY what I needed. Now I see you just posted this on Friday and I found it a day later...Thank you so very much!!!
Leslie
ruth.marie
I am so grateful that you posted this tutorial. I was pondering all the turning in and out in the pattern, but now it all makes perfect sense. Yay. Can't wait to finish off my stocking. Thanks so much.
Merry Christmas :D
Joni
Thank you for this tutorial! I love the design
of the pieced stockings.
KerryQ
My brain doesn't work that way at all! It would've taken me ages to figure out, and a lot of seamripping. Thanks for saving me some holiday angst!
Kim Walus
These are my FAVORITE Christmas Stockings EVER!!! Thanks for sharing the stocking pattern you used and how you added your own special touch. I especially love the double hourglass one. It's my favorite. Merry Christmas to you and yours. Hugs!
Tammy
That is beautiful!
MosaicMagpie
I am just getting ready to make some stockings for this year. What a great find this tutorial was,Thanks!
Deb
Rachel T
I have just made a stocking for each of my daughters, using your tutorial, and I am SO pleased with them! Thank you so much for sharing this online. The stockings are just wonderful, and I really hope my daughters treasure them for years like I still treasure the one my Mum made for me.
Lynn
I just followed the link to you from Purplepanda's blog. Thanks so much for your tutorial, I've always struggled with making stockings, now I've got it thanks!
Alida - Radcrafter
Great tutorial! I featured it in a recent blog post....http://radcrafter.com/2011/11/10-diy-christmas-stocking-tutorials/
Alida
Stevens Family
For some reason my stocking isn't coming out right. I have unpicked 3 times now and finally threw it against the wall. You line everything up (i.e. toes, heel) facing the same direction when you put right sides together, correct? When I flip the lining toe is facing a different direction than the outer fabric. I am so frustrated!
Stevens Family
Two down...three to go. Thank you for this great tutorial! It has turned a light on in my head. I can see this coming in handy for bags and such.
Marilyn (Pulp Sushi)
Hello! I had to share this in my DIY Tutorials post today :)
twirlingbetty
Hello there - just wanted to say thanks for this lovely tutorial. I wasn't nearly so organised as to be able to do a beautifully quilted front like yours, but I loved using the tutorial to make a stocking for my youngest this year.
Oknana
Hello, what a neat tutorial and very well done! I loved it! I am in a stocking swap group where we are making a Christmas stocking (yes, I know its Jan>) LOL, and we are going to fill it all year with small gifts from all those that signed up! Sure Hope my chosen person likes her new stocking! Thanks to YOU, It is nicely lined! I had not ever lined a stocking before and was a little intimated to make one but you took that away, and I can make more now with confidence! Thanks so much!
Fine Sting
Nice christmas stockings:) I loved your use of colours:)
Mrs. Landrum
I realize that it's May and Christmas is probably the furthest thing from everyone's minds, but I just had to leave a comment thanking you for such a wonderful tutorial. My puppy now has a Christmas stocking for this year! =)
Hanki
What a great tutorial! Thank you so much for sharing with us. The stockings are so beautiful. You inspired me! I made one than I felt in love with them and made another 5! for my friends and family so I am ready for Christmas this year!
Sarah Watkinson
Thankyou so much for your tutorial!!! I would still be thinking of how to do the lining if it wasnt for this!!! So big big thanks!!
Krisandra Davis
I was looking for a way for the cuff of the stocking to stand out more, and this tutorial gave me the simple fix I needed. Thanks can't wait to try it!
Tina Potter
I was just ready to throw all the beautiful material I bought today to make stockings into the woodstove! I spent hours trying to figure this out. Thank you! Thank you! Thank you! Bless you.
Graphic Quilts
Thank you so much! I am totally confused with anything inside out or reversed/ upside down.... My usually smart brain goes totally blank and it really bothers me. I know this took a lot of time and really appreciate you sharing
Graphic Quilts
Thank you so much! I am totally confused with anything inside out or reversed/ upside down.... My usually smart brain goes totally blank and it really bothers me. I know this took a lot of time and really appreciate you sharing
Kelly Marie McKee
THANK YOU so much for this tutorial. It was so helpful. I made 5 socks today and they turned out AWESOME! Thanks for sharing!
Jen Boes
Thanks for sharing such a straightforward tutorial! Your stockings are really fun - great eye for color and design.
Steff
Three years after posting this tutorial...you are my lifesaver!! I was stuck in the lining hokie pokie and couldn't see how to do it right. Thanks for sharing your talent and the hard work you put into such straightforward tutorials. My family will be enjoying their Christmas stockings for a long time thanks to you!
Michelle
I used your tutorial a couple years ago when I started making stockings for our family, but now that it's grown (and growing more!), I need to make more. I started panicking because I couldn't remember how to find that really great tutorial that I used in the first place. :) But, I found it. Thank you for such great help!
TwynMawrMom
Oh my goodness thank you so so much for this! I have completed two other stockings and can't seem to get the lining right (no pun intended) ;) Perfect timing!!
Rachel Myers
Thank you so much for the tutorial! I am not sure I would have worked this one out no matter how long I stared at a made stocking.
Ann
I can't believe you figured that out! I'd still be sitting in front of the sewing machine scratching my head on Christmas Eve. Thanks so much!!!
Lisa
Thank you so much for this easy to follow tutorial! God Bless you for taking the time to take pictures and put it on the internet for people like me. Just made 2 beautiful stocking for future-in-laws!
heartofbrightstar
Thank you so much for posting this tutorial. I started a stocking for my grandson and left the instructions somewhere, It's December 23rd, and here I am trying to figure out the inside out, outside in, hokey pokey! And there it is-the instructions I need! thanks again!
Alison
I made three stockings this year with your pattern! It was my first sewing project and they turned out well. I would appreciate in the future more instruction about when to press seams. They turned out great though! Thanks so much!!
mattie
Your pattern was the best I've found on the internet! I made 6 stockings this year and they turned out awesome, I've linked your blog on my post about it. Best wishes :)
Teacosy
Thank you for sharing.
Sylvia
Rebecca Grace
Allison, once again you are a godsend! Thank you so much for posting this. I have been wanting to make some cuffed stockings for years but I kept getting hung up about how to manage the lining and the cuff with all seams hidden. No I have no more excuses! By the way, I love it when I search on Pinterest for ideas and Pinterest sends me to a blog I already follow. :-)
Hollie Parle
You just saved me, thank you for an easy to follow tutorial. Hollie :)
Andrea Teal
Thank you for this!
Fonda Boyd
Thank you thank you so very much for the tutorial for the lined stocking. I just finished one and it turned out great. I have made quite a few in the past and always struggled a bit with my cuffs, this worked so well.Really I'm so glad I found it.
Debbie
This tutorial was so helpful. I just finished my grandson's stocking. I will definitely be using this again. Thanks.
Heather
Hi Allison, I just followed your tutorial to make a stocking for our little boy. I had never made a lined stocking with a cuff before and probably never would have figured it out. . .but it turned out perfectly when I followed your instructions. Thank you SO much!
Betty
Our quilt guild makes Christmas stockings for a few of the local Assistance Ministries. My Bee makes about 75 each year, and we have the process down pat. Here is a link to the stocking pattern we use, and some brief instructions.
http://www.whqg.org/WHQGStockingPattern.pdf
krista
where did you buy the material for your stockings?!? i love the colours and am wondering if it was a fat quarter pack(s) or if you chose them all individually. I'm kinda new to this... but choosing fabric is killing me! thanks for your help!
Kelly P
I've used this every year for the past four to make stockings for family and friends - such a useful tutorial. Thank you!
Valerie
Just finished making 2 stockings for Ronald McDonald House. Your tutorial is excellent. They are beautiful!
Bobbe Pittman
I actually "fill" my stockings...do I need to do anything to leave room for the goodies inside? If I sew the front and back flat against each other will there be room for contents?
Allison
These are very fillable Bobbe! They look just like a stocking you would get at the store, I even made mine a little larger.
JoAnne T.in southern California
Thank you so much for sharing this. I've done this in years past but I just couldn't remember how it is done. Bless you! We have a granddaughter and she needs a stocking! Merry Christmas to you and yours!
Zoe
I am not a sewer by any means but this was the easiest tutorial to follow. My stocking looks amazing! Thank you so much!
Jen Friscia
Thank you so much for this tutorial. I successfully made stockings for my daughter and her family (4 in total) and couldn't have done it without your help. Each one has different blocks, but the one with your quilt block design is my absolute favorite. I'm looking forward to making more of these for myself and the hubby. I just referenced your tutorial in my Facebook group. Thanks again!
Allison
I'm so glad the tutorial worked for you! They sounds darling! Happy Holidays! -Allison
Julie Christiansen
Thank you and bless you for posting this. I have been puzzling my through trying to figure out how to line and cuff my stockings. This helped SO much.
Michelle De Long
I literally sat at my cutting table for an hour yesterday trying to figure this out and had flash backs to those tests in HS where you had to see the unfolded shape on paper and figure out what 3D shape it was. I was trying to sew the lining and the stocking together first and I couldn't wrap my mind around it. Thank you so much!!!
Stephenie Fontenot
Pure ingenuous! I just finished my first one and it is beautiful! Thank you for posting this wonderful & inspiring tutorial. :)
Andy
Thanks a bunch! Worked great!
Hannah W
Thank you for the tutorial...it is still blessing last minute moms, like myself.
LuAnn Menzies
Thank you, thank you, and thank you again! This tutorial was just what I needed. I may have stared at the stocking for TEN days and never figured this out!
Marie Chamberlain
I was hoping you could answer a question, the quilted front - did you use a backing fabric when quilting and then the lining? I was hoping to quilt my back as well but not sure I want to use that much material
lynn hall
well....7 years later and you are still helping those you are always confused with all that turning...this was great...thank you!!!!
Allison
I'm so glad!
Sherrie Swerbensky
Thank you so much!!!!!!!!!!!!!!! I decided to make stockings this year without a pattern. I didn't realize how difficult it would be until I was half way done with the first of 7. If it weren't for this post my children wouldn't have stockings this year. Blessings and Merry CHRISTmas!
Cynthia Nanto
This was just the refresher I needed - so hard to conceptualize and you show it so well - thank you!
Chris
I have made a few beautiful stockings last year, and am now making two more for my daughter and husband.
Thank you so much for the easy to follow tutorial!
:-)
Gina F
I really love this tutorial. I just finished a special project for a friend--made family stockings out of their late and beloved grandmother's skirt. Thanks!
Morgan
Thank you so much! I sometimes have trouble with that same right side is inside but the Wong side... I flip what? This tutorial was perfect and very clear. My stockings came out just like I wanted!
Allison
haha me too...I made this tutorial mostly for myself! ;)
Marge Therio
made 10 stockings this weekend; our old ones are too small. I did fine till the cuff...your directions are wonderfull..thanks a million...Love your quilted one!!!! Marge
Allison
Yay I'm so glad it helped!!
Joelle
as a quilter for the past 15 years I have stepped out of the box and started venturing into the sewing world (first project = I reupholstered my daughter's 1972 Boler she was rebuilding :) ) I never grew up with Christmas stockings and it was hard to find a pattern with hidden seams; thank you so much for posting this along with the measurements - I've already made 6 with exposed seams which I think I'll bind, but now that I have your pattern, I'll play around with another 6 or so :)
Pat Eads
Thank you, Thank you, Thank you!!! All day yesterday I was trying to figure out how to do my stockings. . Then I went to Pinterest and there you were. They are turning out exactly the way I wanted.
Jan Weicksel
This is EXACTLY what I have been looking for! Thank you so much! The whole cuff thing is the biggest problem! So many patterns solve it… there ARE no cuffs! But my family wants a name on their stocking…
Thanks!!
Janet O.
I am very late to this party, but had to say thank you for this excellent tutorial. My daughter contacted me 3 weeks before Christmas asking for new stockings for herself, her hubby, and their daughter. And she wanted them out of recycled men's plaid shirts, with one of them being your double hourglass design. With all the mail issues these days I needed to have the stockings finished in 2 weeks in order to make sure they had them by Christmas Eve. She linked me to your tutorial, and I am so glad she did. The stockings turned out beautifully, and the instructions were foolproof. Bless you! https://roguequilter.blogspot.com/2021/12/the-stockings-were-hung.html
Sarah
Thanks for your tutorial! You have made my life simpler...Merry Christmas.
Kendra
This is the BEST! Thank you so much for this tutorial. It is the second time I have used your instructions. They are easy to follow, pictures are excellent and the results are beautiful. I just finished my new little granddaughters stocking a few minutes ago. I hope she will cherish it for a lifetime. Thanks and Merry Christmas!
Heidi
Where is the pattern to download? I think I had it years ago and lost it.
Allison
There isn't a download, just the version on my website....maybe someday I'll get around to making a printable download!
Melissa
This tutorial saved my life! Thank you SO SO much!