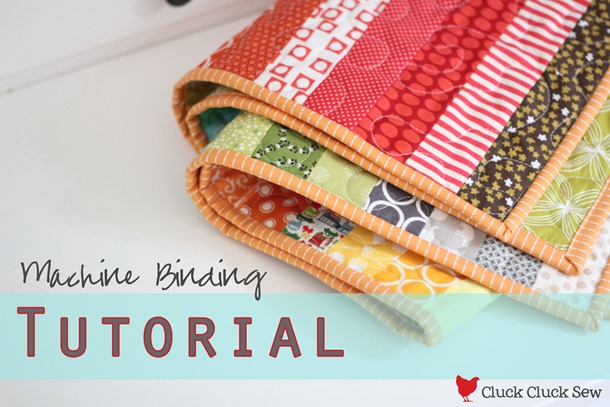
There are lots and lots of binding tutorials. Lots. So I’m going to skim over binding basics fairly quickly in order to share with you how I machine bind my quilts to look almost hand sewn.
I do all my quilts this way, so by now I’ve become fairly quick at it. I still love a hand-stitched binding, but I’m more confident that my machine bound quilts can withstand lots of washings and use from my family. I always machine bind baby quilts…because we all know that baby quilts get washed all.the.time.

First you’ll need to square up the edges of your quilt. I lay my cutting mat on the floor or table and straighten up my edges with my rotary cutter and ruler. I cut my binding strips 2.5" x the width of the fabric and trim off the selvages. To figure out how many strips you’ll need, add up the length in inches of all four sides of your quilt + 20 inches. Then divide that number by 42" (the width of fabric).
Lay your fabric strips right sides together as shown, sew a diagonal seam from corner to corner, trim the corner, and repeat until all of the binding strips are sewn together into one long strip. Then press that whole long strip in half, wrong sides together.

Sew the binding onto the quilt FRONT first.
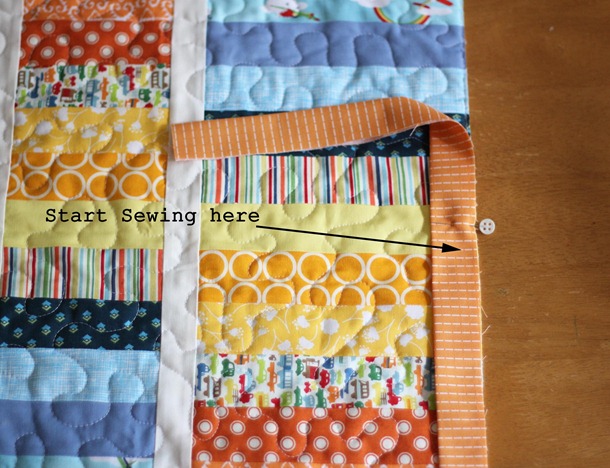
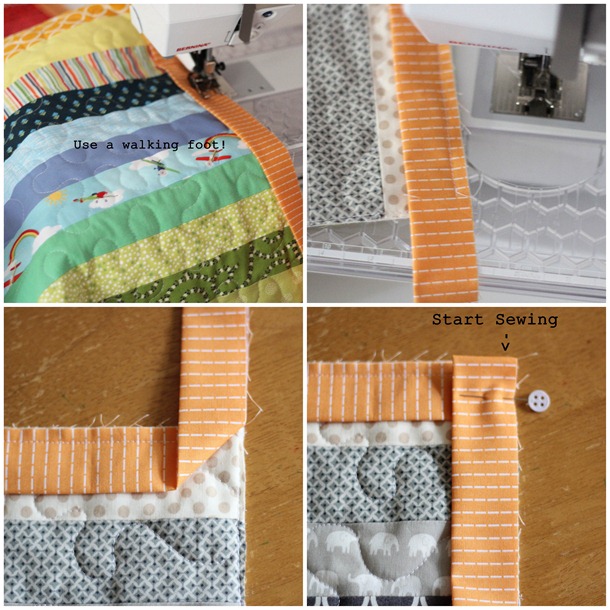
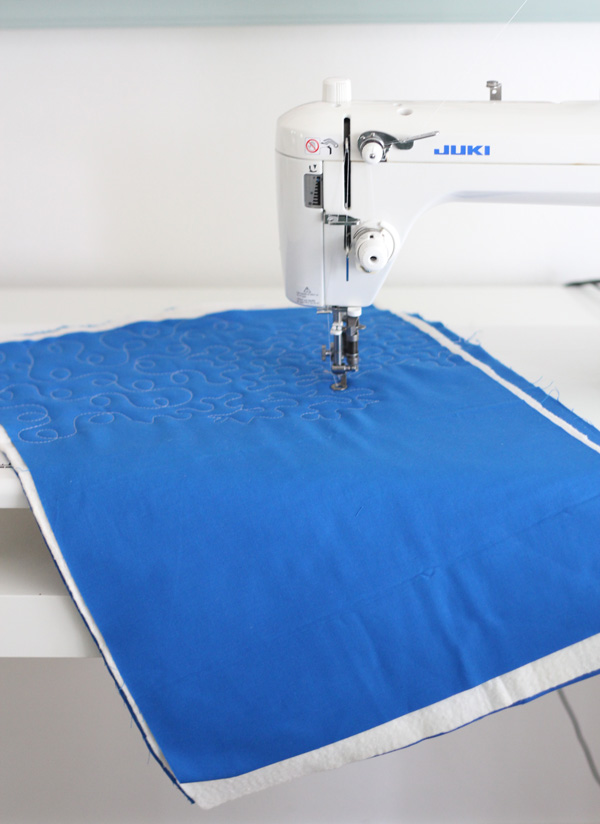
Pin the binding to a side of the quilt, matching the raw edges and leaving about a 10" tail. Start sewing under the pin using a ¼" seam allowance. Use a walking foot.
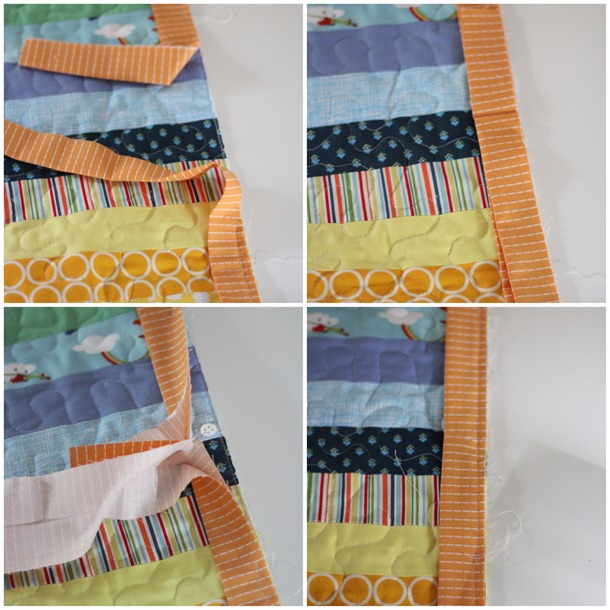
Keep sewing until you reach a corner, and stop stitching and backstitch ¼" before the corner/next side of the quilt…it’s important to get that ¼" of unsewn space at the end! Lift the binding strip up as shown making a diagonal fold, then pull the binding strip back down creating a fold at the top, pin. Start sewing down the next side at the top using a ¼" seam allowance.
When you get back to where you started, stop sewing about 10" from where you started, leaving a unsewn tail. Fold the bindings to meet in the middle of the unsewn space, press with an iron or finger press…enough to make a crease. Open the strips, and match the crease marks and pin the strips right sides together. Sew down the crease marks, trim (make sure it’s sewn correctly before you trim!), and press the seam. Place the strip back on the quilt and finish sewing the binding on.
You can also sew these together with a mitered edge…I don’t bother because this method is so quick for me now. It looks complicated and its really hard to explain/take photos of…but once you try it you’ll get it.
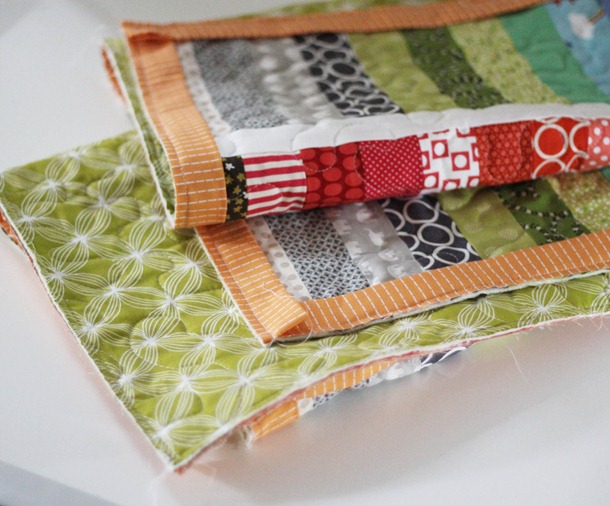
This is what your quilt will look like now:
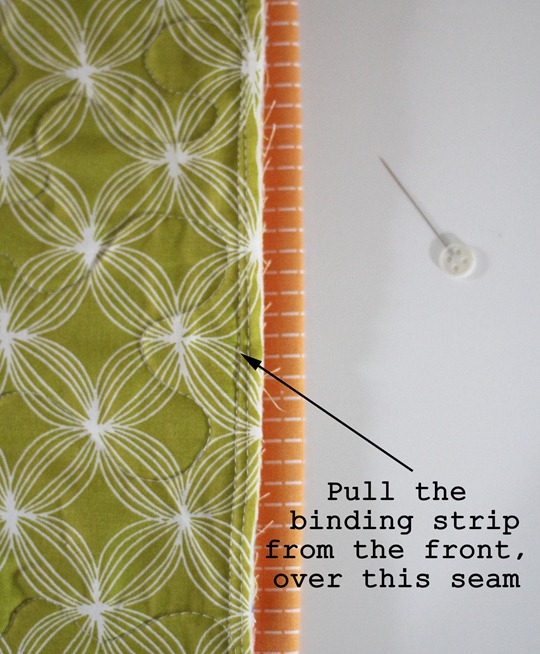
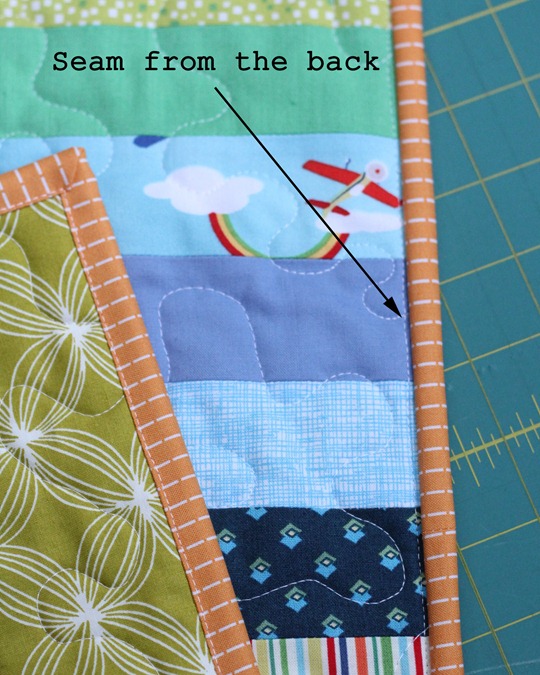
Now turn the quilt over and we’re going to stitch the binding down onto the BACK of the quilt.
Choose a place to start, and fold the binding strip over until it’s PAST the ¼" seam line that you made sewing the binding onto the front and pin. This part is important…if you don’t pull the binding edge past that seam line…you’ll get stitches in your binding on the front.
(the other seam line in the photo is the stay-stitching after I’m done quilting…ignore it)
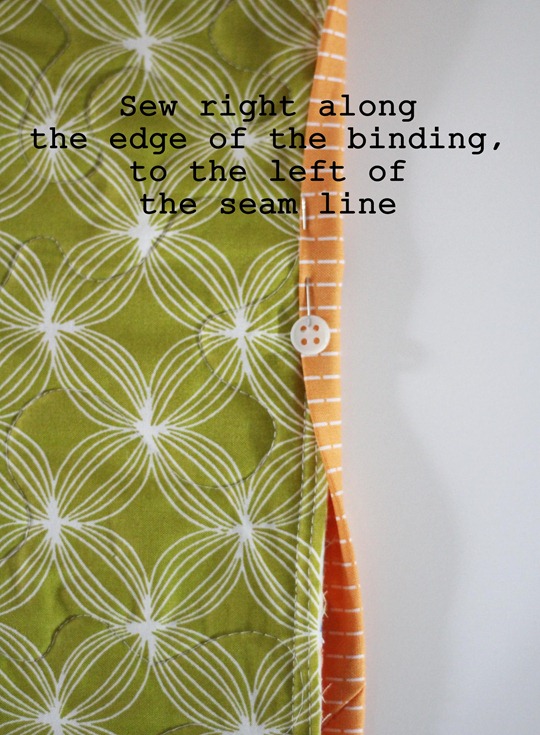
Sew right along the edge of the binding on the back…you are trying to sew to the left of the seam line always. If you pull that binding past the seam line and sew right long the fold of the binding strip…you should be fine.
Keep sewing until you reach a corner, stop 6" before the corner, fold the bottom edge up, then the side edge over creating a nice mitered corner and pin. Sew to the corner, leave your needle down and turn to sew down the other side.
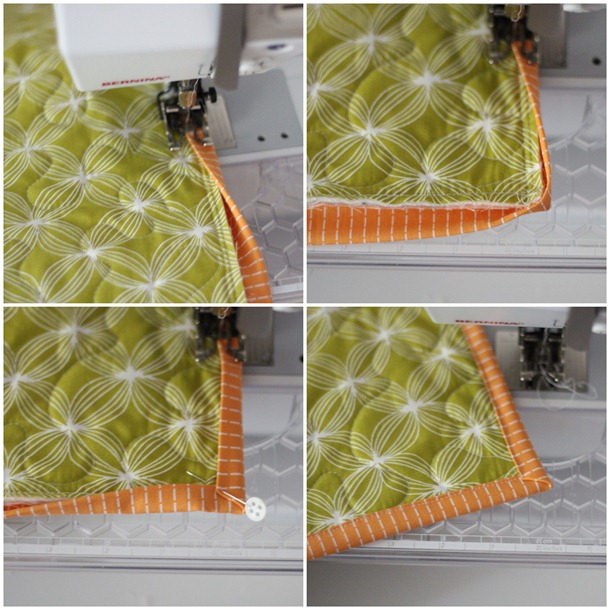
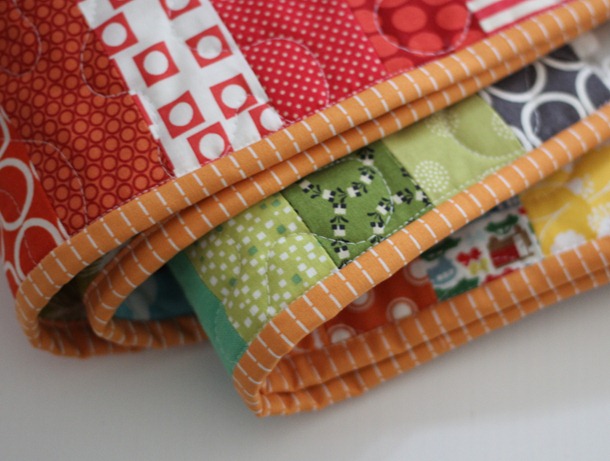
Keep on sewing until you’re back at the start and you’re done! If you did it right (it takes some practice!) the binding will look like this on the front/back.
See no stitches in the front binding? All you can see is a nice straight line of stitches in the quilt, and it blends in nicely with the quilting.
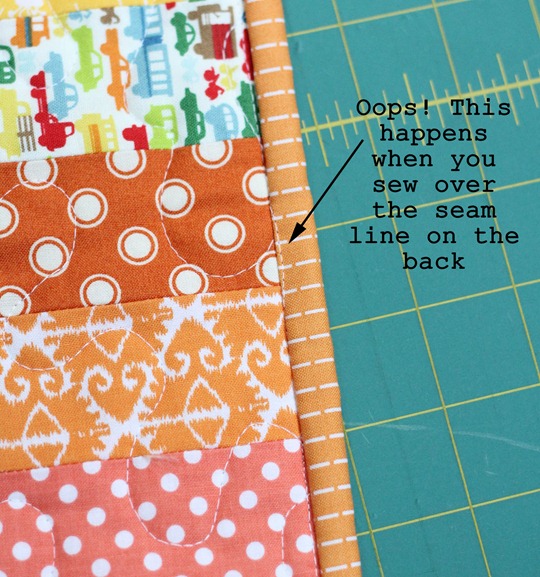
If you don’t stay to the left of the seam line when your sewing the binding down on the back, this is what happens…you’ll get some stitches in your binding.
It’s a very easy and fast method to sewing bindings, and it looks way better than sewing the binding down on the front of the quilt with a visible seam line in the binding.
Doesn’t that binding look nice on the quilt front?? Hopefully it’ll work for you as well as it has for me!

Suz
Machine binding can be so persnickity... but this looks like a technique well worth trying. As you say, the stitching on the front blends in with the quilting stitches.
Char Kobold
i will start binding my quilt ( in 2 hours!) at my city's quilt and fabric shop where I have much more room to work on my BFF's wedding quilt which is an extra long queen sized. ! Much bigger than any quilt I have made to date. Why haven't I seen this way to bind on the reverse before?? It looks simple but we shall see. I will be taking my walking foot with me.Thank's for the help!!!!!!
Pat Johnston
Love this. Great explanations. Did this on my first quilted stole, a few stitches on the front binding, but I’ll stick with this!
Becky Oestreich
I just ran across this technique. Can't wait to try it. I have a quilt that needs binded soon.
Jocelyn
Thanks for this! I need to bind a quilt & was thinking about trying a machine binding cause I want it done quick! :) I'll have to give your method a try.
CHD
Thank you for the tutorial. I am new to quilting and starting on my first one. This has been most helpful and I'll be coming back when I get to that stage. Cx
darlene
is this kinda like stitching in the ditch? can you do this from the front and get it more like in the ditch using the bernina #10 edge stitch foot? i must confess also, i sometimes round the corners of the quilt and sew it that way, without mitered corners ... shhhh .. don't tell! darlene
Allison
Sort of, you can stitch from the front and try to make sure you catch the edge of the back, but I like the look better of no stitches in the front binding (stitches will be on the quilt top but usually blend in with the quilting) so I stitch it down on the back.
Susan
Thank you so much. I have never done a binding before and this method looks very nice.
Melanie
Great tutorial. Thank you!
M-Carter
Thank you! I’ve tried this method before but don’t like the look of the stitches on top either. I’m going to try on in reverse as you’ve done here. Wish me luck!
Allison
Good luck! Just practice a lot and you'll get it and love it!
Donna
I am going to try your method. It looks great. I’ve been doing my binding by stitching from the front but I like the look of yours better. Glad I saw your video. Thank you.
Allison
Try it and see what you think! Just go slowly while you are learning and stitching on the back...eventually it becomes faster!
Valerie Orner
I was so happy to find your excellent tutorial on binding totally by machine. I have always done it with finishing on the back side by hand but have been having some issues with carpal tunnel syndrome. I didn’t know how I was going to bind 7 quilts by Christmas, but now I know it can be done!! Thank you so much. (I only recently found a machine quilter when she opened a quilt shop as part of her house.) I have been feeding her all the quilt tops I have Accumulated over the years and it feels great! They are going to be Christmas presents for family.Anyway, thanks again.
Kellie
Thanks for this Allison... you have a great way of explaining things. I'm going to try this with my next quilt!
Mom2mykids
This is a great tutorial! I made a quilt for my daughter and I wish I had known about this method before I put the binding on it! I'm making a quilt for my cousin, and will definitely use your method to finish that one. Thanks so much!
La Pecora Nera
Great tutorial! Very fast!
Thank you, Emanuela
thea
I'll be binding a baby quilt soon .. might just try it.
N. Maria
I think that makes perfect sense....strength for the babies wash! This tutorial helps to know exactly where to fold over your binding and to stitch on the side that needs the stitching. Good one!
Carie
Thanks for a great tutorial; I like your method so much more than any of the ones that leave you with a seam down the binding so I shall have to give it a whirl. I do love a handsewn binding though; somehow it gives me time to say goodbye to the process of making the quilt and embrace the finished item!
Jessica
Wish I had this method up my sleeve a couple weeks ago when I had a baby quilt to bind in a night. I think I'll have to give it a go on some smaller items first so that I'm ready for the next quilt! Thanks for sharing.
Simplesmente Silvinha (Simply Silvia)
Thank you I have a BIG problems with Binding .
Kathleen
I love ALL of your tutorials and thi is another great one!! I always look forward to new posts!
Thank you!
trish
I have always wanted to learn how to do this. Thank you for taking the time to show us how. :0)
Sue B
I am certainly going to try this on my next quilt, stitching the binding down by hand is a tedious job, thanks for the tutorial.
Domini
How wide do you make your binding?
girlsfour
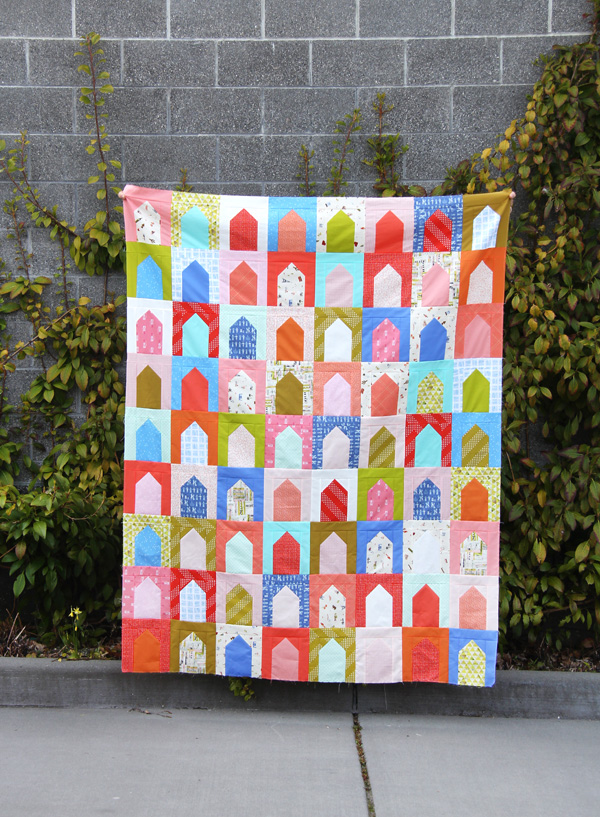
Beautiful work! Love how colorful the quilt is that you used in your tute!
Got all excited when I saw the pins you use. I use them quite often (of course have lots of pins, all shapes and sizes). I every now and then teach kids with a friend and we finally decided that the button-topped pins are prerequisite on the supply list. Kids have a hard time pinning and those pins really help.
I also work very pt at Hancock Fabrics and I promote those pins quite often. I do tell them though that they can bend.....
Thanks for the great blog!!!
Meg
Woodbury, MN
jmday
Yours is the first machine sewn binding that I actually like the look of. I've tried a zillion and one ways (including this method) and mine never look good AT. ALL. But FWIW, I've sewn a million baby quilts, with a million hand sewn bindings and they've held through the washes ok. :)
Meg HarmonMeg
I do bindings almost the same but I secure binding with clips so I know my binding on back is last week lind. Then I see on front in the city in line between binding as quilt. You could end use invisible thread on top and bobbin thread to match binding. I love this method and am not going back!
Deborah Hamilton
Thanks so much for this tutorial. I thought the stitches were supposed to go on the top of the binding, and I never liked that look, so I sewed them down by hand. I'm going to try your way now. It looks so good, and I also like your way of doing corners. Thanks again
Colleen Potter
Thanks for this wonderful tutorial - excellent pictures and explanation. I got a new sewing machine for christmas that I am waiting impatiently for it's arrival. It has a walking foot and I can't wait to try this binding method !
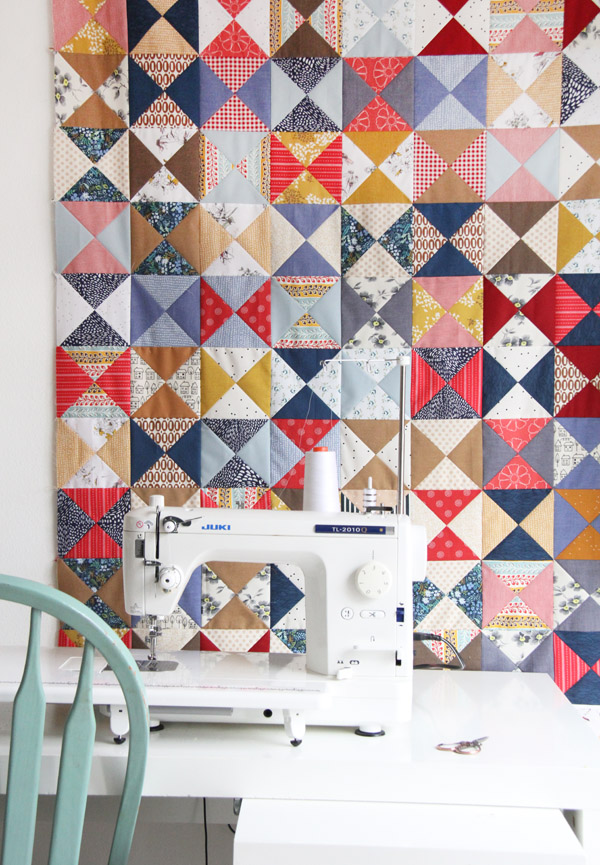
Love the colors in this quilt too.
Angela Atkins
Ha! I tried a new method to sew on a binding this weekend, the one on Red Pepper Quilts, and was terrible at it. I need to see what I'm sewing. Had to rip it out but didn't want to rip the seams from attaching the binding to the quilt. This method is what I ended up with. Now I feel a little better.
Tiffany
Thank you! I've seen lots of binding tutorials, but so far yours is the best! It is SO important to sew to the left of the seam line, but it took me forever to figure that out on my own! ;)
The Cozy Pumpkin
Have you ever tried a 2 1/4" binding? That's my preferred width, but it probably just makes it a bit more challenging. I like your method for the corners...it makes much better sense than the method I was taught.
-Amanda-
Vicki H
I've always done my binding by hand because I didn't like the stitching on the front of the binding. I will try this method. Thanks for the tutorial.
Sandy
Sewing the binding has been my arch enemy for so long... I am definitely going to try this on my next quilt! Thank you soooo much :)
Jean Burke
How do you decide on thread color - do you match it to the color you used for the machine quilting? What if it is very different from the binding color? Thanks....great pictures!
Patty
Thanks for the fast and easy lesson.
cyndiofthevortex
I've always wondered how to do this to make it look as good as hand sewing the binding to the back! This looks great and your tutorial was very well done. Thanks so much. I'm definitely using it for my next quilt.
Mary Deckert
Great tutorial! I have a question about your "stay-stitching" around the edge of the quilt before binding. I've tried it, but always wind up with a pucker or two, so I finally just stopped doing it, depending instead on the quilting to hold everything in place. Can you explainthe advantage of stay-stitching? Thanks for all your great tips!
Caroline
Thank you for this tutorial, I'm going to be binding my first quilt ever! So any and all examples are greatly appreciated.
thedodds
Fabulous! Thank you, Allison x
thedodds
Fabulous! Thank you, Allison x
Helen L
Great tutorial. I've always sewn the back of my binding by hand, but I need to try this for baby quilts: like you say, they get alot of washing!! thanks!!
SewBlinkey.blogspot.com
Thank you for this tutorial. I tend to sew on the front binding more than not. It's frustrating. I will continue to try and I love the way you sew your tails together. It has been so hard for me I almost gave up quilting. I decided to sew them across. Your quilts are wonderful!
stitching under oaks
this is awesome! I'm going to pin it so I can find it when I need it. i usually hand sew on my bindings, but this looks great and would be so much faster! Thanks!
karen
Thanks so much! I will refer to this for the next machine binding I do. I did three the weekend before Xmas and used a zigzag stitch--UGLY (IMO; the family didn't mind a bit, though). I really love the look of a hand-turned binding, so yours definitely appeals.
Becca Ross
Great tutorial! I recently wrote one on my blog for binding quilts. Yours is much more thorough, so I won't even bother sharing mine! :)
Becca
celkalee
What a great method. I know several people who do it well. And you make it looks so easy!
Marie
Thanks so much - I always do mine by hand but thought it would be good to know how to do this, especially for baby quilts, as you mentioned. Faster too, me thinks!
homeamazing
Thanks for the tutorial! I always do machine binding but have always done it the opposite way... sewing the binding on the back of the quilt first, but I agree that it looks much better without the seam running through the binding on the front. I will have to try this out for my next quilt.
Theophanie
Cool! That has GOT to be faster than hand sewing, I will have to try it. :)
Amanda Corbet
Thank you so much for this tutorial! I have used the technique where you are supposed to stitch over the top of the binding on the front and it is so hard to do! I've only made two quilts, but this method looks so much easier and prettier! I will definitely try it out on the two quilts I plan on making for Christmas gifts for this year!
Michelle Corey
Haven't had much luck machine binding yet, but I am definitely going to try this. Seems much easier to keep the stitching off the binding on the front than to try to keep the stitching on the binding on the back. (If that makes any sense.)
Goog
A good way to avoid the stitches showing on the FRONT of the binding is to bind it the opposite way - attach the binding from the BACK, then pull it around to the front.
Purple Quilter Queen
WOW! That is so simple. I've always done it the same way, but once I've flipped it to the back and pinned it down, I'd always done the stitch in the ditch from the FRONT. I much more like the way you did it. It seems like it helps you control the backing looking smoother if you stitch it from the back - Awesome step by step pics - thanks so much!!! Jenn
Lucy @ The Pink Button Tree
Thank you so much for this tutorial. I'm definitely going to try this on the next quilt I make.
Cydni
Thanks! That is great to learn that way. At some point will you show how to bind a scallop edge quilt?
P.S. Love your blog!!!
Brooke
Tried this method tonight and it worked like a dream! Thanks for sharing and for the clear instructions! I used it on my 4th hourglass quilt using your tutorial. : ) Love it!
Brooke
Tried this method tonight and it worked like a dream! Thanks for sharing and for the clear instructions! I used it on my 4th hourglass quilt using your tutorial. : ) Love it!
allison
I'm so glad Brooke! Thanks for sharing! -Allison
Erin @ Billy Button Design
I've always sewn from the front... Will try this out though. Thanks for the tips
wasntquiltinaday
Ah, thank you for this tutorial! I've started a few quilts, but the binding is scaring me - this really makes sense and now I can't wait to get to this step.
Claire Jain
This looks nice. I usually stitch in the ditch on the front, but sometimes the binding isn't sewn down as evenly on the back. I'll have to try this on my next quilt!
SIMPLESEW
Thank you for sharing.. Please stop by my blog and share the news.. of my blogaversary..
Christina Flowers
I like to use my fancy stitches when machine binding, mind you I also do a much wider binding than most people, the smallest width I use is 3" since I believe the binding is an integral part of the over all look. I really recommend to reverse this process if you want to use fancy stitching and do the binding finish on the front rather than the back since the fancy stitches tend to be more difficult to handle and you don't want boo boo's on the front of a quilt lol! Thanks for the quick walkthrough, I am going to try your method on a couple of small projects and see if I like it better :)
Savannagal
Your tutorial was really helpful. Thank you. The only part I didn't quite follow, and it's because I am a complete beginner, is the part where the two ends of the binding strip is joined together. I can't exactly tell what you did there after pinning the two ends together at the creases. How do you stitch the two pieces together, by hand down the crease lines, with the tails up in the air to be cut off later? Then there would be raw edges then. The tails don't appear to be tucked under and sewn down, after being trimmed. Thanks again for your great tutorial. It's really helpful to beginners like me.
sara
Thanks for such a useful tutorial!
http://www.infanta.blog.pt
Shawn Stephenson Schumacher
Great tutorail!
Trinity
Thank you for the tutorial! I don't have the patience for hand binding and this method leaves a much cleaner look. Also, I have never really caught on to joining the ends--I've always just overlapped them and I have never liked the end result. I was stuck at first until I caught on to opening the strips then creasing and sewing. I will continue to use this method--thanks again!
Alanna Latham
Thank you so much for this awesome tutorial! Makes it so simple!
scrappin' girl
thank you for this great tutorial .. i have just finished my second ever quilt .. the first one i hand stiched the binding on the back but the one that I just finished this rvo (a small baby quilt) i used this technique !!!! finished in no time !!!
meli55a2001
Thank you very much for this tutorial! I just completed binding for the first time. It's not perfect but I know I'll get better with each project. :)
Kim
I combined this with another tutorial to complete my first binding today! I have a question though--how far over are you supposed to fold the binding to the back? Should the fold be right against the quilt sandwich?
Tami C
Very nice tutorial. Bonnie Hunter sent me here. I think I'd like to use this method. I've always sewn the back on by hand. Thanks!
Taylor Family
Thank you so much for posting this tutorial. I really appreciate the time you spent photographing, explaining and blogging this. Thank you so much for taking the time to help other improve!
Carly
Marva
Oh how cool! Can't wait to try this!
RaspberrySunshine
Thank you so much for sharing your method. I am a new quilter and just binded my first lap quilt using your method!
Cindy
GrecianUrns
hello...you actually forgot to say in the instructions that you first stitched all the way around the quilt to hold all layers together. I couldn't work out why , when you turned it over to stitch the last and other side, , that there were 2 rows of stitching, and you pointed to just one row, saying.. stitch OVER this line.... now I know why you had two rows of stitching....
Lisa Baker
Great tutorial. I bound my first quilt ever this afternoon & I am very happy with the result. Thank you!
Ashley
This is the best binding tutorial I have come across after lots of searching! I like how you started on the front of the quilt instead of the back. I will definitely use your method!
Kellie
I'm attempting machine binding for the first time tonight... need to get a quilt done by Saturday and I don't think I can get it done by hand that quickly... wish me luck!
Elizabeth
This tutorial just saved me from another below mediocre binding. Thank you, thank you, thank you!!
giddy99
I just bound my dad's queen-size quilt by machine (my first machine-binding ever), and my life will never be the same. THANK YOU! So much faster than hand-binding, and it looks lovely. :)
RoseMary Baty-Willcox
I was wondering what of foot were you using. My walking foot does not look like the one in your pictures.
Thank You posting this seems so much easier.
Mary @ Ms. Redo
I finally got a new Janome, I finally got a walking foot, and I finally got this! I understand it now and I'm at the machine sewing those corners so fast! Thanks for the awesome tutorial!!!
Mary
Deanna McCool
Great tutorial! I linked to this from my post today! :)
http://www.sewmccool.com/chinese-year-of-the-horse-hot-pad/
Moheckie
VERY helpful, well done pics. Its helpful to see the mistake too, I've done that...
Moheckie
VERY helpful, well done pics. Its helpful to see the mistake too, I've done that...
Ellen
I am making my first baby quilt for my daughter's first baby and this tutorial was/is a lifesaver. It is clear and understandable and the pictures are great. Thank you so much.
allison
I'm so glad it was helpful Ellen...and congrats on the new baby coming!!! -Allison
Amy in VA
Thank you!! I finished a teacher gift using your tutorial just a little bit ago. It was a lifesaver!!
Aly V
Thank you. This is awesome.
thecraftymastermind
This is my preferred tutorial! I have come back to it everytime I've finished a quilt. Brilliant
Alicia
I just used this tutorial and, while I still need some practice, it looks great! Thanks so much for sharing this!
Natasha Renstead
This tutorial just helped me sew my first ever machine binding on a quilt. as I have a few baby quilts in the near future to complete I think this will be the preferred method of binding from here on in :) Thanks so much for writing this post.
rhondar
I am so in awe with your binding tutorials. I had googled self binding since I am quilting my first ever quilt. I took a class on binding the past weekend to help with this first quilt and it was not all that helpful. No handout was given to go by when u get home to help and the instructor was not very good at explaining the process but your tutorial is 100% right on. I so understand now. Thank u, thank u, I thank God for u. Loved the self binding tutorial as well. God bless u and ur talent.
jena
Thank you so much for this tutorial. I just finished my 9th quilt, and decided to try a different method of binding -- for all of my other quilts, I've just folded the backing over to the front and stitched it down thinking that that was the easiest method. This method was SO much easier, faster and looks so great! I was so pleased with the results, I just had to thank you for this awesome tutorial!
berylthepearl
This method is definitely the best, I've been doing binding this way for nearly 50 years! Your instructions are very clear. I would add to make sure your bobbin thread color blends well with the fabric of the front side. Good tutorial!
Joy Manoleros
I had never liked the thought of machine binding... I've done my binding my hand for 30 years! But a couple months ago I was in a real hurry to finish a charity quilt and I stumbled upon your tutorial... now I'm hooked. I finished it in less than an hour with amazing results. THANKS!
Jeanne
This was so clear and easy to follow and it worked perfectly. Fast and simple with great results. Thanks.
Carmen Lee
Thank you so much for sharing this here! I really need to bind a quilt for my brother. I was just thinking about to trying a machine binding cause it can be done quickly by me as well. This method is so clear and easy to follow and you know what now? II just have to follow you. :)
Jamie Farrell Tomlinson
Well I tried this. So far, it has produced the best results out of my 8 failed attempts, but I still couldn't make this work. I must really suck at binding. :'(
Linda Spears
Thank you for the binding tutorial. I am going to try it on my Christmas mug rugs. I don't like sewing binding on anything (tried a few times), but it might be the same as with zippers .. just need practice!?? By the way, I love the name of your blog!!
Sandy
Have sewn several quilts, had them quilted and they have sat waiting for binding. I finally bit the bullet and looked for tutorials online. I really wanted to do it all by machine (it will get a lot of wear) and found yours. Loved the idea and after a whole afternoon (binding was already made) I did it this way. Love it and it will be my go to from now on. Thank you so much for sharing. P.S. Most of the others I had found for machine application involved attaching the binding from the back and doing final sewing from the front. Did not like the look of that. Thanks again.
JeannieMay
Awesome tutorial - thank you for sharing. I just finished my quilt and am quite pleased with it. :-)
Living Each Day of my Journey
Thank you so much for sharing you really made my day..working binding on my second baby quilt and your pictures and directions helped me so much..
God Bless and keep posting I need all the help I can get :)
Tina
Thanks so much for sharing, and you are right, it does take practice.
Heather371
I keep coming back to this tutorial, thank you again for the time for taking the pictures and explaining it. Very much appreciated.
Allison
I'm so glad you've found it helpful!!!
phyllisjoyce
Just found this tutorial. New to quilting and found this a great help. Many thanks from Phyllis in Scotland.
seddy5Stephanie
Thank you so much for this tutorial! I had read a few other ones and was still confused until I found your website. Just finished binding my first quilt following your steps.
Norma Jean Kroos
I have a suggestion. Reverse the process. Sew the binding on the back of your quilt the same way as shown above. There will only be the nice, neat sew line on the binding on the front and on the back......well looks somewhat like part of the quilting.
Allison Harris
I actually prefer this way because then there are no stitches in the binding on the front of the quilt! It looks exactly like it would on the front of the quilt if you had hand stitched it to the back. It takes some practice to not get any stitches in the binding...but by now I've got it down pat! Both methods work great and I love both though!
cynthia black
Thanks for your tutorial! I have read and watch so many tutorials that I was so confused. Yours was so easy to understand. Your quilt binding is done so nice. Thank you.
CC.
Susan
Thank you so much for this tutorial! I used it for my first-ever quilt, a gift for a new baby, and I never would have finished it in time or felt confident that it was machine-washable without this method.
Terry
Thank you for this tutorial! Very easy to follow and worked great
marg milburn
I just want to say thank you for having this! I have saved it and I look at it each time to review before I do my binding. I must say that I enjoy binding more and appreciate your wonderful, excellent and precise instructions! Much appreciated!!!
Sharon Gornicki
Hi, I have a question about something I didn't understand in your tutorial. When you are explaining this part: "Open the strips, and match the crease marks and pin the strips right sides together. Sew down the crease marks," I don't understand what you mean. The picture that goes along with that description shows the 2 unsewn edges pinned together. I don't understand how it goes from that to the next picture where it's completely finished. Let's say each strip is like a V shape (on its side) and you've pinned one side of each V shape together. What part do you sew and what part do you cut off? I don't see where you've matched the crease marks or how you could sew them down? I mean I'm guessing you have one side of each V pinned together where the crease marks are, but I don't get how they're sewn together from that. Can you elaborate or perhaps show some other explanatory pictures?
I am new to quilting and I found your tutorial very clear and helpful except that one part tripped me up. Thank you!
Allison
Hi Sharon! There are a few ways to match and sew the ends of the binding together. This way, you just sew a straight line where the two ends of the binding meet...so where the two ends of the binding meet, you make a little mark or pin, then unfold the strips and sew them right sides together...just as if you were piecing two pieces of fabric together. Then re-fold them and sew the binding strip down. OR you can attach the strips with a diagonal seam. Here is another great tutorial that shows sewing the binding strips together that way: http://www.canoeridgecreations.com/2013/02/double-fold-binding-tutorial-part-one.html She has great pictures of that part!
Cindy Johansen
I cut my bindings 2 1/2 in. but when I sew to the front, turn to the back, the back binding is always so much wider so my seam line on the front isn't close to the binding like yours. Any suggestions? You said you're making your bindings at 2 1/2. I don't think I'm folding them over tighter than usual. Thanks!
Allison
So do you mean it feels like you have too much binding, or too little? I usually have just enough to fold it over to the back, and just pull it across the seam line on the back and sew it down. Make sure you're using a 1/4" seam when you sew it to the front, and if you feel like you have too much or too little you can always cut your binding smaller or larger. I also don't like to have my binding tight and snug against the quilt edge when I pull it around to the back, I like a little bit of wiggle room for when it's washed and shrinks up.
Amanda
I was using this same binding method, except stitching in the ditch on the front of the quilt. Then, on the binding on the back, my lines turned out wonky and there was too much space between my seam and the edge of the binding. I'm going to flip it over and sew from the back like you do in this tutorial! Can't wait to see the results!
Madeleine
Thank you for the tutorial, still using it in 2017!! :))
Allison
Yay I'm so glad it's still helpful!
Sandy Rizzo
This is the best tutorial on binding, ever!!! It worked perfect on an 8x8 mug rug. Thank you so much!
Allison
I'm so glad it worked well for you!
Lisa
This tutorial is spot on!
Angelina
have used this tutorial for each quilt I've done- on my 7th!
Tegan Nilles
Awesome! Just tried it on a quilt I’m finishing for Christmas and it worked beautifully. It looks much cleaner than a lot of machine binding and the seam blends with the quilting. Thank you!
Chelsea
This tutorial is so helpful! It's my new favorite way to bind a quilt. It looks neater and seems faster than other methods I've tried. I'm finishing up a baby quilt now. I know you wrote this in 2013 but I just came across this on Pinterest in 2017! Thank you!
Alycia Maurer
I have been machine sewing my binding to the back, then attaching to the front with very mixed results. I have also hand sewn my binding to the back, but that is so time-consuming and I worry about the strength of the stitches holding up over washings and time. I will try this method next. To join my binding ends, I use the binding tool and that has worked pretty well for me.
Allison
Yes this definitely works better for me, and from the front of the quilt, it looks hand done. Just make sure you are pulling that binding on the back across the front stitches before you sew it down.
Tiffany Saller
This is my favorite quilt binding tutorial by far. Super easy and it comes out perfectly every time! Sometimes I make it wider to get a larger border. Love the way it looks. Thanks so much.
Allison
I'm so glad it works well for you! It's my favorite and really all I use!
Tammy
Look be your tutorials
visit website
This machine binding quilt tutorial will walk you through an easy beginner friendly method. Follow the photos or watch the short video clips below.
Gretchen
Yes! I haven't quilted in about 5 years, but this is exactly the tutorial I used to bind. It took me forever to find this again through Google. I just remembered the coral colored binding and when I saw Cluck cluck sew, I knew this was the one! Thank you, thank you, for creating such an easy to follow tutorial!
Rosie
Wonderful binding tutorial!
Allison, you are a very clever quilter and awesome blogger!. I am trying this method today on an overdue quilt for my BFF. (Glad I procrastinated!)
Very grateful for the pictures showing what happens when you sew to the right of seam line instead of the left.
Thank you for sharing!
Relief & Smiles,
Rosie
Leslie
Hi It looks like your binding is cut on the straight grain. You don’t cut it on the bias?
Margaret Harmon
I tried this twice and missed binding on back because I was trying to stitch in ditch on front. I think I will try really pulling over the binding and stitching on edge in back like I do on the front. Hopefully that will work better. I want to try it in my granddaughter's wedding quilt. Hopefully all will be well!
Linda
I have tried to sew bindings on many times. The weight of the quilt made the stitching go crooked I finally found a tutorial from Camille from Thimble Blossom she said to iron the binding back from the front then glue it down with Elmer's glue then iron it again to dry the glue. This held it in place then I was able to stitch it down easily.
Meg Harmon
Might try that too Linda. Thanks. Also think stitching around whole quilt first before binding might be helpful.
Trish
First time following your instructions for making the binding it came out beautifully. It was a slow process but I’m looking forward to the time I get faster.
Michelle g
l have just bound my 4th quilt using this method and love it
Mind you l am not at the expert level of many here but l find it easy, hassle free way to bind my quilts
okbetsports.ph
I found this post very interesting and informative. Thank you for sharing your special thoughts with us. My site: okbet betting
Lucky Cola
Ang Lucky Cola ay isang online casino brand na nagsusumikap na magbigay sa mga manlalaro ng first-rate na entertainment at napakahusay na on-line na karanasan sa paglalaro. Ang isang malaking uri ng mga larong may mataas na kalidad, kasaganaan ng mga jackpot, mga nangungunang bonus sa casino, mga kasanayan sa patas na paglalaro, at suporta ay ilan sa maraming bagay na naging dahilan upang ang Lucky Cola ay isa sa mga pinagkakatiwalaang online na casino ngayon. Ang mga laro sa online na casino mula sa Lucky Cola ay binuo gamit ang mga advanced na 3D graphics at tanging ang pinaka-cutting-edge na software. Tinitiyak nito na masisiyahan ka sa pinakamahusay sa online na pagsusugal na libangan. Kapag sumali ka sa kasiyahan, magagawa mong maglaro ng malawak na hanay ng mga sikat at kapana-panabik na mga laro kabilang ang roulette, blackjack, slots, poker at marami pang iba. Gusto mong makakuha ng higit pa tungkol sa Lucky Cola na balita, maaari mong suriin
Laurel
So appreciative of your tutorial …on binding, I hope that you will help with more information on how to square a already put together ….front piece only, I need to square it and put it on to the batting. Mine is really off …..
S888
You are lucky to know and to come here and make your fortune s888
Soliare
Want to earn money? Visit here solaire casino
Sw418
The most accurate Jackpot predictions of all times sw418live
LuckyCola
Welcome to the world of online gaming, where thrill and excitement meet opportunity
Lucky cola Casino
Luckycola
Get some cash to play with and try out a casino risk free Lucky cola gaming
Hawkplay Casino
Unleash the thrill and win big at our premier. Hawkplay Casino
Lucky Cola
Play Online Game Casino to Win a big Prizes Lucky Cola Casino
Pind Daan
It’s really a extraordinary and valuable piece of data. I am cheerful merely fair shared this valuable data with us. It would be ideal if you keep us up to date like this. Thank you for sharing. Pind Daan
tata ipl
I admire your creativity in problem-solving. You bring fresh ideas to the table that inspire us all. Check my page for other related articles tata ipl
rs7 casino
I admire your creativity in problem-solving. You bring fresh ideas to the table that inspire us all. Check my page for other related articles rs7 casino