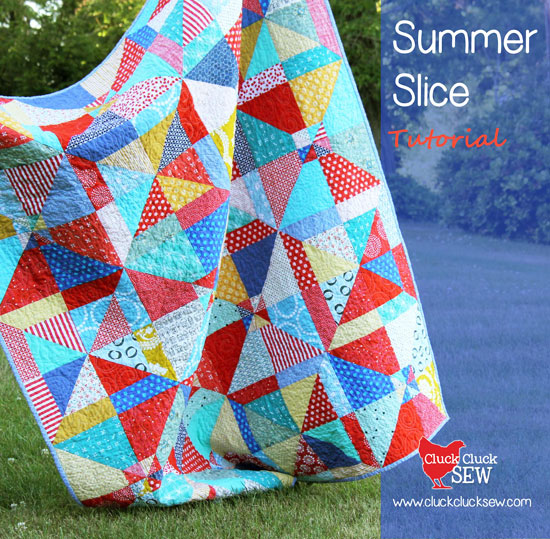
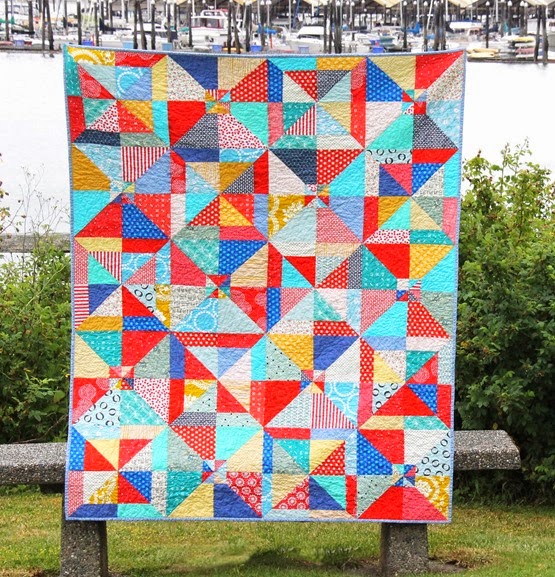
You’d never know it at first glance but this is SUCH an easy quilt to make…my favorite kind. This is a beginner friendly quilt, but I would recommend having some experience with simple piecing and matching seams.
This quilt is 57 inches by 71 inches.
You’ll be working with some bias edges (fabric cut on the diagonal against the grain) so I highly recommend starching your fabric before you cut.

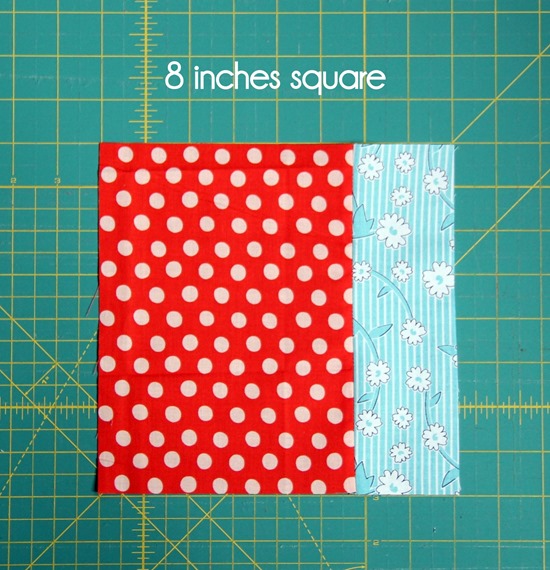
You’ll need to cut: 80 rectangles 6” x 8”, and 80 strips 2 ½” x 8”.
I cut all of my strips from various prints and yardages, but I estimate you’d need about 20 FQ if you were buying fabric just for this.

Sew a strip onto the side of each rectangle with a ¼” seam allowance. Press seams open.
Count out 40 of the 8” squares from above.
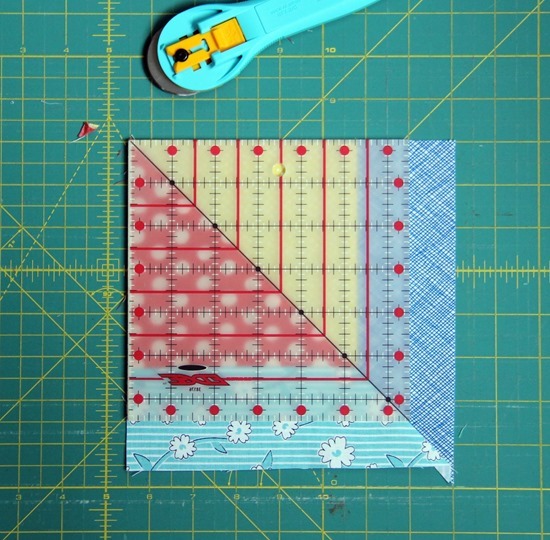
Lay them on the cutting mat like so with the strip at the bottom, and make a diagonal cut from bottom right to top left. You can stack and cut 3 or so at a time to speed this up.
Cut all 40 squares like this, keeping the top and bottom triangles in separate piles.
![IMG_5362_thumb[8]](jpg/img_5362_thumb8.jpg)
Cut the remaining 40 squares, but this time cut each from the bottom left to the top right.
![IMG_5368_thumb[7]](jpg/img_5368_thumb7.jpg)
Gather all of the triangles with the large strip portions. Place 2 triangles together matching the seams of the strips. Pin and gently sew the triangles together.
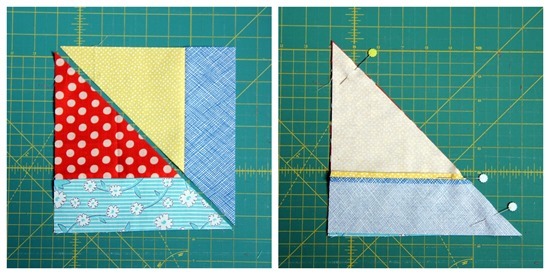
Press seam to either side. Repeat to make 40 of these blocks.

Repeat with the small strip triangles to make 40 of these blocks.
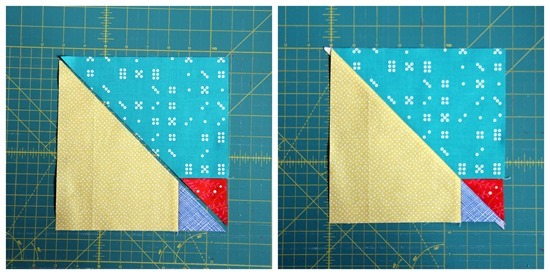
Your blocks should measure 7 ⅝”. Mine were all fairly square so I left them as is and trimmed off the corner bits. If your blocks are a bit wonky, you can trim them up to 7 ½”.
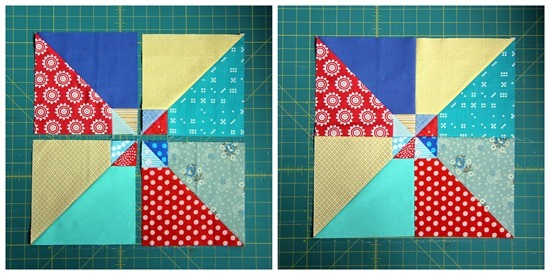
Layout 4 of the large strip blocks as shown. Pin and sew the right and left blocks together to form two rows, and press seams in opposite directions. Pin and sew the top and bottom together to create the block. Press seam in either direction or open.
Repeat to make 10 blocks. Unfinished they should measure 14 ¾”.
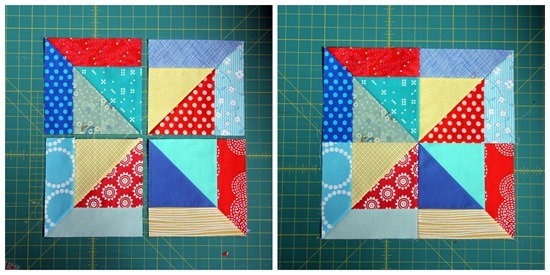
Repeat with the other blocks to make 10 small square blocks.
Lay your blocks out into 5 rows of 4 blocks each, alternating in between blocks. Pin and sew your blocks together to make the rows, press, and sew the rows together to finish the quilt top.
You can make this quilt in no time by chain piecing all of your strips and triangles together. Everyone will think you’re a quilting master and nobody will suspect it was so super easy to make. ;)
If you have any questions leave them in the comments and I’ll answer them in the comments.
Happy quilting!
Bear Creek Quilting Company
Beautiful! ~Shari
Diane
Looks great. Will try this summer
Diann
How would you adjust measurements,etc to make a throw size quilt?
harriet
i live quilting
really love short-cuts
here's one for this quilt
when your 2-stacks are complete...
take one from each stack
lay together right-sides facing
small strips at lower side
draw a line from one corner to opposite corner
stitch 1/4 inch each side of line
cut apart on the drawn line
wow... 2 complete block pieces
Montel francis
Thank you for sharing, I will try making it.
I want to be a quiltter, but their is a little fear in me.
Cassie
Don't be scared! you can always join a quilting class or watch beginning quilting & quilting tips videos on YouTube.
Karen Bragg
Join a quilt guild if there is one in your area. Quilters love to teach new quilters the joy of quilting.
Christine S
Thanks for sharing!
genevievegraves
What a fun pattern! With slightly larger blocks this would be a perfect way to use a couple of layer cakes...
Jennifer
How fun! Thank you so much. This is going to the top of the list.
Lynda
Brilliant Allison - thank you so much.
Debbie Smith
I love this pattern. You are so creative. I saw the picture and knew that I had to make it. Thank you for sharing and inspiring us!
Jane Blazer
Can't remember if I left you a comment or not. But I just found my notes I had taken to make this fun quilt. So guess what just got added to the next quilt projects list? Yep, it's going to be so much fun! Thank you again for this gift!
Florence
how sweet for my ten year old gd,,,,,,cant wait to show her this one,,and she will love your using mary ellens,,,,,,,,,,,,we use it also,,,tks hon
KathleenD
Thank you for the very nice pictoral and measurements! The end result is very pretty and FUN!
SoozeM
This is fantastic, thank you!!
Krysta
This looks like such a fun quilt. I want to make one.
Gina
great tutorial thank you. HAve bookmarked for a later date xx
Ginny
Beautiful quilt, and sew easy! Thanks for sharing. I'll definitely be trying this!!
Betty
Thanks for sharing this with us; we all love great & easy!,
Hen
Fabulous! Look forward to trying this. Thank you.
bobbye sanderson
I must have missed something. How did you get the little triangles in the center. I read all the comments thinking maybe someone else would ask, buy think I am the only one. Love the pattern.
Allison
Hmmm, I'm not sure without looking at your blocks. The little triangles come from when the strip blocks are cut, they are the small strip that are cut at a diagonal.
Crystal
the little triangle is created when you cut your blocks diagonally. One half will have the strip at the bottom and the other has the triangle :-)
charlotte
Wonderful. I can't believe how easy this is. You are right, it looks so complex.
Sandy Rowe
Love it! Thanks for the tutorial!
Westfalenmaedel
Thanks a lot for that great tutorial!
I love your quilt :o)
Greetings from far Germany,
Karin
Doris Rice
What a great tut and a fun quilt. Thanks for sharing!
Mary Pat Callihan
This looks so great! You're right, no one would guess how easy it is. I sure didn't! I think you'll have a lot of us making this quilt this summer. Thanks for the super tut as well.
Dee
Love this! Thanks for a wonderful tutorial.
Dee
Love this! Thanks for a wonderful tutorial.
Gene Black
I do like that -and it really looks easy.
My only thought was that I could lay the two pieced squares right sides together and sew those diagonal seams to avoid sewing bias edges.
What do you think?
Paula @ Sewy Stuff
I loved this when you showed a sneak peak a while back. Thanks for sharing the tutorial. This is going into my ever-growing "to do" list (but this one is going near the top of the list!)
ga447
This is a winner.
Janina Postma
Thanks for sharing!
Buffy Skolnick
Great tutorial! Can't wait to make this...was looking for an easy throw pattern for a throw for this fall!
Francis Paul
thank you for sharing your tutorial!!!
Susan Long
It's adorable. Thank you for the tutorial. I am gearing up to make a baby boy quilt, and I think your ingenious pattern is perfect for him.
Havplenty
Thanks. Perfect pattern for just what I needed to crank out an easy quilt for a gift.
Paige
I love this! What a great pattern!
Linda
Love, love, love it.....Can't wait to have some time to call my own. Until then......it will remain at the top of my list in my file of plans!!!
Carol Q
ooh fabulous. perfect beginners quilt (for me!)
Leslie Frost
Brilliant! Thanks!
Kellie
probably not a smart question but..... how hard would it be to make this a smaller "lap" size for charity quilts? maybe 9 squares with a solid border? thoughts?
Jan
Added to my must make list; thank you for so generously sharing!
Janet @ Simply Pieced
This tutorial is great! Thanks for sharing!
terrieannie
So simple and a great stash buster.... can't wait to make one (or two or three!!)
A Quilter's Mission
Thank you so much for sharing. This is such a fun pattern.
allison
Gene - You can put the squares together and sew on the diagonal like you would a HST to avoid bias edges, but then you don't have as much control over fabric placement in the final block layout. Either way works though!
Kellie - Great idea! It would also make a great baby quilt that way without the borders...and it's pretty easy to configure different ways.
Pam
Thank you for the wonderful tutorial!! I will be making one of these!!
Holly
I am a beginning quilter and get a little hung up on selecting patterns/colors to go together. Did you cut a certain number of red ones vs. blue ones etc, or did you just cut what you had an put together what looked good in the end?
Center Hill Clayworks
Thank you so much for this gift! I love this quilt and look forward to making it my second ever quilt! I'm a new quilter and finished my first quilt this past year and I'm ready to start another and I just love this pattern. Many thanks! Anna
Needled Mom
That looks great.....and easy.
Debbie Leschisin
Thanks so much for sharing this tutorial/pattern! Can't wait to try it!
StubbsFamily
Thanks so much, I love a good tutorial. Now if someone would put a scrappy bundle together, I would be set.
Margaret
Beautiful.
Anita
This is awesome! It does look much harder than it is. Thank you for this fantastic tutorial. :)
DivaMomCarol
You really have a gift for sharing....I am grateful!
margaret
as if I did not have enough to do and now you hare this with us, it is a must for me but will have to go on hold for a while.
A wonderful quilt
Claudia
i fell in love qith this quilt the second I saw it!It's such a fabulous pattern. what a pity htat I have to finish three other quilts first before I can start on this one. thanks a million for sharing!
Stacy Lindblom
Oh my gosh, I love love love this pattern! Thank you so much for sharing it!! It's so pretty and easy enough for me to create! LOL! Did I mention I love it?
allison
Holly - I just used an even amount of reds/dark blues/lighter blues/ and added in some grays and yellows. I didn't keep track of how many I used...I just cut them out until they looked good! :)
Scorpie
So glad that I re-read this tutorial. The time through I thought no way I could do it. Now, it's printed and just waiting for a trip to the fabric store for supplies. Thanks so much for writing and sharing this tut.
Roberta
What would the measurements be for a smaller baby quilt around the size of 40x51ish? I love the quilt and want to try it for my grandson who is on the way! Thanks!
Chloe
Did anyone get back to you about how to make this baby quilt sized?
Melanie
Love this! Thank you!
Pat
You are a very talented, clever woman. Thanks for sharing. How did you quilt "Summer Slice"? I tried to look closely to the picture, but it was not easy to see.
Linda Cerrito
I've had the itch to start quilting, have been looking at patterns but once I saw this one and read through your very clear instructions I knew for the first time I really could do it! I'm so excited... thank you so much.
Rebecca Grace
This is a really cute project, and it makes me happy to read comments like the one just above mine and to know that you are inspiring new quilters to take the plunge and start their very first quilts!
Leigh Ann
You are brilliant! and kind to share with us all. I need to make this - This may bump up to the top of my to-do list.
allison
Linda - I LOVE hearing that!!! Quilting is so much fun and you can definitely make this quilt!
Rosa
Fabulous.Thanks for sharing!!
make.share.give
Thank you for this! It's going on my to-do list :)
Anita
I have already started making my version of the quilt; I am using 82 different fabrics so it will be really scrappy!
I will keep updating on my blog.
Diana Collins
Beautiful quilt. Thanks for sharing.
Bev Arason-Gaudet
Love it, love it!!! Thank you so much!
Nancy in IN
I love this. I think it would be ideal for leaders and enders (Bonnie Hunt). I have plenty of scraps.
Thanks for sharing.
Katrine Rubenstein
Would you recommend this as a beginner quilting experience?
allison
Yes Katrine! I'd make sure you've sewn a little before you start....make sure you've got a good 1/4" straight seam allowance down and pinning...and you should be fine!
Jessica Kok
I just finished piecing this. I ended up needing 18 fat quarters (using every little bit). Thanks for the great pattern. I love my new quilt top!
Nanna Liz
This will look great as a Quilt of Valor for a Coast Guard "Coastie."
Thanks so much!
sgrancio
Just saw this pattern on a blog showing a finished Halloween quilt. Love the idea of getting such a complex look from a bit of clever cutting and arranging, thanks so much for sharing.
Will definitely add it to the "to make" list.
Susan in Dublin
Evelyn Houska
I have been trying to register. Is it possible to get only the written instructions for the summer slice pattern for my personal use only? Thank you for your time and cosideration
Linda
Hello I just love this pattern. I was thinking of using a layer cake for this quilt. What do you think? Will it work ok. Thanks. Linda
Marie Maxfield
What is the size of the small 1/2 sq triangles.
Ruth Smith-Stuhmcke
Wow, another fun quilt. Beautiful.
Charles e. Queen
Looks easy...but can’t understand how u got the small square together....
Gail J
Marie and Charles, like you, I couldn't figure out how to get the small triangles. But I think I figured it out. The "large" blocks have the 2 1/2"' border on the outside. For the smaller triangle, turn the half square triangles so the borders are in the inside of the block. There are always so many ways to turn HSTs, I am sure there are other variations to try.
Elizabeth
Love, love, love this! I am a beginner, but the clarity of your tutorial made me believe that I could tackle it. Thank you so much.
Mollie E Donovan
I am SO WOWED!!! I just LOVE this simple design!! I am going to attack my scraps ASAP!!!! Thank You for Sharing!!
Claudia
I cannot figure how to cut a fat quarter to get 5 rectangles and 5 strips. The most I can get is 4 of each. I think a better estimate of fat quarters needed is 20.
Liyana
Loved the tutorial. I'm a beginner and would love to try this. Have a stupid question. What kind of a material do u use for the scraps if we want it to be made a blanket. If regular scrap cloth is used this would be very thin. Thanks
Vanessa Zoiberg
Thank you for this brilliant article!
Lillian Finley
I'm confused as to where the small strip triangles come from? Did I miss something? I LOVE this pattern and would like to try it. Thank you for any help you can give me. Lillian Finley at lillian.finley@gmail.com
Lynn Duncan
I didn’t cut mine on the diagonal, but laid 2 blocks right sides together with small strip on top of small strip from the other block. I then sewed a scant 1/4” on each side of the diagonal & cut on the diagonal. I ended up with a square with the large strips & a square with the small strips without having to sew bias edges!
Love your pattern!
Allison
Great idea!!
Karon
I made this. It was so easy. Thank you
Allison
I'm so glad it was easy for you!
Tammy S
What a fun quilt. For those who want coordinating fabric buy 20 quarters. Be precise on cutting so you can get right amount of strips and squares. Thanks for pattern
Carol Jordan
I have made every pattern...started years ago. Thank you.
Deborah Pope
This is so beautiful, and you’re right about it being simple but looking awesome! Can’t wait to try it, but have about 15 UFOs or WIPs, depending on what you call them…! Thank you so much, Deb x