The days sure fly by don’t they? I’m trying to soak up my little 13 month old…this is one of my favorite ages. We even match.

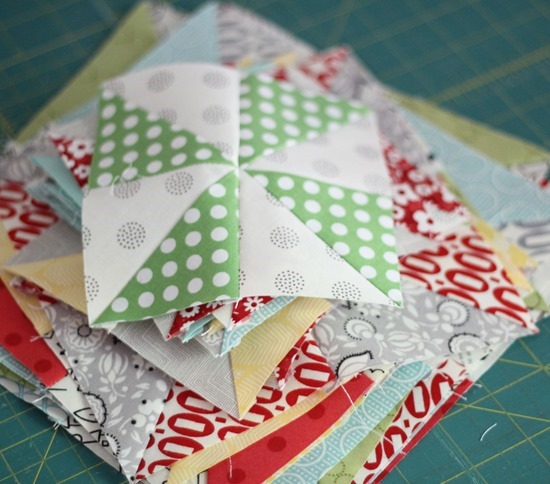
I’m just finishing up a new table runner. I haven’t made pinwheels in so long…I forgot how much I love them. It took all my willpower not to stay up all night making a quilt top.
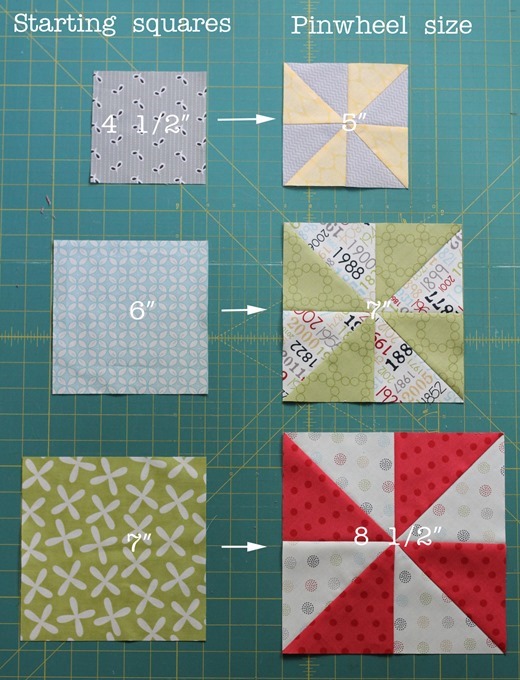
I used this much loved method (see it in action here!). Basically you put 2 squares together, sew ¼" around the edges and make 2 diagonal cuts to make the half square triangles.
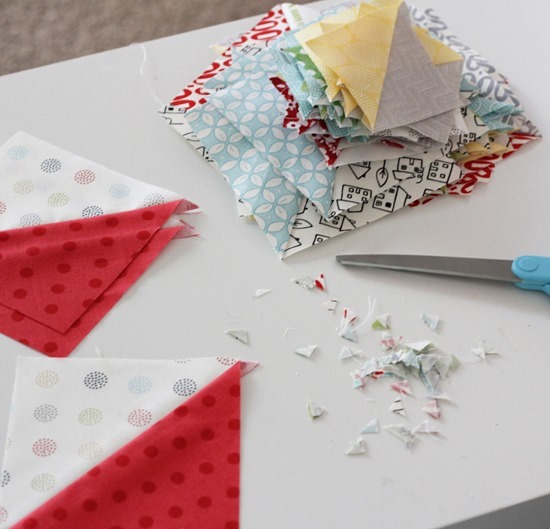
The only thing I don’t like about this method is your left with bias edges that stretch really easy and distort. To prevent that, I starched my starting squares a lot…and my half square triangles turned out perfect.
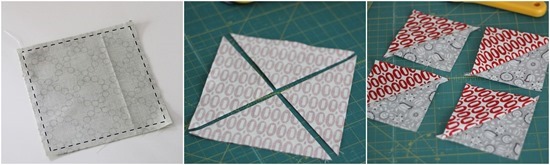
So perfect I didn’t even have to square them up…just trim off the little seam ears with scissors.
And if I zoomed out on that picture you’d see…
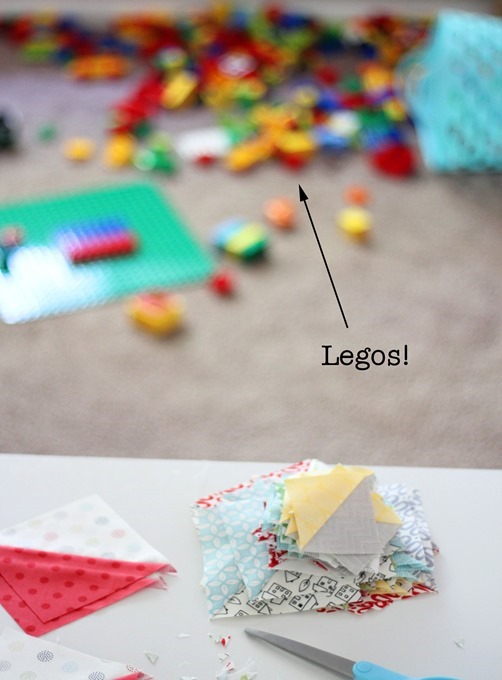
…they are a permanent fixture on our floor. Random fact.
Here are the starting squares sizes and the finished pinwheel sizes I got from them. My pinwheels were squared up very slightly…the 7" pinwheel was probably closer to 7 ¼", but this is about the (un)finished size of pinwheels you can expect after squaring.
It’s a great way to use up leftover charm and layer cake squares!

Mel @ Heart and Homemade
Fabric diets are no fun...I'd rather go on a food diet! Love those cute little pinwheels, that's something I've not tried myself but I feel inspired now. Great tip about the spray starch, thanks!
Julie Thompson
What brand of spray starch do you use? I want to use the same method to make a chevron quilt.
Mary
Starch is starch, key is to use enough to the bias edge doesn't stretch
Emi
I feel the same way about the bias edges. Starching does help. Cute fabrics!
Kris
what kind of starch do you use?
melintheattic
Thanks for the starching tip! Bias edges are usually not my friends (hence I have not tried that HST method), but I love the idea of making four squares at once. Love it.
Auntie Pami
Is there an app for that? HA! Like I'd buy that. Just got my book yesterday. Love it. Can't wait to start sewing...
Missy Shay
My math is terrible and I was needing a 6 1/2 inch block, could I get that from a 5 1/2 square?
worldpresscom986
I can't understand how cutting the square into triangles yields a larger square..... I think you WOULD get a 6.5 from a 5.5 since they got a 7" from a 6". Try it with muslin or scraps...It's magic!
Jilly
Love the legos! They're always just out of the camera at my house, too.
Bev
Brings back memories to see Legos on the floor. Man, nothing like stepping on one when you are barefoot in the middle of the night...
Cheery wave from
Bev
CJ
Best kind of diet to go off of! I fell off the wagon today too! Man, I wish MY new book would arrive, alas I ordered from Amazon. :S
That picture of you and your sweet girl - MATCHING - just melts my heart. My baby boy turns 21 soon and it will be the first bday that we don't spend together. :( Cherish these days.
Helen L
I like your method of making pinwheels, but unlike you, I shudder at the thought of pinwheels!! I made a pinwheel for my sister and don't really want to make them again!! :-)
Julia
I am inspired by your pinwheels! LOL about the lego. Been there, done that hehe...
Meg Roke
What pattern did you use? I love the idea of a pinwheel table runner. Sounds like a fun summer project!
Mary Sherrieb
I think you have your numbers reversed. You can not start out with a 4 1/2" square, sew it then cut apart and sew pices back together for the pinwheel and get a larger square!! No Way, those seams cut the size down!!!!!!
Linda Mcguire
Did you try it?
Allison
Hi Mary! You can! You are sewing 2 squares together...it's not just one 4 1/2" square. You are sewing 2 squares together to get the 4 half square triangles, and sewing the 4 half square triangles together. So you aren't getting 1 pinwheel block from 1 square...you are using 2 squares to make each pinwheel block.
Elizabeth
Would you mind posting about your spray starch method for those of us who are "bias challenged"? What kind do you use, do you spray the back of the fabric before or after you sew etc? eliz.i@sympatico.ca
Elsa
Oh, I just went to look at the book on Amazon ~ looks like a great one~ put it on my wish list.
Love pinwheels and they are so darned easy to make!
Melia Mae Quilting
I absolutely love pinwheels and love the fabrics you chose. I can't wait to see what you make with them and that table runner you keep promising! I hope you are planning on having it go on that beautiful farmhouse table your husband built!
Nancy
I remember or should I say my feet remember legos. My mom made this round mat that had a drawstring for my sons legos once he started using it my poor feet rejoiced. Just thought I'd pass the tip along as you're a sewing master it would be quick to whip up.
Marsha L
There are just so many things you can do with the simple half square triangle. I'll have to try this construction method.
Judith Blinkenberg
HST's are my favorite!! I haven't been sewing very much because I have 11 growing chicks. They are getting their feathers and will too soon be grown, just like children. I agree wirh you, 13 months to about 5 years are my favorite!
Lisas Mom
This is my favorite method for making half square triangles.
amy smart
Legos rule. They are the best kid entertainment.
Cheryl Arkison
I've been thinking about pinwheels lately too...
And yes, this age is so magical. I find myself wanting to hold on and never let go. Stop growing, be my baby boy forever. (And suddenly I get why my Dad called me The Baby, even into my 30s.)
thea
What a great way to make HSTs. Thank you!!
Brushes And Bodkins
Great blog. I have just started a blo myself. Your tutirials look great.
Cindy
I've seen this method before for the HST and need to try it- thanks for refreshing me. And I can remember when my daughter was 13 mos. old- such a fun time!:)
Hannah
I want to see the table runner! I have three boys under 5 ...Legos live on my floor, too! How do they always know when they are missing ONE piece?
Christine Welsh
I really like the idea of a pinwheel table runner! If only I had more hours in the day! LOL
Christine
ChrisW Designs
Hitch & Thread
Lego everywhere at my house too. I'm going to try your starching idea. Thanks.
Caroline Buckland
Love that method for making pinwheels, had not seen that before!
Julie B.
Thank you for the great tutorial. I have been looking for a chart everywhere or some sort of formula. Have you see one anywhere?
Julie B.
Thank you for the great tutorial. I have been looking for a chart everywhere or some sort of formula. Have you see one anywhere?
Jo
Great idea
But I do my half square triangles * 8 & no bias edges.
Have a look here
http://chezstitches.blogspot.ca/2011/01/magic-8.html
Lynda Halliger Otvos (Lynda M O)
I just finished 208 HSTs made the four-out-of-one-square technique and it went great. It will eventually become my husband's sleep-with-it quilt. We use separate covers at night and he feels that since nearly everyone we know has gotten a new quilt in the last couple years, he believes it is his turn !~! Where, of where, do Ideas like that start ?~!
kittyj
I also love pinwheels. When I learned this method all I wanted to do was to make pinwheels. I love your Sea Glass quilt. The colors are beautiful and so soothing.
kittyj
I also love pinwheels. When I learned this method all I wanted to do was to make pinwheels. I love your Sea Glass quilt. The colors are beautiful and so soothing.
Cheree Hull
Love it! This is my next project--a baby quilt (or two) of pinwheels. Do you mind if I link back to this for directions as I make it (on my small, insignificant blog--Just for my family/friends and whoever else wanders in!)?
Nikki
Thank you! I wouldn't have thought of the starch thing... I'm not wise in the ways of quilting yet. Great tutorial.
Erica MT
Cute! Thanks for the inspiration. This was a great stash-buster!
http://i1332.photobucket.com/albums/w606/ericamt82/Mobile%20Uploads/2014-02/Finished%20Quilts/20161221_154013_zpswiq8mhtk.jpg
Cheyanne
I used math and determined the mathematical equation for this as well it is as follows: ✔️(((Starting block size - 1")^2)*2)= Pinwheel block size.
This can also be used in reverse if you want to know what block size you need for a specific pinwheel size:
(✔️(((Pinwheel block size)^2)/2))+1"= starting block size
Kelcey
If I run that equation with 6 as the starting block size I end up with 50 as the pinwheel size. If I run it with 6 as the pinwheel block size i get 19 as the starting block size. (That is using the caret ^ to signify exponentiation) according to the correct order of operations (PEMDAS).. (6-1)=5 5^2=25 25*2=50" pinwheel block size. Aiming toward a 6" pinwheel block gives me (((6^2)/2))+1 is 6^2=36 36/2=18 18+1=19 Explain to me please how using that equation will work for this.
Lesley
Just wondering if you use this technique in your Playful and Playful 2 quilts, and if so do you give instructions for starting square sizes in the pattern?
Judy Ricart
Thanks Alison for an easy, accurate and practically no waste method of making pinwheel blocks!!