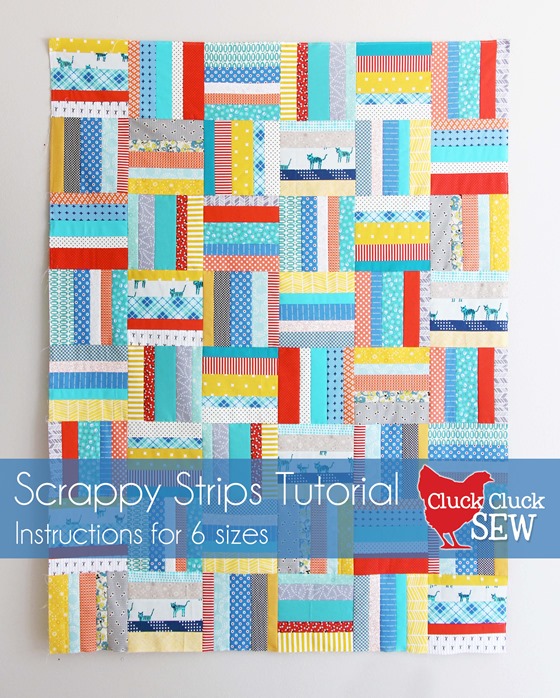
I made the crib size, but I included the info below to make 6 sizes (so much for not using my brain huh?). I’ll answer questions in the comments, so read through the whole post before you start cutting up your fabric!
Scrappy Strips Quilt Tutorial:
1. The blocks are made with 1 ½” strips, 2” strips, and 2 ½” strips. The strips should be the width of the fabric or about 42”. Use the chart below to figure out how many strips you need to cut for the size you are making:
|
Measurements:
|
1 ½" strips to cut:
|
2" strips to cut:
|
2 ½” strips to cut:
|
|
|
Baby size:
|
35” x 42”
|
12
|
12
|
6
|
|
Crib size:
|
42” x 56”
|
20
|
20
|
10
|
|
Throw size:
|
56” x 70”
|
32
|
32
|
16
|
|
Twin size:
|
70” x 84”
|
48
|
48
|
24
|
|
Queen size:
|
91” x 91”
|
68
|
68
|
34
|
|
King size:
|
105” x 91”
|
78
|
78
|
39
|
*Yardage info is at the bottom of this post if buying fabric specifically for this quilt.
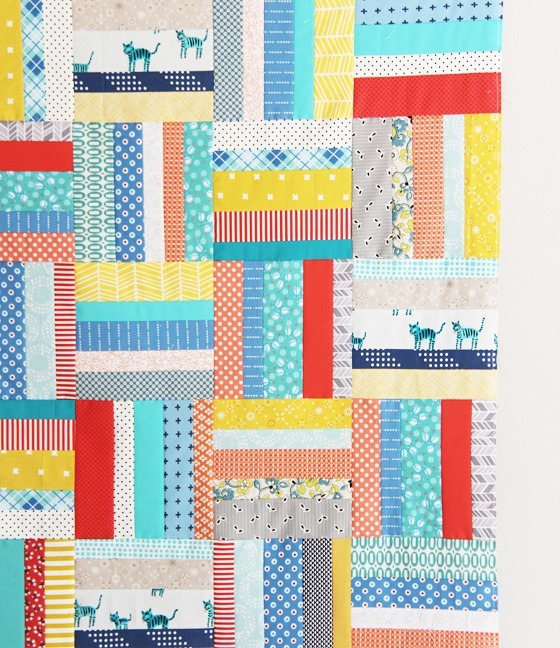
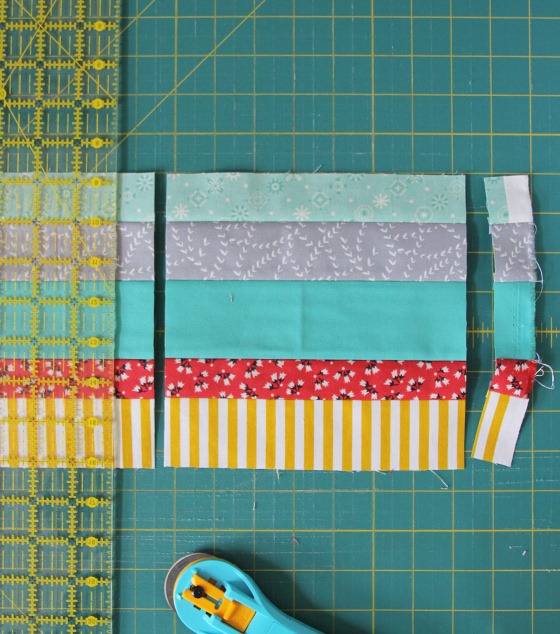
2. Choose 2 of the 1 ½” strips, 2 of the 2” strips, and 1 of the 2 ½” strips. Lay them out how you want them sewn, it doesn’t matter which order. Varying the order for each strip set gives the quilt more dimension. They are laid out in order for the photo below, but I sewed them together with the sizes mixed.
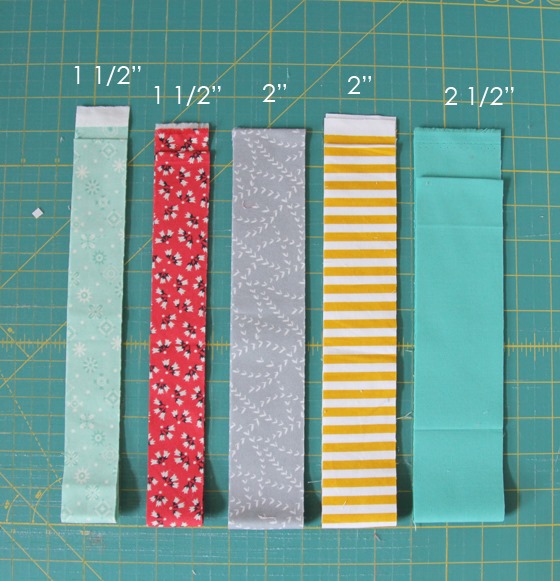
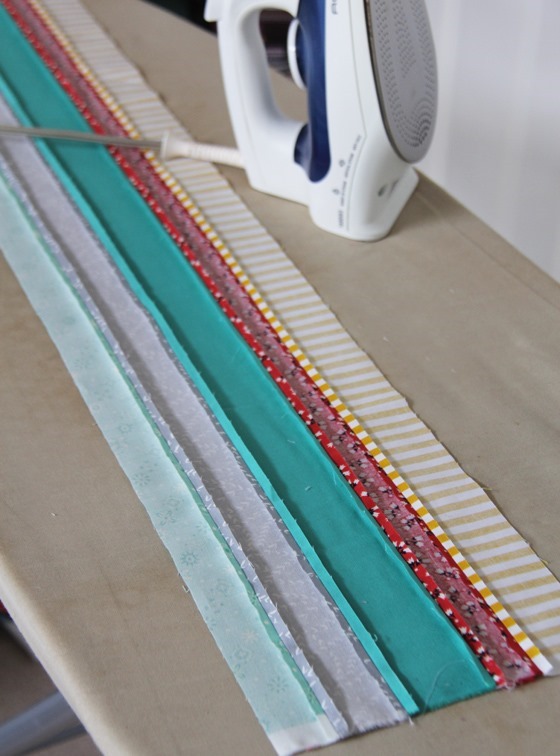
3. Sew the strips right sides together to form a strip set, and press the seams of the strip set open (this is personal preference), or to either side. The strip set should measure 7 ½” x the width of the fabric.

4. Repeat to make the following number of strip sets for the size you are making:
|
Strip sets to make:
|
Blocks to cut from the strip sets:
|
|
|
Baby size:
|
6
|
30
|
|
Crib size:
|
10
|
48
|
|
Throw size:
|
16
|
80
|
|
Twin size:
|
24
|
120
|
|
Queen size:
|
34
|
169
|
|
King size:
|
39
|
195
|
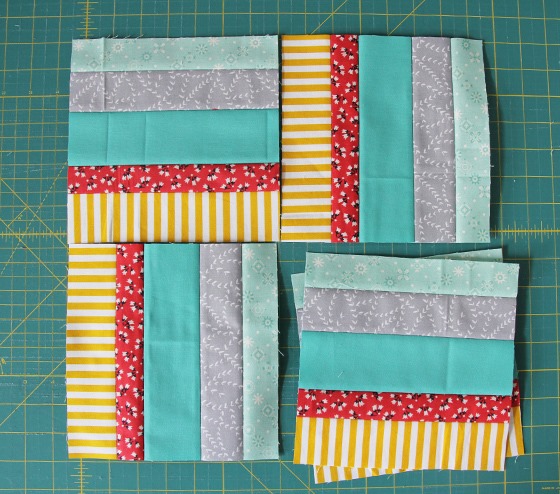
5. Lay each of the strip sets on the cutting mat, and from each strip set cut 5 blocks, 7 ½” x 7 ½”. When finished cutting, you should have the number of blocks in the chart above.
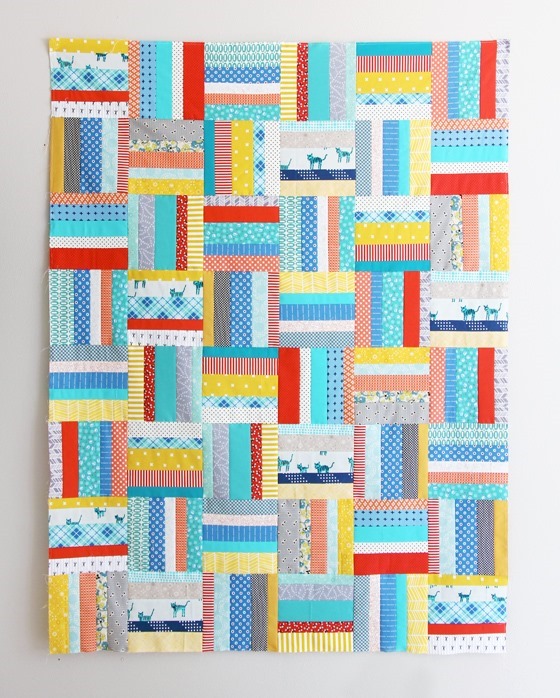
6. Arrange the blocks as desired, use the table below for how many blocks and rows you will need to layout:
|
Blocks in each row:
|
Number of rows:
|
|
|
Baby size:
|
5
|
6
|
|
Crib size:
|
6
|
8
|
|
Throw size:
|
8
|
10
|
|
Twin size:
|
10
|
12
|
|
Queen size:
|
13
|
13
|
|
King size:
|
15
|
13
|
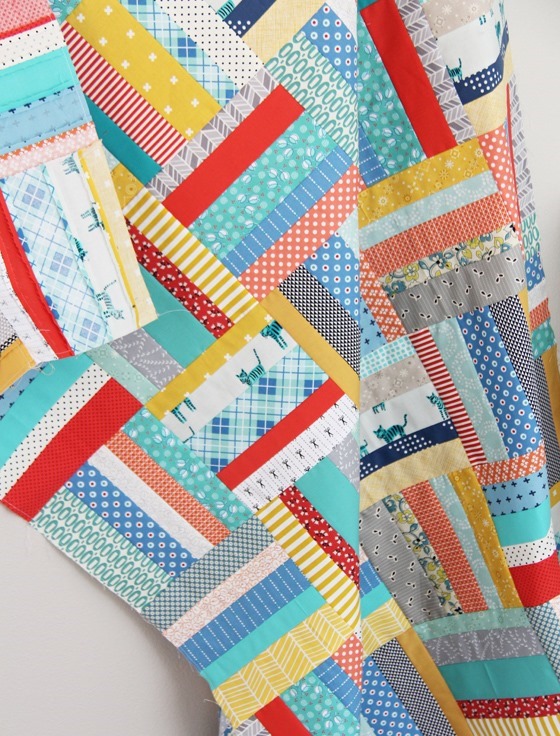
7. Sew the blocks into rows, and press seams towards the vertical blocks of each row. Sew the rows together to finish the quilt top!
If you need help finishing your quilt you can find info here. A tutorial for machine binding can be found here.
Here are yardage guidelines if you want to buy fabric specifically for this quilt:
|
Yardage to buy for the quilt top*:
|
|
|
Baby size:
|
6 assorted ⅓ yards
|
|
Crib size:
|
10 assorted ⅓ yards
|
|
Throw size:
|
16 assorted ⅓ yards
|
|
Twin size:
|
24 assorted ⅓ yards
|
|
Queen size:
|
34 assorted ⅓ yards
|
|
King size:
|
39 assorted ⅓ yards
|
* You’ll want more than 6 fabrics for the baby size, so add in other strips here and there to add interest. These are rough estimates, you may have extra fabric leftover.
From each ⅓ yard you can cut 2 – 1 ½” strips, 2 – 2” strips, and 1 (or 2) - 2 ½” strips, enough to make one strip set (5 blocks).
Now save those scrap strips and put them to good use! I’ll answer any questions about this tutorial in the comments below. Happy quilting!
Suzan Oxenreider
So true! Sometimes mindless sewing is the best kind! Very nice tutorial. Thanks for all the great cutting info. This looks like a good way to spend a quiet afternoon in the studio with a big stack of stash!
Amanda Joan Duke
For some reason mine didn't come out to 7 1/2 inches wide. I ended up just trimming them to 7 inches and it worked perfectly. Maybe because I ironed my seams to the side instead of open?
Allison
It's probably your seam allowance is a TINY bit too large...I had that problem for YEARS before I realized my seam allowance was 1/16th larger than 1/4...and when you have lots of seams it's makes all the difference!
Judy
I think this quilt will be a refreshing change from your Wallflowers quilt which I am quilting now. I am doing some embroidery on the white part of the quilt. I will share it with you when I'm done. Thank you so much for this tutorial, I have always loved your generosity! You are and will always be my favorite designer of patterns and fabric!
Karee
Love the tut and the pressed open seams ;)
Kate Marshall
You're gorgeous for sharing how to make this, and giving so much helpful information. Your version looks cool, I love your use of colour. I've got a massive pile of low volumes that I might pull out to make this. Appreciate you doing the hard work!
Also wanted to thank you for sharing the link to another blog about entertaining kids during the school holidays. Couldn't agree more. I just accept now that I'll have a few days of whinging and squabbling before mine get used to not being organised by adults and come up with some wacky games of their own invention that last for days. The whinging stops (mostly) and the squabbling cuts down a bit too! And I get a but of sewing time even though they're home. Win win.
~Sue
Thanks, Allison! I'm focused on using my scrap strips before purchasing more fabric so this tutorial is perfectly timed.
~Sue
Thanks Allison! I'm focused on using my scrap strips before purchasing more fabric so this tutorial is perfectly timed.
margaret
great tutorial for scraps and so good to see all the sizes there too, many thanks
Pati
Thanks for your tutorial - I think it is great for beginners - quick and easy :-)
Jane H Lewis
Thank you. I have been searching for an easy and unique pattern for all my scrapes.
Jayne
I agree, having an easy project thrown in between the more intense is welcome in my book! Thank you for sharing such a great and easy tutorial!
NebraskaNative
As always, love it! Thanks for the great tutorial and for the extra math you did to help humanity. :) Cheers!
Andrea
What a wonderful use for scraps or for a themed quilt. I'd love to make this with holiday fabrics. Is there a way to Pin this for future use?
Karen H
Great quilt, thanks for the tutorial!
allison
Andrea you should be able to pin it straight from the blog...if you hover over the picture a little "pin it" button should appear in the upper left of the photo. :) Thanks!
Martha C.
I cannot get the Pin It button to come up when I hover over the picture. Thanks for your wonder patterns. You are absolutely the best at color choice - your quilts always "pop"!
Sew Filomena
This quilt is gorgeous and such fun looking. Thanks for the tutorial and I love all the different size options.
cassandra
I have a stack of Doe that I was thinking of cutting up into strips and mixing with solids. I wasn't sure what do next; this is the perfect pattern! Thanks!
Denise in PA
Thanks so much for taking the time to write this tutorial! I'm going to suggest this pattern for some of the charity quilts we are making in our guild!
Happy Quilts by Mrs Patch
Very nice!
And thanks for sharing your *numbers*.
Love Mrs Patch
Jennifer Schifano Thomas
Sew simple, yet so pretty! Love the fabrics you used. Have a super day!
VickiT
What a great tutorial and so helpful you are to give us all the different sizes. Thank you so much.
I read the question about pinning the tutorial and your reply about hovering over a picture to get the little 'pin it' button. None of the pictures do that for me; instead each has a little info text giving the name of either "Summer Strings tutorial", or "Summer Strings Tutorial, Cluck Cluck Sew". I wonder if tagging the pics with the name of the tutorial supercedes the ability for the 'pin it' button to show. I'm not too blog savvy so I don't know, but I'm guessing you can't tag the picture with multiple things possibly? At least it is an idea to check out.
allison
Hmm not sure about the pin it button...you should still be able to pin it with the old fashioned "pin it from the toolbar" method...I'll look into it! Could be different browsers show different things! :)
Cindy
Love this and always love your fabric choices! Thanks so much for sharing! I too need to make a dent in my scrap bin!:)
Christina
Wow, you have made my life so much easier. I have two other friends and myself expecting a baby in less than 5 weeks and of course I left making gifts down to the wire since one lady is usually 4 weeks early with her babies. So far I've cut enough blocks for one baby quilt and it was so fast and easy. Thank you, thank you, thank you :).
Mary 120 Spring Street
Hi, Allison, you've really created a great idea here - I love the simplicity of the pattern. Like you, sometimes my brain is just tired of learning something new or taking on another time-consuming project. Isn't it great to create something that you can finish in less than a month (or often more)?! The tutorial and charts are so clear, thanks for setting this up for us to use.
Mary
khowardquilts
It is nice to be reminded that quilts don't have to be complicated. A quick quilt is always a good choice for a baby. Parents are more likely to use a quilt that is not too fancy. I might even try something similar with the more random width strips a friend gave me; it would be just a little more planning and probably some trimming. I have already used the longer strips for tube sewn blocks.
Nancy Michael
Thank you for sharing. Great instructions. Very versatile. I used all rose material with black back ground beautiful!
darlene
i'm in love with strippy quilts .. i love making the jellyroll race quilt from missouri star company ... and now, this ... i need to make one for hubbs and my bed ... thank you so much for sharing; there are designers who want you to *buy* {and i get that} but a little *share* is so nice, too .... i can also see sashing between the rows, too .... again, thank you for sharing this darling quilt pattern ...
Allison
Nope I don't! Sorry!
darlene
hmmmm ... don't know what i was thinking ... *sashing* ... really!!! i must still be asleep ... LOL ... i retract that sillyness .... having another look, i see there will be no sashing for sure ... darlene
sandie roderick
how can i get the pattern without all the comments
Allison
Sandi when you go to print it you'll have to change the print settings to include only the pages that don't have the comments on them. The pattern isn't in printable format so you'll still have some of the blog webpage print on those pages. -Allison
Deb
Thank you so much for this tutorial.
I made it u for my grandson.
The only change I made is to use 2.5 inch strips (4) and then cut 8.5 inch blocks.
Kym Landon
Thank you for this cute straightforward quilt pattern. I was a patchwork nutter until struck down by a severe stroke a little over six years ago. With a fabric stash half the size of a Spotlight store I have recently convinced myself to give it a go & this is the "give it a go" pattern that I believe I can do. Fortunately I am right handed & the main disability is with my left arm. With perseverance I can control my rulers for cutting & if I go slowly I am hoping I can manage the sewing. Thank you for a design I think I can accomplish.I will send a photo when I have a result to show. Thank you, thank you!
Chris K.
You might want to look into an Accuquilt Go or similar. I don't even have one, but I've read good things about them, and it would certainly help with the arm problem.
Andrea
Hello allison,
many hanks for the gread quilt tutorial. I`m a beginner and this tutorial is very easy for my. I love your blog and your ideas.
Regards Andrea
pamelajs56
Thank you for the detailed tutorial. Varied widths make the quilt more interesting. I adore it. Very cute!
CPA
Thank you! I love the simplicity of the quilt construction, along with the variety one can achieve by changing the sewing order of the strips. I'm a beginning quilter, so I love projects like this. I also appreciate your detailed, clear instructions and photos :)
LUCINDA DUPUIS
Is it me or can everyone read the yardage. I can't get a landscape view to determine the yardage.
Allison
If you're reading on a phone or tablet you might have to turn it horizontally, on a computer it should look fine though. Hopefully it's just the mobile version!
Peggy
I do a screenshot of the parts I want. Then print them from the photos that they made
Nancy
I love this quilt. It's such a simple design but the effect is so cheery and seemingly effortless. Such a happy quilt, I may make it for me!
Abby
I'm a true beginner so don't have a ton of extra fabric lying around - I'll have to buy almost all of it! If I'm making a queen size quilt, do I really need 34 different fabrics? Or can I get away with less?
Pattymae
I am so glad that I am now subscribing to freequiltpatterns.info/. It led me right to your wonderful tutorial. It has inspired me to tackle my sewing/craft room so that I can make a few of these lovely quilts. I was fortunate to work with a former co-worker, who makes beautiful girl dresses and she gave me loads of her scraps before moving away. I am going to put all the already long strips to great use. Thanks so ever much for a wonderful tutorial!
Pattymae
:) I just signed up to get emails of your posts, looking forward to getting them. Won't want to miss any. I see that I am going to have to set a timer, because I want to browse through all your past postings as well, but gotta get back to that sewing/craft room so I can get started on making these lovely quilts!
Ruth Toles
I love this quilt and the simple pattern! I am new to quilting and 72 years old - and cannot do 1/4" seams. How do I adjust fabric needed for 1/2" seams please? I have the perfect assortment of fabrics which came in one large bag and each different fabric is large pieces. Found at St.Vincent's Thrift Store for $3.00!
I would love to have the PDF pattern-directions please.
Shannon
I had cut strips for another pattern but like this better! Thanks!