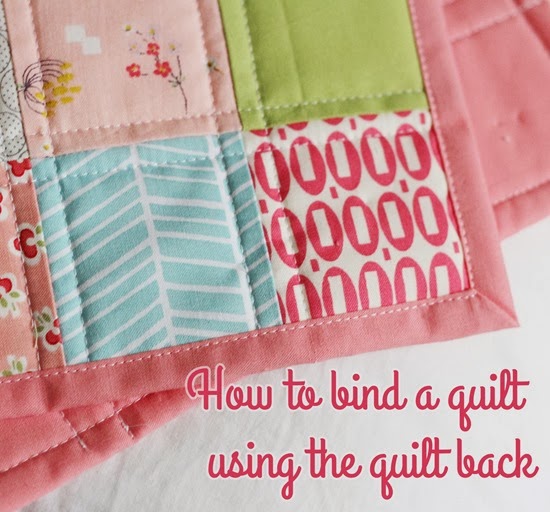
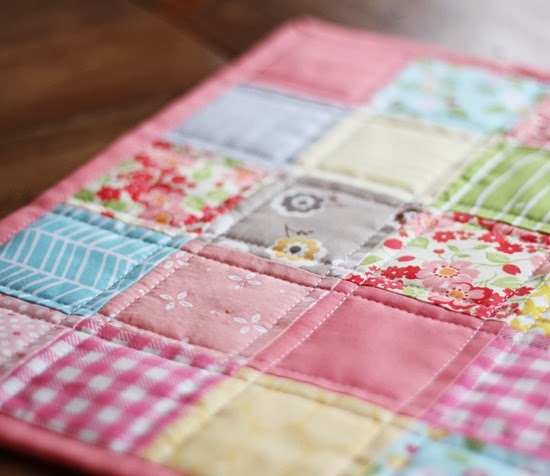
I made a doll quilt before Christmas and realized I’d never posted a tutorial on this quick and easy binding method. Since I know a lot of you are beginners…this is a really great way to dip your toes into binding a quilt. I especially love it for small things like hot pads, table toppers, or a mini quilt.
1. Baste your quilt. Normally I would cut the batting the exact same size as the quilt top…but in these pictures using this method was an afterthought. Believe me though…it’s much much easier to start with the batting the same size as the quilt top!
![IMG_2769_thumb[1]](jpg/img_2769_thumb1.jpg)
2. Quilt like normal…except make sure none of your stitches go into the batting. Start and stop all of your quilting stitches on the quilt top and backstitch.

3. Carefully cut the batting away (if it was a bit larger than the quilt top). This is tricky if you’ve quilted to the edge…which is why I recommend keeping your batting the exact same size as your quilt top before you start. I’ve cut through many backings by accident doing this!
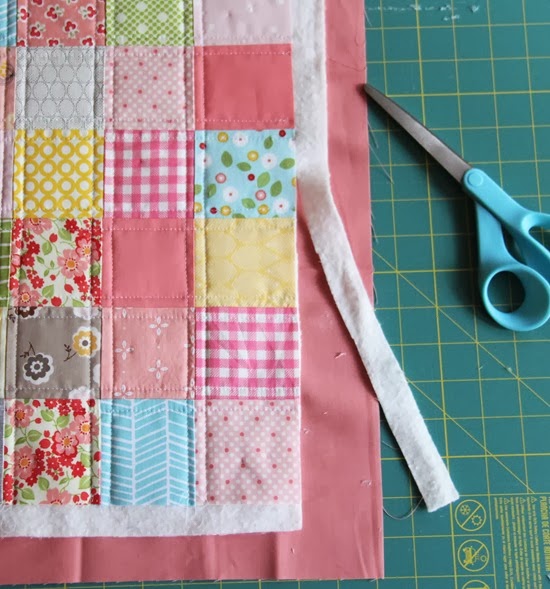
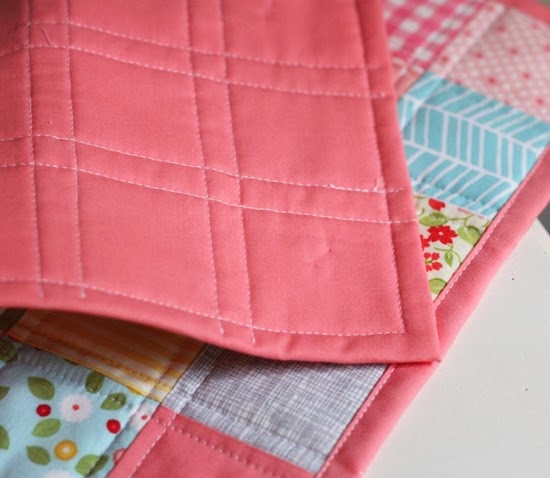
4. Trim the backing fabric, leaving 1” around all sides of the quilt top.

5. Start anywhere, and fold the binding over halfway…
![IMG_2791_thumb[1]](jpg/img_2791_thumb1.jpg)
…and then in half again, and pin. You can do this on your ironing board and press it as you go…it makes it very simple. Fold all the way down to the next edge.
![IMG_2800_thumb[1]](jpg/img_2800_thumb1.jpg)
6. When you get to a corner, fold the corner up like so…
![IMG_2803_thumb[1]](jpg/img_2803_thumb1.jpg)
…then fold the next edge in half…
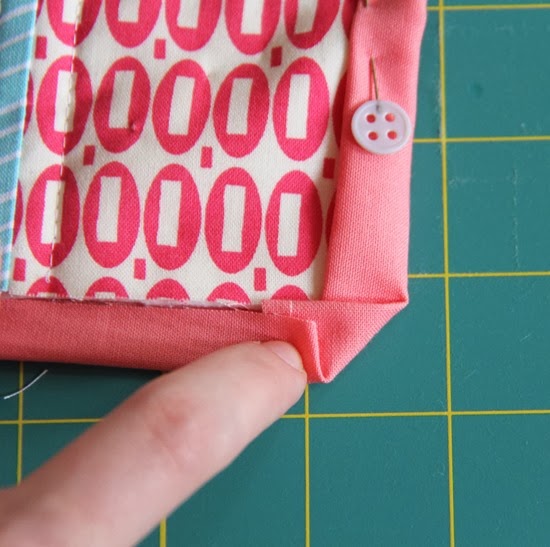
…and in half again to make a nice mitered corner. Pin it in place. You might have to play with the corner a bit, but once you actually do this it will make sense.
Continue until you’ve folded and pinned the binding around the whole quilt.
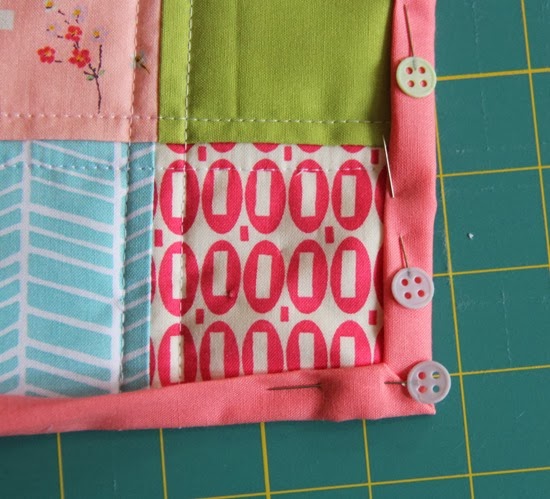
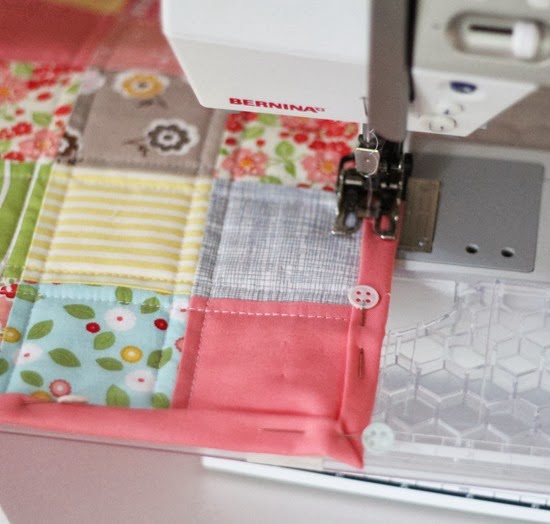
7. Sew it down using a walking foot, right along the edge of the binding. Sew to the corner and leave the needle in the fabric as you lift the presser foot and turn to go down the next edge. Easy as pie.
Now there are a couple of reasons I don’t love this method:
1. It’s hard to square up the quilt and keep the edges nice and straight. So I only use this on small things.
2. You have to plan so your backing fabric will also look great as your binding fabric.
3. If you quilt to the edge of your quilt top…you’re going to see it in the binding of the quilt on the back. I normally wouldn’t quilt to the edge using this method and instead quilt 1” away from the edge or so…but it was an afterthought with this little quilt.
And there you go…an easy way to do bindings! If you’re a beginner who is mastering bindings…here’s my other tutorial on a Machine Binding a quilt.


Linda K
That´s a perfect idea. Thank you so much for that.
Greetings from Germany,
Linda :)
Lynda
thanks for this tip - your instructions were very clear and helpful - will try this out on my next small quilt.
margaret
thank you for these instructions, sounds much easier than a separate binding and looks good too
Melissa @ My Recent Favorite Books
Thanks for the helpful tips!
Happy New Year!
Rebecca Alonzo
Thank you so much . I am going to try this great tip on my grandson's quilt.
Teje Karjalainen
Hi! Thank you for a great idea and tutorial! Often I have been thinking that normal binding needs too much fabric and time when making something small. This looks great and if we like, we could plan the backing so that there is a stripe with other colour. Happy NEW Year! x Teje
Mokki stevenson
Great tutorial. I'm a newbie when it comes to quilts so this is really useful. Thank you.
Jana
Thank you for great tutorial. I was wonderring how to do this so I am so happy I can try it. Thanks.
Gene Black
I have tried to do this before but I didn't know how to deal with the corners! Thanks so much.
Elsa
Such a pretty quilt and love the quilting ~ straight lines are the best!
I've done this method a few times but usually on a smaller quilt. It really saves time and looks great too!
Quiltingranny
Awesome tutorial. When I first started quilting this is how I did it because I didn't know about binding at all!
Sarah Marie
What a wonderful tutorial! This is also a great way to bind mug rugs as well. This technique is what I used for some of my kid's quilts, and they are holding up great :)
paulette
Excellent toot!! Crystal clear instructions and great pics!
P
Amber Colby
Very cool trick, and a super cute choice in fabrics too!
Frambooske
Thank you for sharing! What a great idea, I'll definitely try this out - woop :)
Vanessa D
This is great. Thanks for the binding tip! I'll have to make a table runner just so I can try this technique out. haha Where did you get your pins btw? They are so cute!
Lana
Great photos...and a great technique! I am going to try this!
Thank you for sharing.
QuarterMileQuilts
So great Alison! I've been using this method for years (it's how I learned to quilt) and use it to teach my friends. I'll have to reference your wonderful tutorial now, especially with such fabulous photos! Best, Kate
Kay
Thank you so much for this, I will be giving this a try soon.
Pickletoes Quilts
Thanks for the great tutorial! I'm always looking for binding shortcuts!
hron
Your tutorial is so clear and your photos are so helpful! This helps me SO MUCH!!!! I create miniature quilts and all is beautiful, but I'm terrified of BINDING!!!! Tee, hee.
excuseme23
Nice of you to share your expertise with us, beautiful doll quilt.
Julia
Thank you for teaching me this! I've learned so much from you on your blog. All the way from how to piece together batting to sewing together HST's with using tape. Your pictures are lovely. Thanks again for taking the time to share with all of us who are learning but don't have a physical person close who knows how to quilt to show us!
Virginia Frederickson
I used your instructions to bind a small project that I am doing. It is the first time that I did binding like this and it turned out great. Thank you so much for sharing.
allison
I'm so glad it was helpful for you Julia!!! Have a great day! -Al
Lilpuddin
I love this method! Thanks for sharing a brilliant idea
Karen F.
I'm a handquilter and I've been binding all my quilts this way for 30 years or so. The only thing I do different is when I fold the 1" of backing over, I slide the edge under the batting about 1/8" of an inch. That way, when I make the second fold a double layer of binding covers the quilt edge.
I was looking at one of my daughter's quilts the other day that I made in the mid-80s. The binding has worn thru so I need to replace it. This time, I'll use bias binding just like I would on any old quilt that needed a new one.
Rosa
Great idea and sure I`ll try it and gorgeous fabrics.Thanks
Angela @ Cottage Magpie
What a cute little quilt! ~Angela~
Adrienne @ Chezzetcook Modern Quilts
This is awesome! Thank you :)
Di~
It looks really good! Thanks!
thepalmierifamily
I was just about to do this on a baby quilt, and it turned out great. Thanks for the help!
Alex Duenkel
Thanks for sharing... especially the photos of how to do the corners! I will be sure to give this a try.
Palak
This is my favorite way to bind a quilt! I'm featuring this at my frugal sewing site Sewistry next week: http://sewistry.com/2014/01/cheaper-way-bind-quilt/. Please let me know of any concerns.
Suzanne
Thank you for inspiring me to try this method. For baby quilts and quick ones, it sure saves time.
Susie in the country
Thanks for sharing this method. I am a beginner sewer and will certainly try this on a future baby quilt I am going to try. I will work my way up to piece binding when I have more confidence in my sewing. I hate to make a mistake in sewing as it is a more expensive hobby than say crocheting or knitting where one can frog it.
Victoria Guthrie
Great tutorial! Thanks! x http://www.craftygoodness.co.uk
Cindy Mizer
This method works really well with Mugrugs.
Liz
Great tutorial! I was especially interested in how the corners were handled.
Very clean and concise.
Liz
OPQuilt
In the way old days we used to bind all our quilts this way. Now that some of those quilts are approaching their third decade, the edges are wearing out. And now it's not easy to re-bind them. I know no one plans to have quilts around for 20+ years, but it happens. One day you wake up and that quilt is still here, but now with worn edges that need a new binding (quilt is still going strong). Having older quilts around gives a perspective on solid vs. shoddy construction, too.
Glad you mentioned your dislikes. Since I'm an older quilter, I see also what time does, too.
I love reading your blog, but don't always comment--you have such fresh and beautiful designs (esp. love your new patterns!).
Elizabeth
opquilt.com
Katy
Thanks! Used this today to bind my first quilt! :)
Elizabeth
I love this! Thank you for posting it! I plan to make one.
One funny thing, I kept wondering why you were adding a button to the binding! I thought maybe you were just showing the width of the binding. Finally, while showing my daughter, I realized it was part of the pin!
Elizabeth
I love this! Thank you for posting it! I plan to make one.
One funny thing, I kept wondering why you were adding a button to the binding! I thought maybe you were just showing the width of the binding. Finally, while showing my daughter, I realized it was part of the pin!
Emily Carnes
Thanks for this great tutorial! I am about to do this on a baby quilt. Glad I found your photos and detail on how to fold the corners!
Emily at backtothecraft.blogspot.ca
Paqui Galán
Gracias por compartir tus conocimientos .. :)
http://dreamspaki.blogspot.com.es/
CarolT
I just found this post when I asked google how to self bind a quilt. Thank you for this. I am now helping at church to make quilts that we send Lutheran Word Relief for charity. I wasn't sure if I did the mitre corner right. When I read your post, I found out that I did it right.
Amy Clausen
Hi - I just finished a summer pinwheel table runner, backed with a printed seersucker (yay for the clearance rack!) and found that this tutorial was perfect for a small project like that! Thank you!
Life of Here and Now
This is SUCH a time-saver!!! It only took me about 15-20 minutes to bind a 64 inch by 76 inch throw quilt. :)
Lisa Clark
I love this idea. I am a newbie quilter so I really want to try this.
Lynda Halliger Otvos (Lynda M O)
Allison, this is my favorite way of binding a quilt. I have done it this way since I began two years ago despite never having seen it done. I had seen only strip bindings where you have to do the bias folding. Well, once I saw in my own studio the easiness of this method, I was sold. Just like tying instead of trying to quilt on my tiny Singer.
Love your blog, your designs, and your openness and sharing. Thanks very much.
judygold
Thanks for the tutorial. This is a great way to bind little items, like coasters or mug rugs.
Lillibeth
Thank you for this clear tutorial! I found it on a google search. I've messed up so many corners of self-bindings over the years! I never could seem to get the folds to stay right. My latest project turned out perfectly.
lizzyanne
This was the way that I first learnt to bind quilts back in the 1980s and was glad to move on to present day methods. However, it's a very good way for quick, machined binding instead of having to sew by hand on the back. Thanks for the reminder.
Roha
Thank you so much for the tutorial. Is it possible to use this method for large items such as a lap quilt? Thank you again for inspiration and lessons. God bless.
Rohini
Rosiebee
Thanks for such clear pictures and text. I'd previously struggled with my corners. I used this method to bind a bed runner. It was my first attempt at free quilting and as I was concerned about untidy loopy stitches showing through on the back of the quilt I used a piece of sheeting to back the quilt. I then used a 'good' piece of fabric to back and bind the finished quilt. Thanks again. Brenda K
Kate
I just tried this - thank you very much for your excellent how-to. :)
Sirinadesigns
I have been struggling with this problem for a while and could never get a neat finish. Then I found your post which is the clearest that I have found and now have no problem finishing my quilts.
Thank you for a helpful post.
Cheryl Barron
Thank you sooooo much. I've been learning to quilt now for about a year, and binding seems to be my greatest challenge, but this is the first tutorial that I feel I can actually accomplish without the stress of trying to finish my project. Thank you again so very much for sharing
Lynn Reedy
I found your blog via Pinterest and so glad I did. This is exactly what I have been searching for. I am a very new beginner quilter. A friend of mine started a quilt for my little guy. She started the binding using the backing and she started by hand stitching. Well it was taking soooo long for her to finish this quilt (that I had every intention to do myself but she decided she was going to make it, well insisted) after months of waiting for the quilt I finally went and picked it up and insisted machine sewing would be faster then hand stitching. Considering I stay so busy with our farm the little one and our rescue kennel I didn't want to hand stitch this quilt with all the dogs and a little one always wanting right in the mix of things. I can't wait to get this quilt finished which was suppose to been done before Christmas ☺️ Now I will definitely be getting on This today !!! Thanks so much for all your tutorials they are all so helpful to us beginners and ALL of your quilts are just beautiful !!
Christine Pierson
Thank you so much for this tutorial, this is a nice and quick way to complete small projects. By the way, at mitered corner, I did cut off some fabric to reduce the bulk.
Thanks again.
Christine
Jacqui Delchau
Perfect, clear instructions, this technique will be well worth trying on small items. Thankyou for sharing.
Susie in the country
Thanks for the clear and concise tutorial. I'm also a newbie. You do say to use this technique on small things and everyone has a different idea what a small thing is, so a baby quilt or lap/throw size or smaller? thanks again. I will certainly attempt to try this.
Kris
Would it be okay to link to your binding tutorial on our guild blog page. I love how simple you make this look.
Lynne
Thank you, I'm about to start my first ever quilt and this method looks very neat and certainly less daunting.
Kay
I love the way you machine quilted the squares! and thank you for the easy to understand tutorial using back piece as binding. Working on a toddler size one tomorrow and needed this instruction!
Linda Webb
This is the easiest thing I've seen yet. You made my day. I was just getting to finish a baby quilt and didn't want to spend a lot of time on it. This will be the cats Meow. Thank you, Linda's Quilts
Cindy
After using this method on a large quilt, I will never go back to any other. It's easy and the best part is that you don't have to piece together fabric to make a binding.
lyckoslumpen
Great tutorial! Used this as help when finishing my first quilt ever this sunday and it turned out great (for a first quilt, I still have lots to learn...) ! Thank you for a great and inspiring blog :-)
Jayne
Great for placemats!! Thanks!
Rita
Thank you! Just beginning quilting and loved this binding method. Helped me get my first project done quickly and easily.
momma Byrd
I am a beginner and haven't started my first quilt or binding, but I could totally follow your tutorial! Thank you for leaving in your mistakes! makes it easier for a beginner like me to remember the tips and see to not do the same thing!
Lynn Gluyas
I'm a new quilter also and found your blog with lovely pics very helpful, great to have another option for binding....I did not know this one :-)
Jo-Ann
Thank you so much I just finished my first baby quilt with your method I think this will work for table toppers.
Rona J Monahan
Thank you so very very much. I have developed arthritic hands, fingers and wrist. I no longer can hand sew my bindings. Your tutorial using your quilt back is so excellent, I put the picture of your mitered corner right in front of me and it turned out perfectly. Thank you again....Pearlybear
ncpacs
Thank you for your simple instructions on finishing corners. Very valuable and helped me to finally finish a quilt that has been on the go for 6 years!
jamie
thank you for sharing this! i usually bind my quilts the traditional way, so whenever i decide to use this method i have to check back on your site to refresh my memory. today, however, i must have food on my brain, because i opened this post and started scrolling down through the text and photos, looking for the recipe. when i realized there wasn't a recipe for christmas cookies (or whatever i was subconsciously looking for), i had a good laugh. so thanks again!
Allison
How funny! You are in Christmas mode for sure! ;)
Carol Mattson
Saved my life. I've always used binding strips and self binding a pair of pot holders threw me for a loop! Just couldn't figure out what to do with all of the extra fabric at the corners. Thank you!
Allison
I'm so glad it helped!!
Crystal Doddridge
I accidentally cut the backing fabric in 2 places when trimming the batting. Is there any way to still bind with backing?
Allison
You'd have to stitch it back together where you trimmed it off, tricky but possible!
twemyss
Did you mean don't quilt right up to the edge? Bit confused
dianne
I love your pictures and explanations. Thank you.
My question: My backing is Cuddle fabric and I'd like to make a fairly wide wrap to the front for the binding. Would it work to leave the batting larger than the quilt top so it will help give body to the trim? I'm thinking of making 1.5 inch binding with the quilt back.
Stef
Loved the tutorial. It was just what i needed the other day! Thanks heaps :)
Kelli
Newbie here, working on my first quilt top still. I plan to bind this way eventually, but step 2 is confusing me. "Quilt like normal…except make sure none of your stitches go into the batting. Start and stop all of your quilting stitches on the quilt top and backstitch" Isn't normal quilting stitching through all 3 layers, top, batting, and backing?
Thanks to anyone who can help!
Marie
Kellie, under photo 2, I think she means don't branch off into the batting that extends beyond the quilt top in that photo.
You are right, you do need to quilt through the three layers.
Traditional binding methods are best but this is a quicker method for smaller projects.
Good luck!
Allison
Sorry I didn't see your comment Kelli! Yes Marie is right, usually when you quilt you start and stop off the quilt top on the batting. In this case though since you are going to be cutting the batting away, you need to be able to fit your scissors in between the quilt back and batting to cut it away, and if there is stitching on the batting it's really hard to cut it away!
Julie
Hi. I am a beginner sewer for the past 35 years! 🤣🤣🤣 I was really never taught how to sew, I just always try to fumble through spontaneous sporadic projects.👍 So, I’m sorry if this question seems dumb but I really did think about this long and hard before asking. In the above, you say something similar to you “normally wouldn’t quilt into the binding zone” and then continue on to say ~ “to measure 1inch from the quilt edge (inward) and quilt to that line.” I get it. The idea is to stop quilting one inch from the edge of the top piece (the pieced side) and then the quilting will not run into the back fabric as it’s turned on itself to create the binding. Right? But here’s where my thinking went, if you measure outward on the back fabric, 1 Inch from the edge of your completed quilted top piece, cut it, then fold it on itself, then that reduces that fabric to a measurement of 1/2 Inch, then it’s that 1/2 Inch that is then folded over the top quilted piece to become the binding. Do you see where I’m going with this? So.... I’m thinking that means my securing seam (sewing the “binding” through all of the fabrics) means that my “binding” seam will be approximately 1/2 Inch from the overall quilt edge. Not 1 Inch. So, if I had stopped my quilting runs 1 Inch from the edge of my top piece, that means all of my quilting will stop short of that “binding seam” by 1/2 Inch. Am I totally wrong in my thinking? Because I don’t think that’s what you want, right? The idea, I think, is to have the quilting meet the edge of your binding seam and not cross into it but also not to be short of it either. Right? So...? Is the answer to quilt to 1/2 Inch (inward) from the top piece edge, if we use your cut measurements? Or is the answer to cut the back fabric at 2 inches from the edge of top piece, fold over itself, leaving 1 Inch to then be folded over the top piece, thus the quilted seams, which according to instructions are stopped at the 1 Inch mark, will then meet that binding seam?
Or.......again,.... am I totally way off and not understanding?
Sorry for the length but I wanted to be sure you understood my thinking and then I was hopeful you could tell me where my thinking went left and got this wrong or if my thinking might be correct. Lol🤣🤣🤣 I just don’t have a clue which it will be. 🤣🤣
Thanks! Btw... love your tutorials! 💖💖
Blessings to you and yours,
Julie 😃
Allison
Julie I think you might be over thinking this! ;) LOL! Normally when I free motion quilt something, a start and stop the quilting on the batting/backing. For this tutorial, you simply just start and stop quilting on the edge of the quilt, where it will be hidden under the binding, because if you stitch on the batting it's hard to cut away the batting. You don't need to stop quilting 1" or 1/2" or anything distance away from the edge...you can quilt right to the edge of the quilt. Watch this video it makes sense: https://www.youtube.com/watch?v=npTvVGouO6Y
Kathy R.
Thank you for the tutorial I kept trying to follow directions in a book, the picture was small & I just didn"t get it. Following your pictures for turning the corners helped and now I have nice corners on my charity quilt. Keep up the good work, I really enjoy your blog.
Allison
I'm so glad it helped!
joystudio
Thanks for this tutorial! I am about to try on my first (mini, doll) quilt.
Carla Bybee
I came across your tutorial on mitered corners months ago with a particular quilt and loved this technique. Now I'm back at it with another quilt that called for this, but couldn't remember how to do it, so I searched the internet for three and a half hours to find you, and YAY! I did! Thank you for the easy to follow instructions and gorgeous photos!
Jane
So great! I found and used your Machine Binding Tutorial on my very first quilt and still use it. Thanks so much.
Allison
I'm so glad!
Donna Bequette
Hi Allison, I am a self taught wanna be quilter and I love your toot. My question for you is this, I am using fleece for my backing and was wondering if you think I should still fold it over twice or do you think it would make it way to bulky? Thank You, Donna
Allison
Hi Donna! Sorry for the late reply! Fleece doesn't fray like normal cotton, so you would be fine only folding it over once. The only reason you might want to fold it over twice is if you want a nice finished looking edge. I've used Minky with this method and only folded it over once, and then I did a zig zag stitch along the edges to secure the binding for decoration and to keep the edges from being too raw.
Mary
Thank you for this. I can understand why you would do it for only small projects. I can see that it would be hard to square a larger quilt. Thanks again.
Priscilla Hennessey
Thanks for this tutorial. Clear and easy to follow.
Allison
I'm glad it worked well for you!
sewadilly
Thank you for this ... this seems as though I could do it. I'm a novice, getting intimidated easily. Thank you again.
Allison
You could do it!
LEANE E. MANGOLD
May I please reference your website to a group who is doing a mug rug swap and want to know how to bind them?
Allison
Yes definitely!
okbetsports.ph
I found this post very interesting and informative. Thank you for sharing your special thoughts with us. My site: okbet 2022
Barbara Schofield
I am folding over the backing to use as my binding and also final row; so therefore it will only go over the edge of the quilt top about 1/8th inch. should the batting extend out to the edge of the binding and does the extreme outer edge need to be stitched or tacked to keep the batting in place?
Jill
Thank you! I've tried many methods and this is the best and easiest!
April
This is my favorite method by far. I use a glue stick to apply glue as I press each fold of the binding and it stays in place so I need fewer clips/pins. Then it's very easy to add the final stitching. Thanks for the tutorial.
JBO
เครื่องหมายด้านในหน้า Lobby
เครื่องหมายข้างในหน้า Lobby จะไม่มีอะไรสลับซับซ้อนโดยมากแล้วผลิตขึ้นมาเพื่อไม่ยุ่งยากต่อการใช้งาน โดยเนื้อหาของเครื่องหมายที่สื่อความหมายจะมีดังนี้ https://www.jbosport.org
BKK
ลีนนอก ของเก๊ส่วนมากจะผลิตออกมาเป็นเส้น หรือหากเป็นเส้นประก็ไม่อาจจะทำเป็นเหมือนกันกับของจริง โดยเหตุนี้พิเคราะห์วันเดือนปีที่ผลิตรวมยอดอายุให้ดี ถ้าว่าพบว่าไม่ใช้เส้นประน่าจะคืนตัวแทนขาย
BKK
ลีนนอก
หาซื้อง่ายรวมทั้งยังมาในราคามือจับควรต้องได้อีกด้วย เยลลี่นอน 7-11 ราคา 40 บาทเท่านั้นประกอบไปด้วยเยลลี่ทั้งหมดทั้งสิ้น 4 เม็ดด้วยกัน กลิ่นองุ่นเคียวโฮ
JBO
https://www.jbosport.org/
การเดิมพันอีสปอร์ตเป็นการแข่งขันต่อสู้เกมที่ดิน เว็บไซต์พนันอีสปอร์ต ได้นำเข้ามาเปิดให้ได้พนัน โดยมากแล้วจะเป็นการชิงชัยที่ใช้ข้อตกลงตามมาตรฐานสากลแล้วหลังจากนั้นก็เป็นการเปิดให้พนันแบบแมตช์ต่อแมตช์