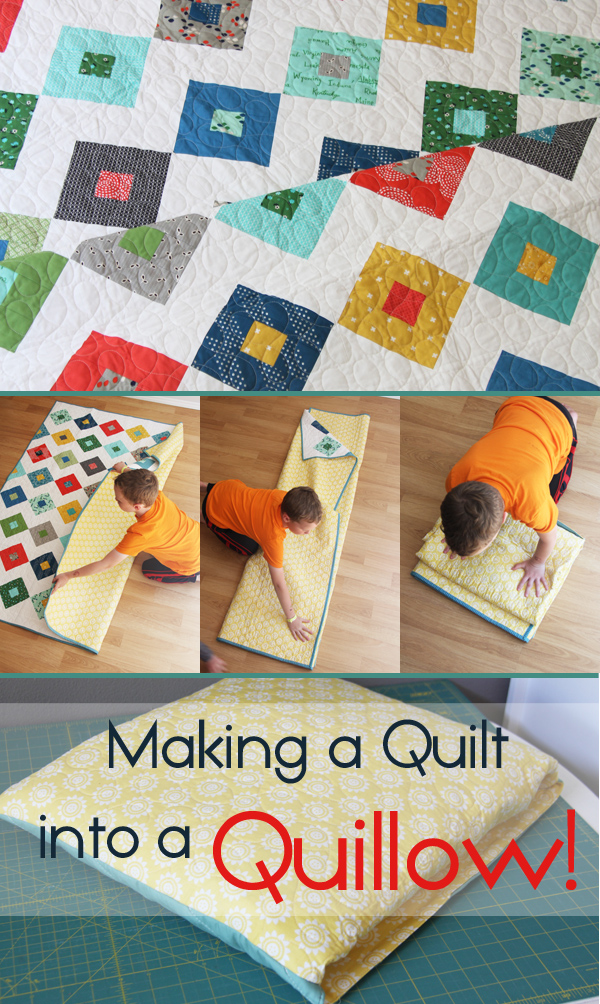
During a family reunion when I was growing up, my Grandma let us grandchildren take turns choosing a quilt to keep. On the back of each quilt a pillow case was sewn to the bottom, and the quilt could be folded up into the pillow case to make a pillow!
A quilt + a pillow = a quillow!
I've had a weird fascination with quillows ever since. I even included a pattern for a quillow in my book! I've been meaning to write this tutorial for years, and hopefully you will find it helpful if you ever find yourself wanting to turn a quilt into a quillow!

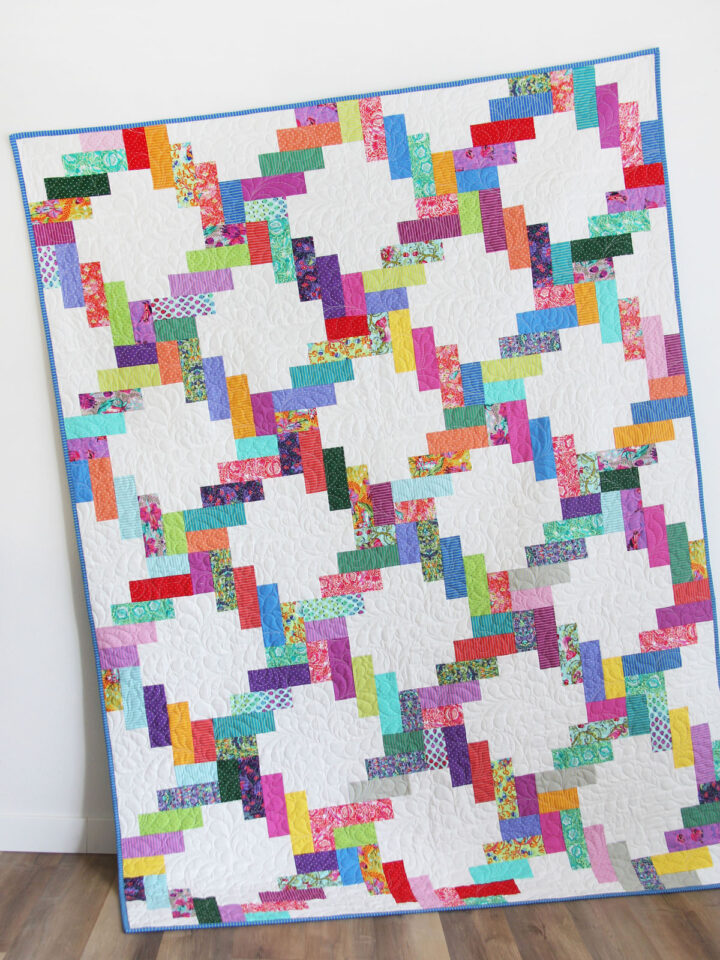
For this tutorial I'm making my Lucky quilt into a quillow, and since my quilt is done, all I have to do is add a pillow cover/pocket to the back of the quilt.
First, figure out how large your pillow cover material needs to be:
- Divide the width of the quilt by 3 = the width of your finished pillow cover.
- Divide the height of the quilt by 4 = the height of your finished pillow cover.
- Add one inch to both measurements to account for the seam allowance (I use ½" seam allowance).
For example, my Lucky quilt is 60" x 73". 60" divided by 3 is 20. 73" divided by 4 is 18 ¼". So I my finished pillow cover needs to be 20" wide, by 18 ¼" high. Add an inch to both of those numbers and that is how large I will cut my pieces of fabric for the pillow, 21" x 19 ¼".
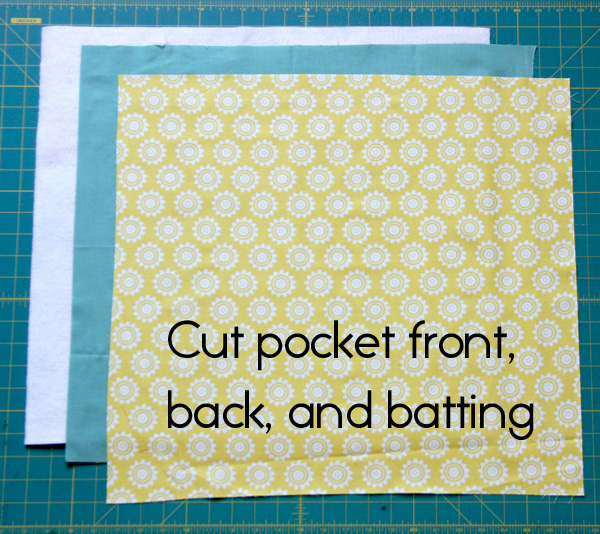
After you know the size to cut your pillow cover fabric, cut a pillow front, a pillow back, and a piece of batting (optional) to that size. I used the same fabric as my backing so my pillow cover would blend in on the back of the quilt. Normally I would have the same fabric for the front and the back of the pillow cover, but for the sake of this tutorial I used a teal fabric.
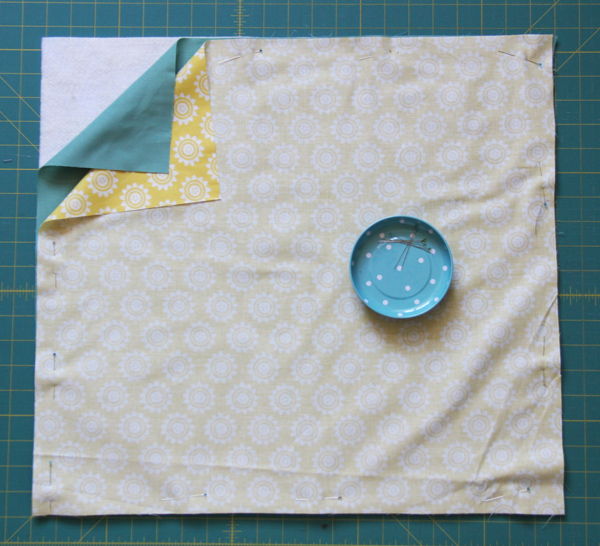
Layer the batting on the bottom, then the pillow back and front fabrics on top of the batting, right sides together. Pin around the edges. Sew along the edges with a ½" seam allowance, leaving a hole at the top (along a wide edge or the top of your pocket) for turning.
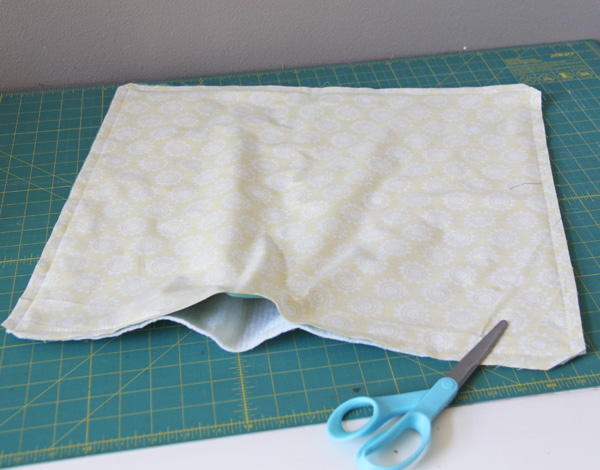
Trim the excess from the corners and turn the pillow cover right side out. Press the edges well. Pin the hole closed, you will sew it shut in the next step, or when you sew the pillow to the quilt.
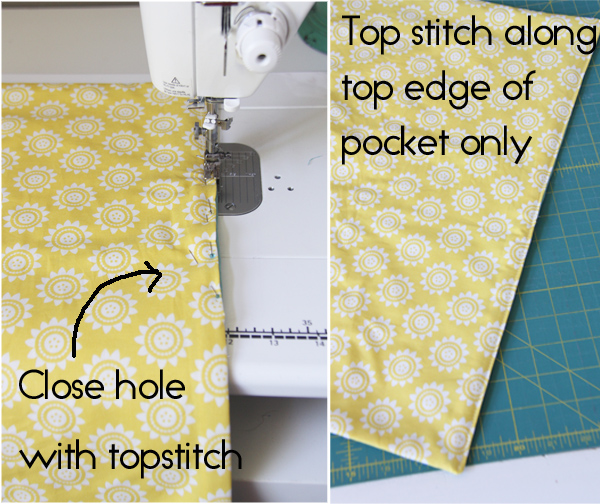
Topstitch along the top (wide) edge of the pillow cover, ⅛" or so from the edge. If your hole from turning is at the top as mine was, sew the hole shut as you sew.
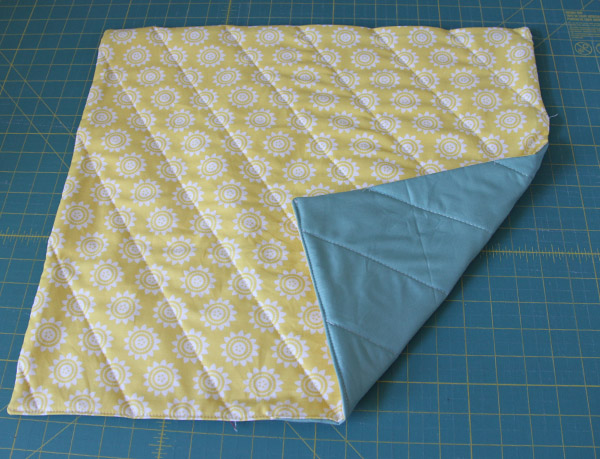
Quilt the pillow cover as desired. Sometimes I don't bother quilting it, but if you have the forethought to quilt the cover in the same pattern as the quilt, it will look amazing!

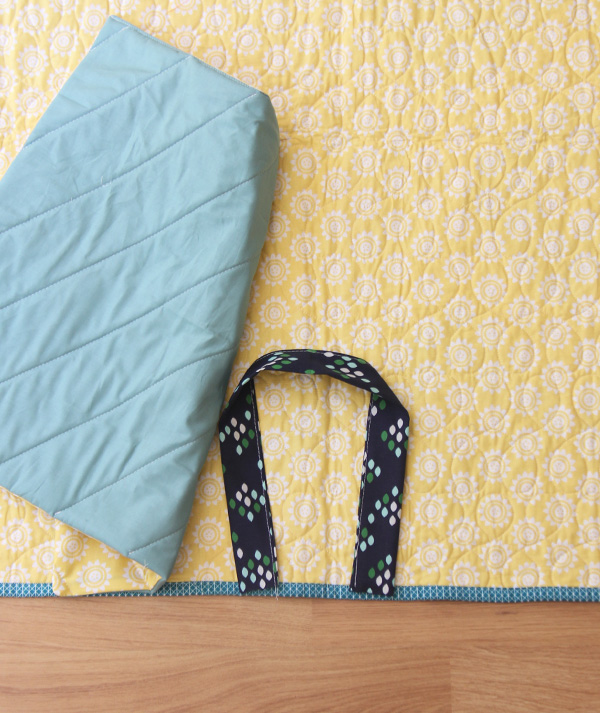
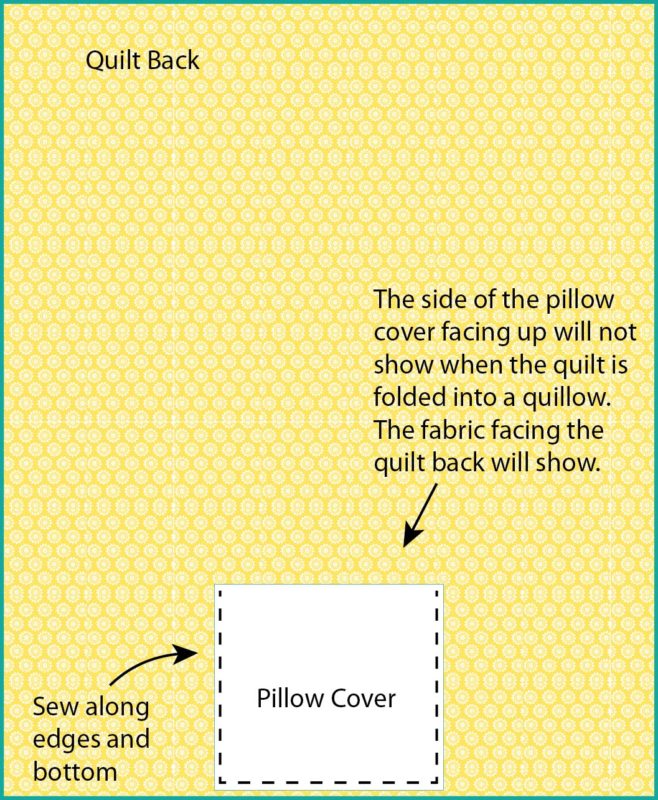
Place the pillow cover on the bottom back of the quilt, centered in the middle and up away from the binding as shown. Pin the edges to the quilt. Sew the sides and the bottom wide edge to the quilt, but do not sew the top! Keep in mind that the pillow cover fabric facing up will NOT show once the quilt is folded into a quillow. The fabric facing the quilt back, will show. Yes...you will see the straight lines of sewing on the quilt front, but usually it blends into the quilting pretty well if you use the same color of thread.
**Just a note that if you wish to add a handle to your quillow, do it before you sew the pillow to the quilt. Make a handle with finished bottom edges (they may show when it's unfolded), and lay it out like shown below and pin to the bottom edge. Place the cover down onto the handle edges, and when you sew the bottom of the pillow cover to the quilt make sure you sew the handles as well. There is a more detailed pattern with handles sewn into the pillow cover in my book.**
Here is an illustration showing the pillow placement if it's easier for you to understand than my pictures:
Once the pillow cover is sewn on you are done! Now to fold your quilt into a quillow!
The first time you will think I'm crazy....but it becomes much easier. I even taught my 7 year old how to do it for the sake of these pictures.
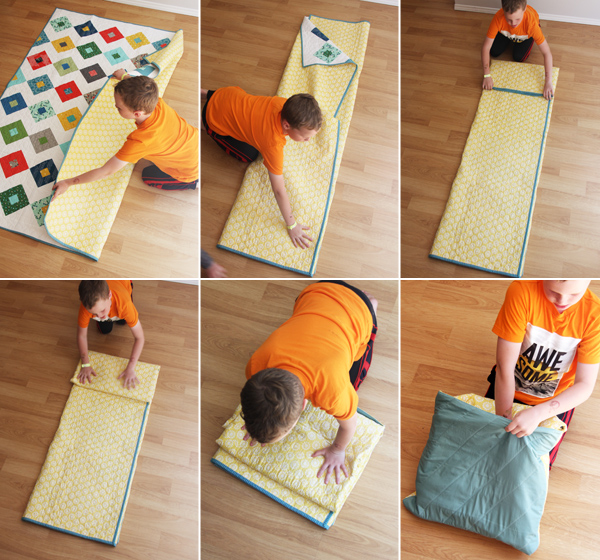
Lay the quilt right side up, with the pillow cover at the bottom. Fold one of the long sides of the quilt to the center, just until you see the edge of the pillow cover at the fold. Repeat with the other side. Fold the quilt down from the top to the bottom four times, the last fold will be resting on top of the pillow pocket. This next part takes some practice, but it's easy once you get the hang of it. I like to flip the folded quilt over on my lap so the pocket is facing me, and turn the pocket inside out, smooshing the quilt into the pocket as you turn it inside out over the quilt. It sounds trickier than it is, and your 7 year old will need help with the last part.
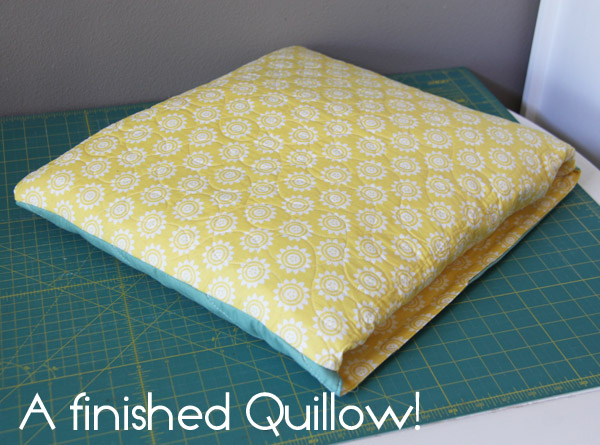
Once it's all folded in there and smoothed out a bit, you're done!
This definitely isn't a full pillow you would want to sleep on unless you were in a pinch, it's more like a flat cushion. My Grandma made quilts with the fluffy polyester batting...and those quilts turned into very fluffy quillows! My picnic quilt in my car is a quillow, and a few of my kids quilts are quillows and I love that I can fold them up and store them easily. It makes a great gift too...tuck a book inside the pocket and they will love unfolding their new quilt!
I have crazy love for quillows. Actually I think I just enjoy saying "quillow" over and over.
Happy quillow making!
Lynne Tilley
Great tutorial. I've been wanting to make a Quillow for years, having seen one at the school I used to work at. This is great!
Janice
Great instructions THANK you. And no useless utubes yeaH
Janice
Di
Thank you for the tutorial - and well done to the seven year old assistant on such a marvellous job of making the folding look so easy!!
Kathleen
I've made these for family members going off to college. I are great for dorm rooms.
Allison
Great idea!
Jean
A QUILLOW! Amazing! Now I must make one! Who knew?! Thank you for the tutorial! - Jean
Cheryl
Thank you for the tutorial. This is a fantastic idea for a kids quilt! Reminds me of the ones that have the pocket for your feet to go into at the bottom too! Thank you.
Allison
Yes! That's the best part....when you are using the quilt you can tuck your feet inside the pocket!
Joyce
I had forgotten about these. In the mid 1990’s I made several of these for Christmas gifts but, never quilted them. I am excited to do some this way. Thank you!
Betty
What a handy thing to know - and your helper did a wonderful job!!! Kudos!
Little Quiltsong
What a wonderful idea. Thank you for the tutorial.
Smiles Too Loudly
Great idea!!! Do your kids ever tuck their feet into the quillow pocket while using it as a quilt? My husband just asked for something like that on a throw quilt since the dog likes to untuck the quilt from his feet. :D
Allison
I am the one who tucks my feet in the pocket...I'm always freezing! ;)
Lisa
Yesterday I was looking up quillow patterns and your book popped up! Thanks for this. I still will be ordering your.
Rosemaryflower
I love this. Thank you for showing me how to make this. I will do this. It is so much better than having a separate bag that just gets misplaced. Great idea, and easy instrucitons
Angie
Love it!! 20 years ago I made a quillow in a class I took in high school called "Fashion and Fabrics." I would have never guessed then that I'd later become so addicted to fabric and quilting!
Allison Harris
How funny!!!
Tina Short
I read the comments and quite a free say just what I'm going to say, the empty pillow case is ideal for tucking your feet into!
Heather
Great explanation! Thanks so much! I will definitely be making a quillow in the future. :)
Ann Sipe
Thanks for this - i have been looking for a tutorial that included the proportions so any quilt could be made into a quillow!
Gayle Allen-Grier
Thank you for this tutorial !! I've been putting off this project but now I feel confident that I can make it correctly.
Sue
I love quillows. Made several over 20 years ago. Still using them today. They make a great gift too.
Janeen
Yea; a quillow tutorial! When I was a kid, my grandma made every one of her grandchildren a quillow (this is amazing to me, with such a big family!) and we LOVED each having our own, made with special prints she picked for us! I never knew quite how to do it, so thanks for the tutorial.
Deborah
Thank you, this is the best tutorial I have found on how to make a quillow.
Allison
I'm so glad!
Catherine
Your tutorial is so clear!, thank you! This seems like a great way to protect quilts when not in use. I think I will add these to my quilts that are already finished.
Ryn (@ReaderRyn)
One of my friends has a couple of quillows and I think she will be happy to have directions on how to make one. :D
Pat
This is great and so easy to follow. I'm just starting to enjoy quilting and I believe this will be a nice piece to work on.
Veronica Hills
So when your stitching the pillow on, you'll see the stitching on the front of the quilt?
Allyn Heald
How can you make it for an adult ?
Allison
You can do this on any size quilt, use the guidelines on the post and you can make one for any adult sized quilt!
Pat E.
Nice idea and a good tutorial. Thank you!
Carol
Thank you. Our quilt guild is making these for foster children. I misplaced the instructions, but your way looks easier.
Allison
They are great for kids and donating! Thanks!
Sureen
A nicely comprehensive explanation - thank you. Can't wait to start mine.
Elaine
How can I make a quillow from scratch, using cotton batting without the seams showing on the front of the quillow? I'm new at sewing but the quillow I got as a gift doesn't show the stitching on the front. Thanks, Elaine
Annette Lunt
I was given a quillow as a birthday present in the 1980's and it was lost in one of my many home moves. I'm so glad that I can now replace it and make some special gifts for my grandkids! Thank you so much.
shamzscrapzChar
I made a quillworts for my son as a baby, he is now 26😃 now its time to make one for my granddaughter. Thanks for the reminder
Julie Coppleman
I recently made my first quillow - did everything to the letter, it looked great, folded it as detailed, turned outside pocket inside out encasing the folded quilt BUT I couldn't fold out the corners! the outside pocket looked like a flat bucket with diagonal shaped corners at the bottom! I top stitched the whole edge of the quilt, including the bottom of the outside cushion 'pocket'. Was this stitching across the bottom of the pocket that caused the folding out problem described?
auian ward
do you have print friendly copies of the free patterns as not to keep running back to the computer page for directions?
Roberta McCarroll
That is my email address
Fleur Butt
Thank you for a most informative tutorial. Just what I was looking for to build my soon to 30yr old son a denim quillow using old jeans.
Denise Prince
My mother made one for me well over 40 years ago. She made it to be a car quilt and it has traveled with me in every car I have owned since she made it. Thank you for the tutorial.
Susan Oxley
Dear Allison,
You are very generous and kind to put up all this information on your blog, I am really grateful for how to turn a quilt into a quillow
I decided that my 50th quilt was to be my last big quilt but I am so tempted by your pattern, especially the cats. I have a feeling that maybe I’ll stop at 100!!
Thank you again for giving me back my mojo xxx Sue in UK
jienhoires
I don't think a small child will be able to fold that but its beautiful. I love your choice of fabric slope! Your quilt is BEAUTIFUL!!!!