
Thank you for all of your great responses to my last Quilting on a Budget post! It is good motivation for me try to save some money and use what I have...so I don't feel guilty buying some of the new cute lines coming out this year! ;)
Ashley posted this fabulous tutorial called two by four last year and I've been itching to use it, but the blocks are bigger than I needed and I wanted to use my leftover jelly roll strips. Her tutorial uses fat quarters and makes a great bed quilt size since the blocks are big!

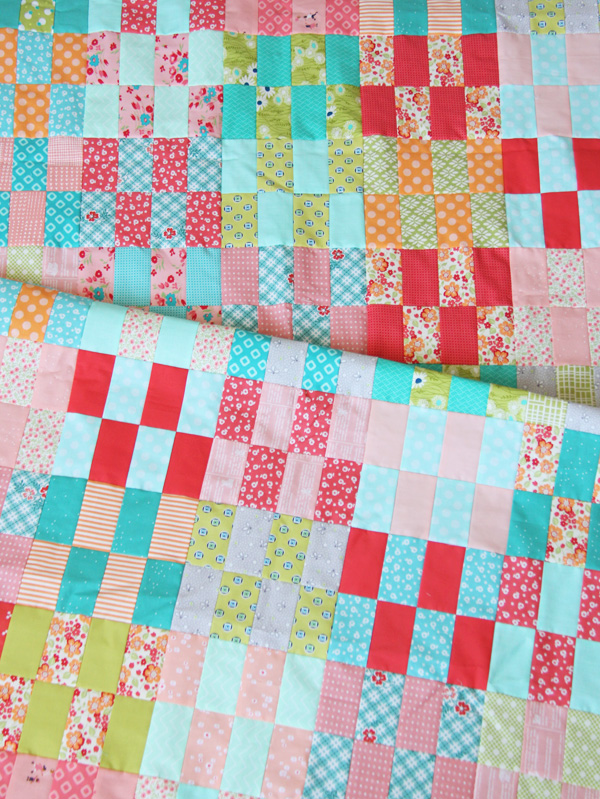
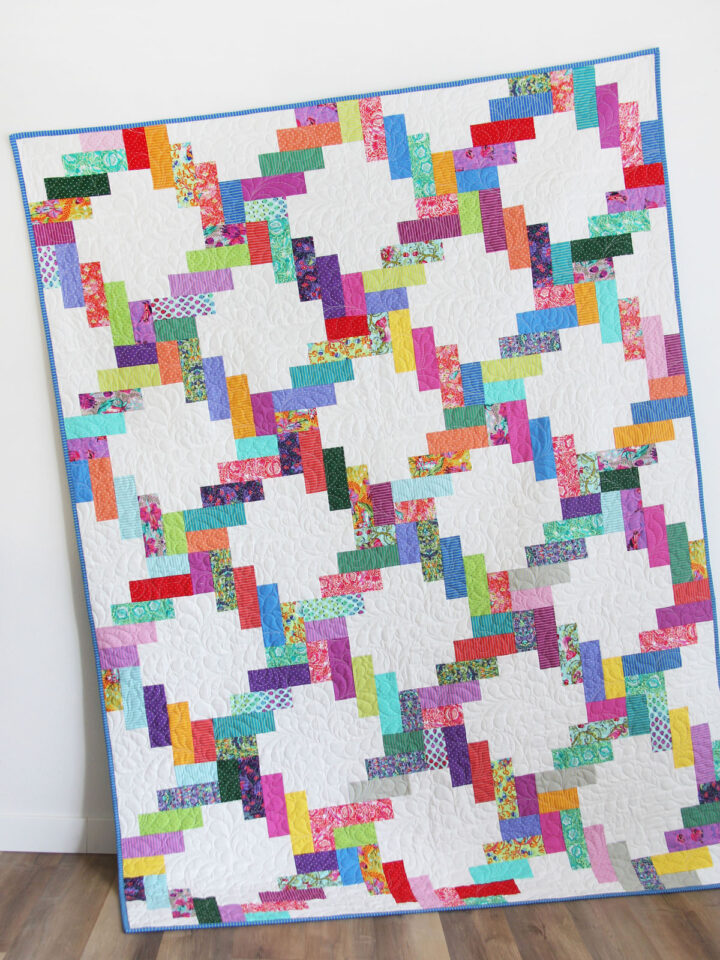
So this is basically a jelly roll strip version of Ashley's tutorial, posted with her permission. Instead of writing out a fancy tutorial I took pictures...so this is the quick version.
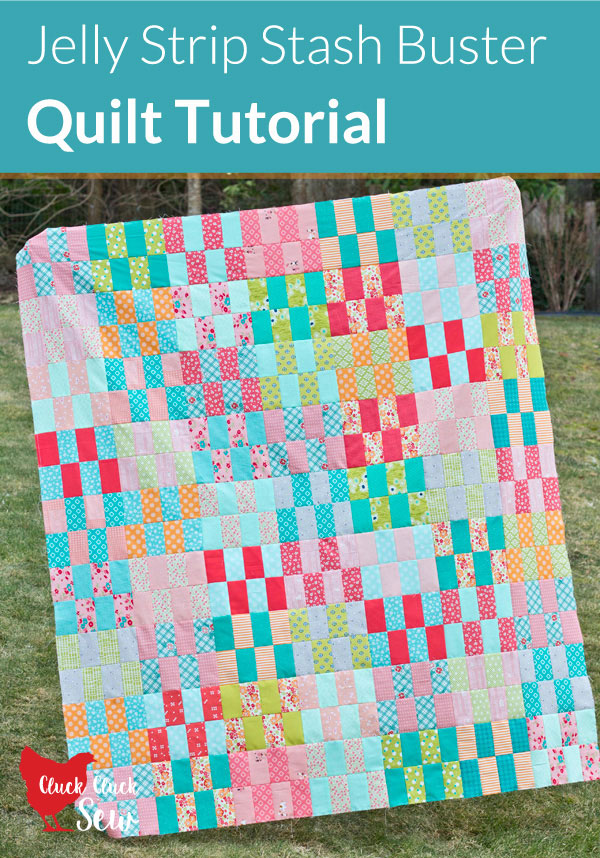
Finished Quilt Size: 56" x 63" , or 56" x 64" if laying the blocks on their side (see bottom of post)
Finished Block size: 7" x 8"
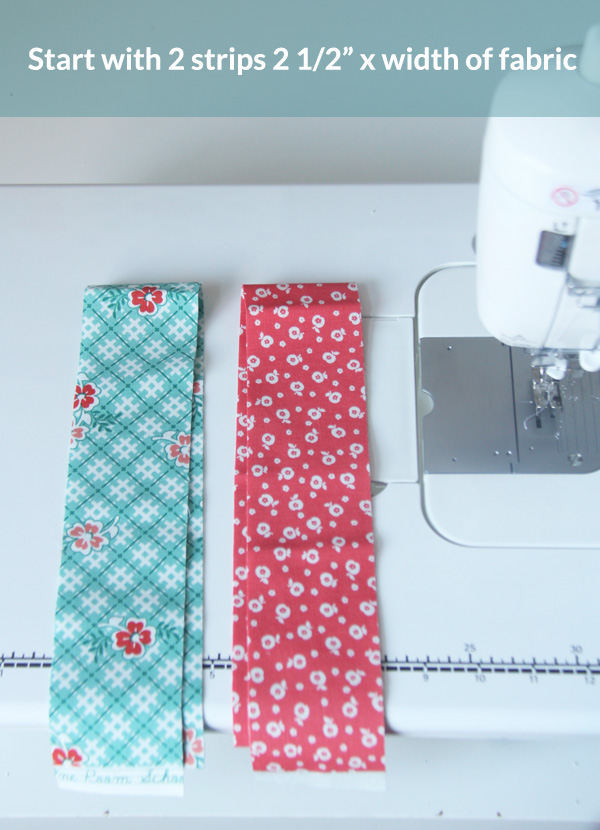
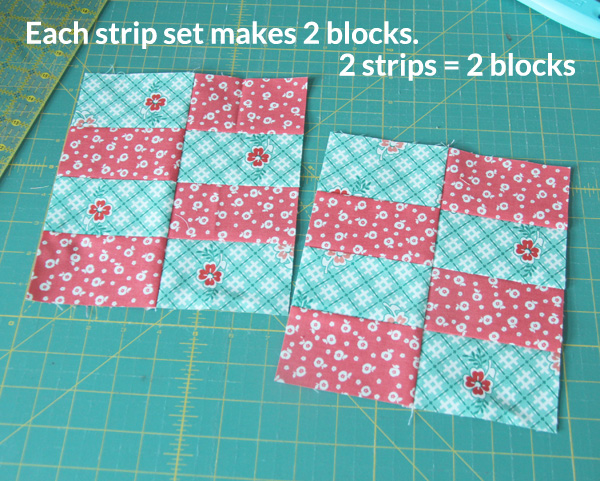
Material Requirements: 63 strips 2 ½" x width of fabric, or 64 strips if laying the blocks on their side. 1 strip = 1 block


I made 63 blocks and laid them out like this, 9 rows and 7 blocks in each row, 63 blocks, 56" x 63":
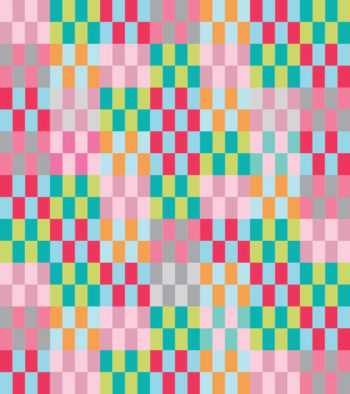
Or you can set the blocks the other way and do 8 rows of 8 blocks each, 64 blocks, 56" x 64":
You can rotate the blocks so that the seams nest if you're really a go-getter. :)
I feel like I'm missing something (don't you hate that feeling?) so if you see something I missed stick it in the comments below and I'll answer it there. Happy stash/scrap busting!
Betsy
I love this! My plan is to start a quilt next month after I get my house in order. Thank you so much!
Pam Arbour
I really like how you simplified that in your tutorial. I am thinking about trying it with RSC17 at So Scrappy. I am trying to sew up my scraps as well. I have so many of them!
lswanekamp
Thank you! I am always looking for scrap quilts that I can make and give away as comfort quilts. I cut scraps into WOF strips and this is terrific.
Cindy in NC
Thanks for another great tutorial -- simple, budget-friendly, and big on wow factor.
Sue
I love this pattern I'm going make one.could I do it as a quilt as I go
Robby
I thought I filed this when Ashley showed her tutorial, but it seems not. Thanks for the great reminder and your clever quick variation. Funny how making rectangles instead of squares makes this familiar layout fresh again. Great photos, too.
Vicki
I love the colors you chose, and the solids!
Sheila Otte
What a cool looking quilt and easy too!!! Love it! Thanks for sharing!
Anja @ Anja Quilts
Great way to use up 2.5 inch strips. Thanks for sharing.
Kay
I love how simple this is. Thanks for a great tutorial. x
pamelajs56
I love it! Beautifully done! Thank you for sharing this quilt.
Anthea
Really great way to use up bits & pieces - we all seem to have so many of them!
Connie Teasley
L💟ve it! This is in my plans for my next project! Perfect!
Ann Becker
I love it. I have been hoarding jelly rolls. Great quilt for using up one of my rolls. Hmmm. Now which one to choose. Decisions decisions.
Libby
Love the simple tutorial...........love, love the quilt. Thanks for sharing !
You're awesome !!
kathy o
I'm busting out my jelly roll that I've saved for the perfect pattern - this is it! Thank you! I love it!
Tracy Minyard
This is the coolest Jelly Roll quilt I have ever seen. Can't wait to make one. Thank you!
Charlotta Bright Norby
Just love this; and I've been looking for a pattern to use with these 2 1/2" strips I have. Found it! Thank you so much. Wish I could go to work on it right now. Unfortunately, several Works in Progress must take precedence. But it's a relief to know what I'll be doing with my strips.
Kim Tomkinson
I love this. Thank you. I wanted to make a quick quilt for my sister and this is perfect.
pgtrans
LOVE, LOVE, LOVE THIS!!! I have a "thing" for jelly rolls and an overabundance (the first step is realizing you have a problem, right???). This is something I'd really like to do!!! Thanks for taking the pictures and showing us step by step. You sure make it easy and "doable". I appreciate you and all you do!!!
Allison
Thank you and it really is super easy! You'll whip it out! :)
Staci
Oh, aren't you timely? I have a stack of left over 2.5 inch strips from a quilt top I'm working on right now. Have been trying to figure out what in the world to do with them! THANK YOU!
Teri
Such a cheerful quilt.
Jane Sprague
I just love the scrappy look of this quilt! I have so many jelly rolls that I could use. Where do I start???
Rena
Hi Allison
Thank you so much for the last two posts. You have helped me stop and refocus. You reminded me that I did not need that latest "to die for" fabric bundle (I was trying to justify the cost .... without a lot of success!!!) and you have provided some amazing scrappy ideas and links to sew.
Love your work and your generosity. Thanks again.
Allison
I'm glad you enjoyed them and thanks for visiting!
Sherry B
Love your quilt and love your photo tutorial...so much, in fact, that I started pulling out my scraps to start my own project. I finished my blocks and started laying them out last night. However, I soon found that I miscalculated as I was using shorter strips instead of WOF from fat quarters and scraps, and ended up with only half the blocks I needed. Back to the scrap box. However, I love how the blocks go together quickly. Thank you for a great stash buster pattern that I'll use many, many times!
Allison
Oh bummer! Yes you do need almost the whole strip!
Joan Viers
don't know how many different blocks I need to get, I moved 3 years ago and again another move a year ago-my scraps are gone, need to begin from new fabric-usually thrift stores. And I don't quite how to put them together. Guess I need more help. Where do I find your response? On this page? Will come back tomorrow, hopefully.
indigoannieblog
Thank you so much for the excellent Budget tutorial - I immediately felt invigorated and went to my sewing room and made a whole quilt top last weekend. And today's quilt is just lovely - simple enough to accomplish in my limited free time, fresh and modern.
Colleen
Thank-you so much for this tutorial ! I was going to start on some WIP's this month but instead started one of these quilts. I'm using some left over jelly roll strips from a quilt I made using your 'Breezy' pattern from your wonderful book. I directed a couple of friends to your last post in hopes of getting some more people hooked on quilting in my rural area. Happy New Year to you and your family !
Allison
I'm glad you like it Colleen! Good luck turning some friends into quilters! ;) -Allison
Barb N
So what did I do on a lazy Saturday afternoon? Whip out a jelly roll set that had been languishing in my closet far too long, and started sewing, and cutting. I have only 40 strips from the jelly roll to work with, so I may have to add borders or something? At any rate, it was a pleasant way to spend the afternoon, and totally spontaneous. Thank you!
Allison
I love that you whipped this out! 40 should make a nice lap size maybe? Or at least a great crib size!
Mary Gontjes
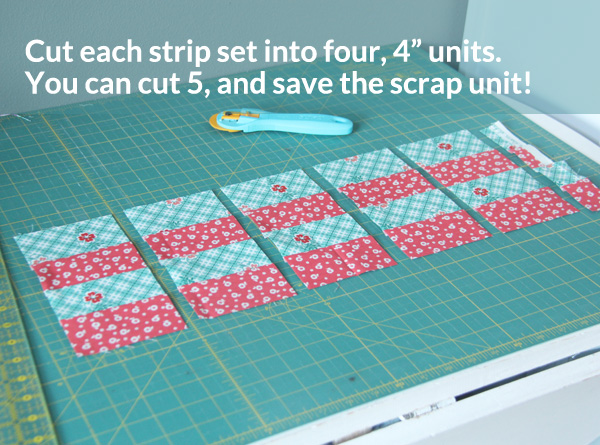
As I am cutting this out tonight. I notice you asked to cut 5 (4inch) strips and sew 2 together to make a 4 unit block...What happens to the extra strip (strip number 5)..do you just sew that up for a random block..?????
Chris
I had two packs of Stonehenge 2 1/2" strips in generally light and dark stone.The blocks are on my wall now waiting to be sewn into strips. It was a great after work project and looks wonderfully mottled like a stone floor. Thank you - I used up all the 64 strips for one large lap or throw. The extras could make up into bed or throw pillows and I may do that.later. Thank you..
Nedra Meister
Tons of colorful beautiful fabric that I found for my most current project at https://persnicketyclothing.com/collections/fabric. I am so in love!
Libba Mary C. Utley
Brilliant. Simple. Effective. Love it. Love the photos as a tutorial. A must do.thank you
Dagmar
I'm new to quilting and sewing and would love to use some of the fabric I found for this! But as a newbie to the craft, what is the best way to finish it off so I don't have all the raw edges? Can someone lead me into the right direction please?
Claire Baldwinsville
I love this! Thanks for sharing your ideas. I make blankets for Project Linus with fabrics donated to my chapter, I have several jelly roll kits that were given to me to work with.
Karen
This quilt is awesome. Your fabric choices make it fun and cheerful. Thanks for sharing a tutorial. I hope to make this one day soon.
Debbie
Great quilt. Love it. Why are we saving the scrap unit???? Just wondering. Thanks.
Yoka Bazilewich
I like that quilt very very much. I love scrap quilts the best will try it with my scraps. Might try your quilting design too once my hand and wrist is healed . I broke it. Thanks for always sharing your quilts with us. It is simple and fun to make I am sure. Happy quilting, Yoka Bazilewich
Patricia Beltran
As usual, a beautiful and easy to make quilt. Thanks for sharing. You are a great teacher.
sissyandme
Perfect beginning project for ladies wanting to donate quilts made from scraps and JR's.. Thanks for sharing the tutorial. I have already passed the link on to others.
Allison
Yes it's a great quilt for donations!! Fast but also great looking!!
Gina Ross
What a great idea! Love it. thanks for sharing.
terrieannie
This just might be the perfect project for my first ever quilt retreat in August!
Kathleen Boden
I like this a lot it is a great way to use those wandering striips that just hang out with no where to go. I was wonder about quilting this would you just do staight line quilting or?
Allison
Either straight line quilting or free motion quilting would look great on this quilt. Really anything looks great on a simple quilt like this...you can't go wrong with anything!
Susan
I looked at this and thought oh wow, I can’t do that all those tiny pieces ! Wow, thank you for breaking it down to easy blocks.....much less scarier and now doable for me a beginner.
B. J. Berlo
I have tons of JR strips that I cut from my stash and this design is perfect. Thanks for the plain and simple tutorial. Think I'll start one tomorrow.
Adrienne
Your tutorials are excellent, and so very clear. Thank you. I might make this as a lap quilt for myself. I love the idea.
Allison
This would make a great lap quilt! It's so easy to change up the size. Happy quilting!
Angela Atkins
OK--I think I did something wrong. I had 64 strips. I'm pretty sure I did. And I've ended up with 32 blocks, which mathematically seems to make sense, with each block using two of those strips. How did you get 64 blocks?
Allison
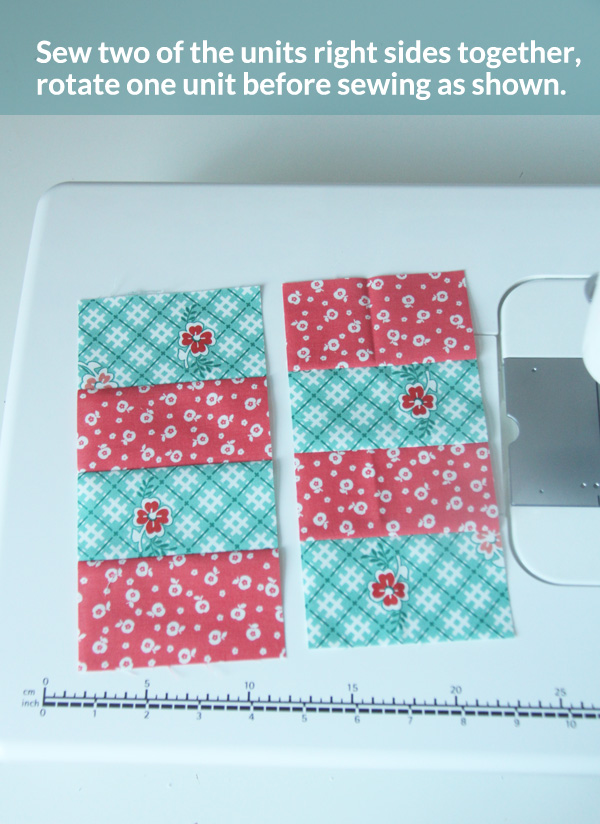
Each set of 2 strips should make 2 blocks. In the top photo I start with 2 strips, then turn those into 2 blocks. So if you had 64 strips to start with, you'd split them into 32 pairs, and each pair makes 2 blocks....so you should end up with 64 blocks still!
Were your strips the correct width? 42" and not 21" fat quarter width? That would be my best guess!
Angela Atkins
I have finally figured out that I did not make two blocks with each two strips. Only now did I figure this out while trying to figure out how to quilt it. So I just ended up with bigger blocks--a 4 x 4 quilt. I will post a picture of it when I finish, because I ended up using the extra off cuts as blocks too to make it work out. Maybe someday I will try again and do it your way!
Allison
I'm glad you figured it out! It sounds like you made it work for you anyways...that's all that matters!!
Colleen
This is fantastic - I am definitely making this quilt with my stash of jelly rolls. I am inspired to start it this week. Many thanks for the simple and straightforward tutorial!
Tina
Magic, but if you make one strip 1 1/4 and rotate you don't have to match seams. Even more wonderful. Mine is very scrappy and it looks great! Diminished the piles in my quilting leftovers box
Allison
Yes! My Scrappy Strips quilt is just like that...and no matching seams!
Betty Grove
Another winner! I have my favorite designers and when I see Cluck Cluck Sew I know I'm in for a treat. Many thanks.
CHERYL FARNSWORTH
love the colors you do a 2 1/2 wide strips but how long are the strips.want to make this for my great granddaughter she loved the colors when we were looking at quits here she picked this one.
Allison
Hi Cheryl! The strips are just the width of the fabric (so in real fabric terms the 2 1/2" is the length, and the width would be the inches from selvage to selvage, usually 44"). Most quilting fabric from the store has a width of 44", so you can cut the fabric into 2 1/2" x 44" strips (no need to cut off the selvage), or you can buy pre-cut 2 1/2" strips called a "jelly roll".
Julie
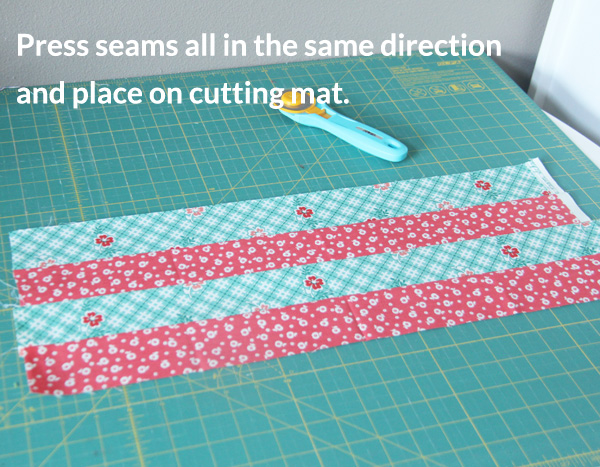
Wondering how did you press the center seam of this block?
Allison
I just pressed to one side, but you can press them open too. If you press to the side, you can rotate the adjacent blocks as you lay it out so the seams nest.
Claudia
I needed a quick pattern to take to church this afternoon as our quilting group resumes after the holidays to make quilts to donate. This is perfect. Thanks.
PAULA MAKARA
How many Jelly Roll's is required?
Donna DuBois
How many jelly rolls did it take for this quilt. Beautiful by the way thank you
Heather
Could you clarify the size. The finished block size is 7”x8”. The finished quilt size is 56”x63 and 7 blocks in each row, 63 blocks. But 7” multiplied by 7” is 49”. Not 56”.
Karen Whiteside
I don’t know if anyone answered you, but the block as shown is actually 8”x7”. So 8” x 7 blocks is 56” and 7”x9” is 63”. Took me a bit to figure that one too!
Marie
I am a very new sewer and a very novice beginner to quilting, I like figuring out the design or pattern but this quilt gives me hope because the straight lines and nesting is still a challenge. I believe I can make this one and I can just use some of my jelly rolls that I was gifted. Thank you.
Kate
If I didn't have full length of jelly rolls and wanted to use of scraps of jelly roll strips , how long is the block set?
Carol Niewinski
How did you make a strip set with the one single strip? 63 strips is an uneven number.
Michelle
Just found this pattern again as l have 3 jelly strip rolls to use
You make it easy to follow for a beginner
l made this in 2019 using a jelly roll and it was beautiful and decided to do it again now to get me back in the groove
Cristina Perez
Love this tutorial. Is there any reason the 4-fabric strip segments can't be cut 4 1/2" instead of 4"? If there's extra leftover, that bit can go into my stash of 2 1/2" x 4 1/2" bricks.
Thanks.
Debby Croshaw
I love this quilt, and have many partial jelly rolls. I'm going to start planning it now. I have a couple of other quilts I have to finish before, but so nice to have a scrappy quilt to look forward to. Thanks for such a clear, well written tutorial. I see this is a pretty well loved tutorial--the comments keep coming after 7 years!