I was piecing these blocks with triangle corners (like the corners in this block) yesterday and thought I would share a quick trick. Usually a pattern (including my own) will recommend drawing a pencil line from corner to corner on the wrong side, and sewing along the line. Like this one:
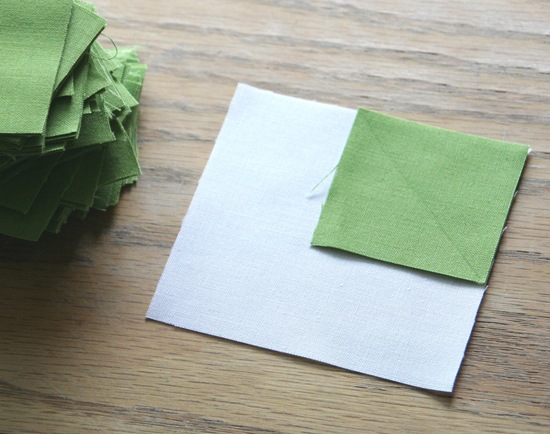
But since I’m a hurried sewer and drawing little lines on 160 squares doesn’t sound like super fun, this is what I do instead:
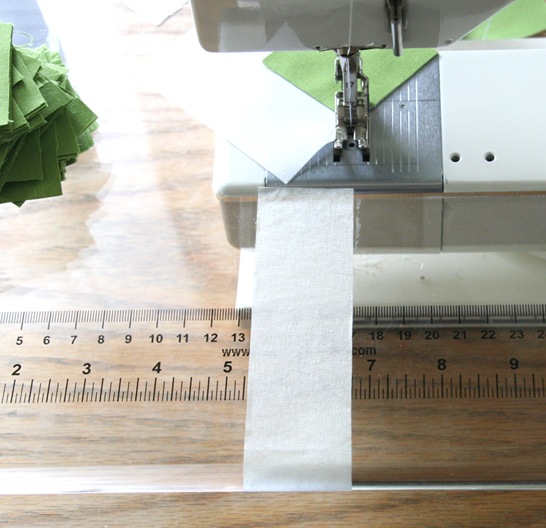
Place a piece of tape so that edge is in line with the needle of your machine.

When you are sewing on your squares, start in one corner, and keep the opposite corner on that tape edge to keep the seam line straight.
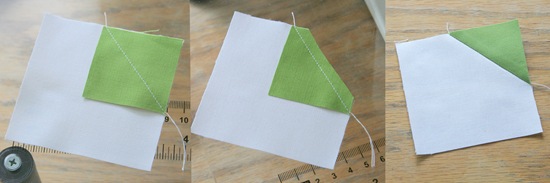
When your done you’ll have a nice straight line from corner to corner, without having to draw gagillions of little pencil lines. Keep in mind though that the smaller the square the easier it is, it might be a little harder to keep a perfectly straight line with bigger squares.
After trimming and pressing the corner should look like this:
Tricky huh? I learned this from my Mom. I always wondered why she had painters tape stuck to the front of her machine….now we know.
Mimi
This is an awesome tip!! I like to take shortcuts that work and this is one that I will definitely try. Thanks for sharing.
Melissa Corry
That is a great little tip!! Thanks!!
Quilty Conscience
You are just too clever! Thank you! What a great idea!
Wendy
I just might try this...I don't like having to draw all those lines either. Thanks!
Miss White Wall
Such a great idea!
corinne
What a great idea. I am going to try this one
Care
GEEEENIUS!!
nettie
brilliant!
Jennwith4
Awesome!! Going now to put tape on my machine! Thanks. =)
laura
Great tip, Thanks!
Vicki @ DottyJane
Thanks! Better than drawing lines!
Becca
Mind blown. Thank you!
Fullgrownwoman
I love you. I seriously owe you like a child or something. I was facing doing this for way too many blocks to fathom and was dreading the heck out of it.
Sew I Was Thinking...
You're so clever! Thank you.
Mary
Brilliant! Thanks so much!
Terriaw
Great tip! The quilt shop where I first learned how to quilt recommended that if we were having trouble keeping a 1/4 inch SA. Works great for these triangles, since I agree, who wants to draw all those lines! We want to get to the piecing and quilting part, right?!
"Lois Grebowski"
Painter's tape is my best sewing friend (besides my seam ripper). I love it. great idea for keeping it straight. Thanks for sharing!
amandajean
handy tip! thanks for passing it along!
Purple Quilter Queen
I do the same thing and yes it is fabulous!! Works so well! Jenn
Courtney
Oh how I wish you would've posted this 9 months ago... when I was drawing pencil lines on 123948102349824619286 triangles! Great post, I will definitely use this shortcut!!!
Emily Elizabeth
Wonderful wonderful tip. Thanks for passing it along!
WoolenSails
Nice idea and once you set it up, it saves on the tracing step.
Debbie
Anna @ Fresh Dew Drops
Brilliance! Sheer brilliance! Thank you to your mom and to you for sharing with us.
kc
Well, how about that. What a great idea! Thanks for sharing!!
Bec Clarke
Oh I just did a million little half square triangles for pinwheels. I will be using this next time.
mummastimetocreate
Yay thanks for this tip!! I'm so lazy when it comes to pinning and drawing, so this is a great tip for me! Painters tape is also good if you don't like pinning - I just stick it to one corner to stop the pieces moving. It loses it's stick reasonably quickly, but you only need a tiny bit and it's so much faster (and less hazardous LOL...) than pinning.
Kate
Thanks for the fantastic tip! Sounds like you had a very clever mum.
Linda
BRILLIANT!
Smithatron
A veryt clever timesaver!
Mitzi
Thank you! Just today I am starting this quilt and your tip is EXACTLY what I needed. http://www.modabakeshop.com/2010/10/charming-stars-quilt.html
Thank you! Perfect! I was dreading dreading dreading drawing all those lines and now I don't have to.
Elsa
Great tip! thanks so much!
Ronda
I learned this in a quilting class. Now all my machines have tape on them. This is a great idea and I appreciate you reminding us of this. It simplifies and that is just what all of us quilters need.
Diane
Wow! Neat trick.... I hate drawing all those lines.
Joanna
Great idea. Thanks to you and your mom. I hate the line drawing.
Jantine
Wow, thanks,you just got me over a hurdle ;-)
All It Seams
Thank you for the tip, aren't mothers great!
Alison
Oooh, what a brilliant idea! I'll have to pass this along to my sister and mother! They'll thank you, I'm sure :-)
di
Oh wow! Thanks for sharing this with us! I have a quilt that I want to make that makes it's blocks like that and now i'm really wishing that I had one of those extension tables for my machine. lol
Linda
You and your mom are SO CLEVER! Thanks a bunch for this tip. PS There is a cream stick in Amishland with your name on it and a donkey or two missing you!
Belinda
If you also sew another line 1/2" away from the first (out towards the corner)& cut between the sewing, you get a bonus 1/2 sq triangle :)
Karen
I just love simple but brilliant ideas like this!
Cowgirl in the City
Awesome! I wish I had thought of that last weekend when I was grumbling at all my little triangles! Thanks for the tip.
Fabric Warrior
I tried this trick yesterday, and it worked wonderfully. I cannot offer enough thanks!! It saved me SO much time making half-square triangles.
eileensideways
how do u cope with the machine eating the corners?
Pat
Use a little piece of fabric as a starter. Stitch on it first then onto the beginning of your corner.
Diane
I was getting ready to start a quilt with these little triangles and said 'wait! I remember something about a trick to di these.... now where did I see that" Thanks !!!
bethanndodd
Loving this tip! Especially since I will be making one of those 4th of July star quilts...thanks! Smiles~Beth
Elle
I love this trick! My addition to it is that I usually now will sew another seam about 3/8" away from the first one, but them apart with a very scant 1/4 inch seam, and then I save all those list squares to put into charity quilts/mini-quilts/other projects (especially if I'm chain piecing, since I can just run them all through the machine in line again, using my existing seam line as my guide (and my 1/4 inch foot is a little wider on the left, so it works pretty perfectly.) Probably silly, but I read a blog entry about getting extra charity quilts from scraps, and despite the fact that I have too much fabric and need to use it up, I've become a bit obsessed with reducing waste. Anyway, I thought I'd share (and at the same time thank you for this great tip - it has made my sewing speed up considerably)!
Tora´s Vintage Dream
This sounds so easy I´m going to use this tip when I will sew my corners on a lot of snowball blocks, thanks for the tip :)
Just Carol
So simple--what a great idea! I hate drawing those lines. Thanks!
Susan
Along with everyone else, thanks for the tip!! As a new quilter, I will take all the tips I can get to make my quilt turn out better. I'll be watching for more!!
Sandra
What an awesome tip! Thanks!
mara oliveira
amei a dica, vou usar com certeza...
emedoodle
This is the most life changing thing to have found on pinterest today. How is it that I didn't know this while drawing all those stinking lines for the Swoon quilt?! :) thanks for sharing!!
Goldogmom
a great tip. Can you share what you use these blocks for? Ive made HST but like the idea of the different sizes of these two pieces, making a block. Do you have a pattern for using them?
Michelle
elnorac
Wonderful tip!!!
Gina
I love moms !!
Kerri
I just drew lines on 300 tiny squares, and THEN found this tutorial on Pinterest! I guess I will know better for next time. :)
Julie Bagamary
GREAT tip! I passed along to my friend who does more precision piece that I do.
Mary Ruth
You are so nice to share GREAT TIPS! This is a great time saver and helps to make more accurate corners! Way to Go! Thanks!
Louise Bruce
Thanks for the tip, I will have to try this out....
Cynthia Oxford-Fishman
I am new at quilting and I am right now gathering a lot of information/tips as to how to make quilting fun instead of work. I want to thank you for this tip. I hope you do not mind me asking this question, if I folded my square in half, finger press it or iron it once folded in half would that not give you a straight line to sew on? As I said I am new to this so if it's a silly question, I will laugh with everyone eles, LOL!
Meredith Hill
Yes, I never draw lines. I press the squares in half on the diagonal and then sew on the line. But her tip is much faster.
allison
You can definitely do that Cynthia...it will just take a lot more time! :)
Cynthia Oxford-Fishman
Thank you for getting back to me so quickly!!! I will file your tip away and be sure to use it with my first quilt. I love your blog and all of your great projects. I am looking forward to learning from you and referencing your blog frequently!! I am so happy I found you today!!! Happy quilting!
ellie
Great tip! Thanks for the info!!
gRANDEBBIE
This is fabulous info, I don't think drawing a gagillion
Lines is fun either!!!
twemyss
Genius, just what I needed as I have a quilt pattern that is dull so putting it on point makes it interesting, many thanks!!
Pat
What part does the ruler play? Or is that painted on your sewing machine cabinet?
Jolene
Awesome idea..thanks for sharing!
luveurope
Fantastic tip...wish I saw this 2 weeks ago :(
C. Butcher
I suppose if you have a top loading bobbin in the way of the tape you break the continuous tape line up to fit over bobbin cover then resume the line of the tape as you suggested??
Adriene Grzenia
I'm definitely going to give this one a try.
CAM
Magic:
Place a piece of tape so that edge is in line with the needle of your machine.
Do you have a blog on how to get the tape in the right spot, so that it is straight? Straight is what matters.