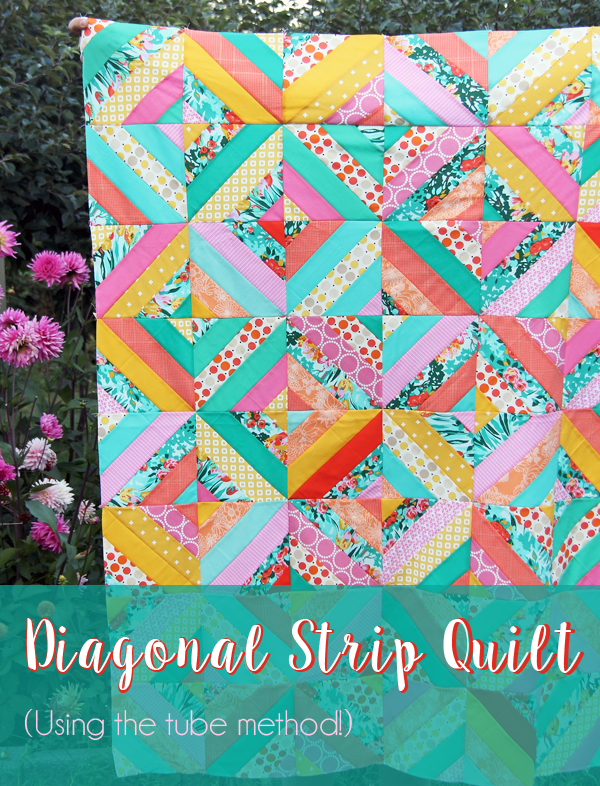
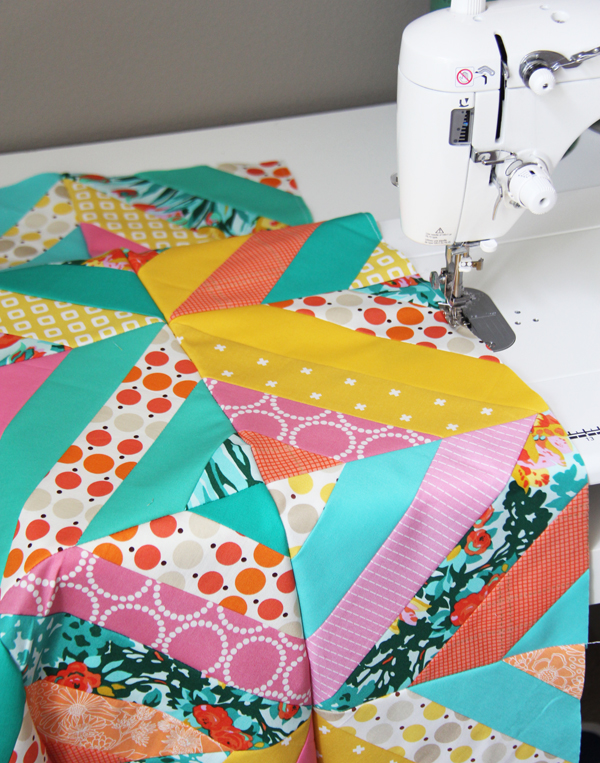
There are a few different ways to make these diagonal quilt blocks...but by far my favorite method is this tube method below. These are fairly easy blocks to make, but I wouldn't recommend this quilt to a brand new quilter as there are tons of bias (stretchy) edges to deal with. Read through the tutorial before you cut all your strips so you know what you're in for!
I'm going to take you through making one "tube", which yields 6 blocks. At the end of this tutorial you'll find a chart with sizes, and the amount of strips you'll need for each. Use a ¼" seam allowance for steps below.
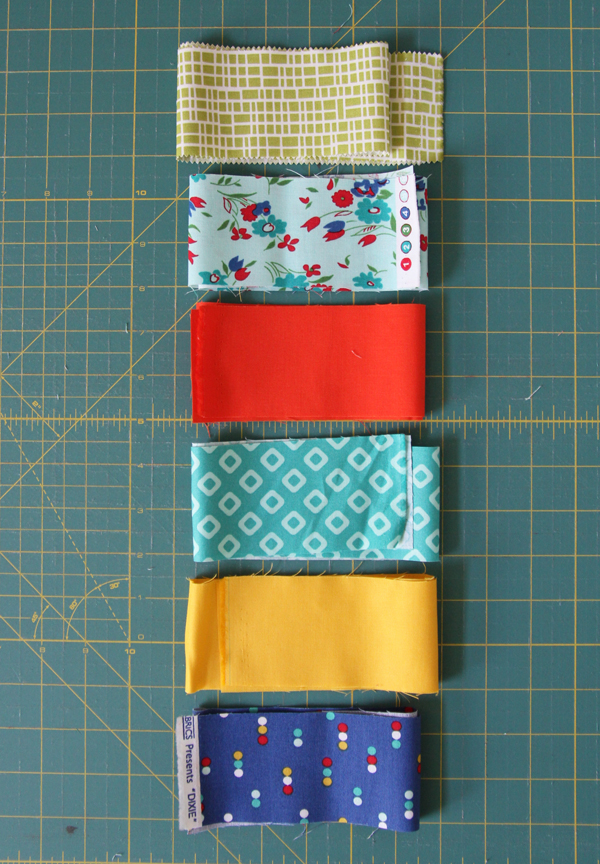
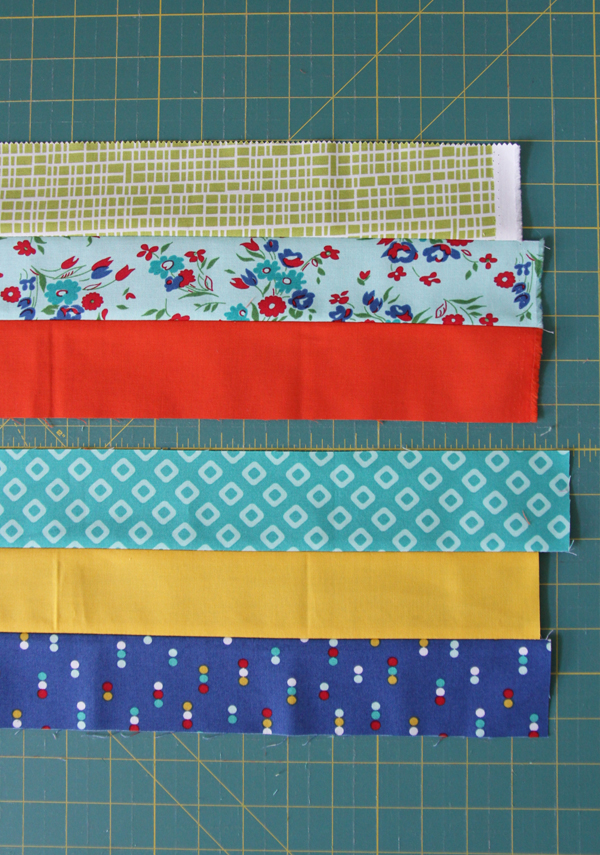
1. Start with 6 strips 2 ½" x the width of the fabric (jelly roll strips work awesome in this quilt!).
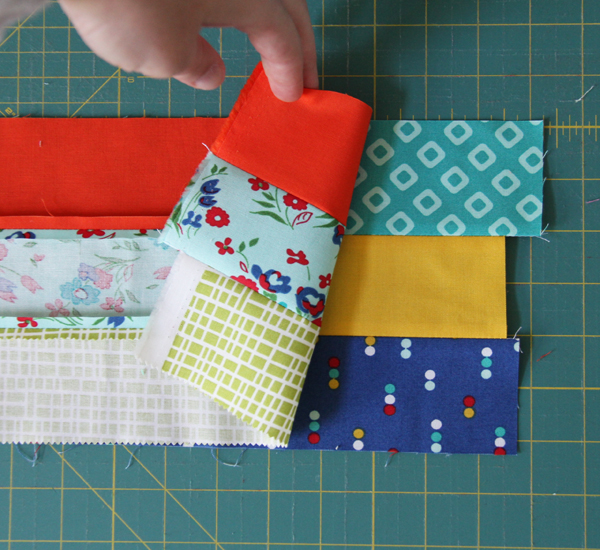
2. Sew the strips into two sets of 3 strips each. Press seams OPEN!
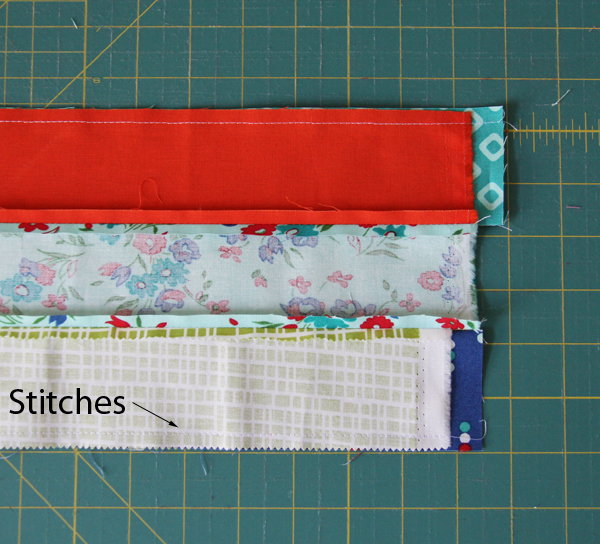
3. Place the strip sets right sides together, matching the outer edges. Sew the strip sets together along both edges (top and bottom in the photo below) creating an enclosed tube.
Below you can see the stitches along the top and the bottom (next time I won't use such a light bottom fabric...sorry!).
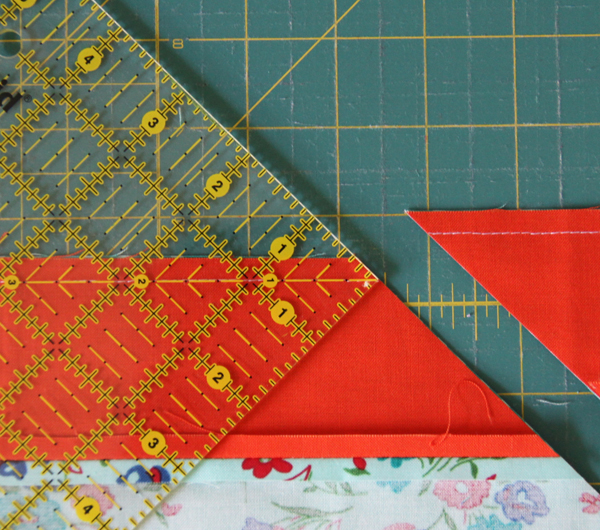
4. Now you'll need a large square ruler with a 45 degree line. I'm using my 9 ½" square ruler from this pack, but any large square ruler will work as long as it has a 45 degree line from corner to corner and it's bigger than your tube.

5. Quick note: I'm right handed, so if you are left handed, start cutting from the left edge of the strip set instead of the right like I do below. :)
Align the 45 degree line on your ruler on the bottom stitch line of stitches. Make sure it's lined up with the stitches along the whole length of the ruler.
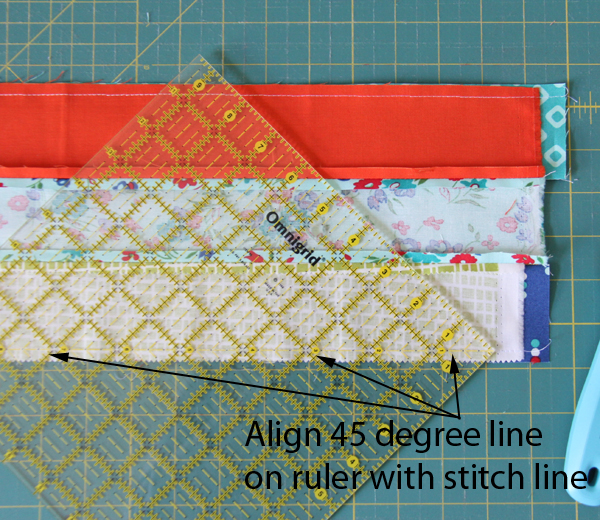

Cut along the right edge of the ruler as shown.
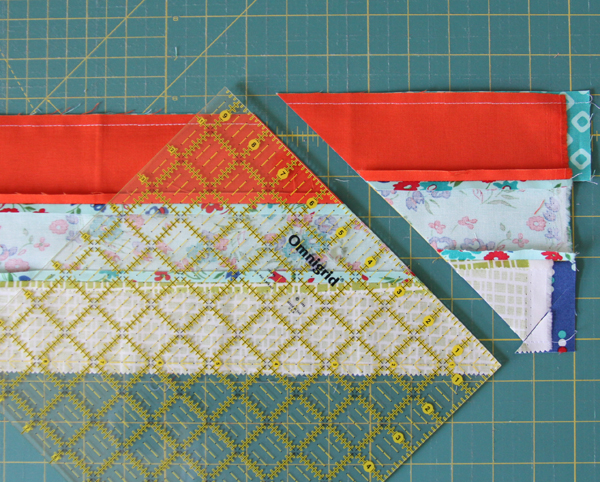
6. Move the ruler up to the top row of stitches, again lining up the 45 degree mark with the line of stitches, and the corner on the cut edge as shown.
Cut along the ruler edge to make your first block.
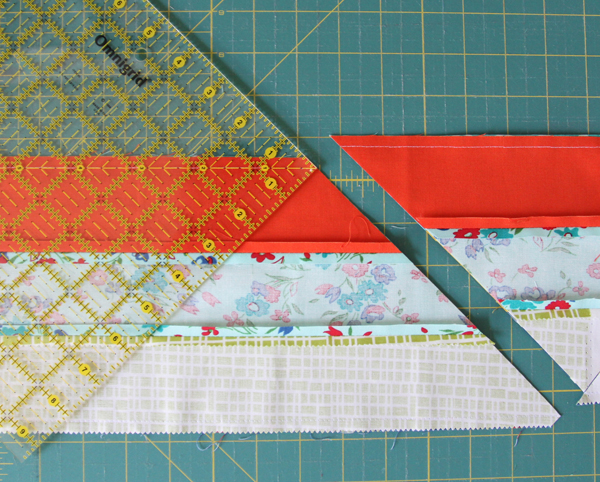
7. Move the ruler back down to the bottom row of stitches, line everything up making sure the corner of the ruler is on the cut edge, and make another cut.
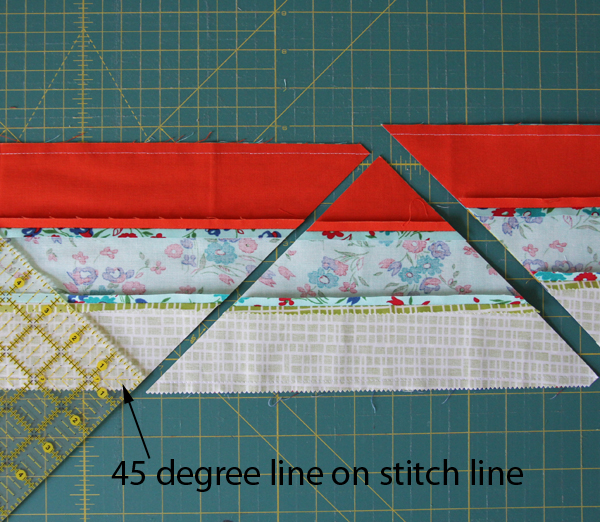
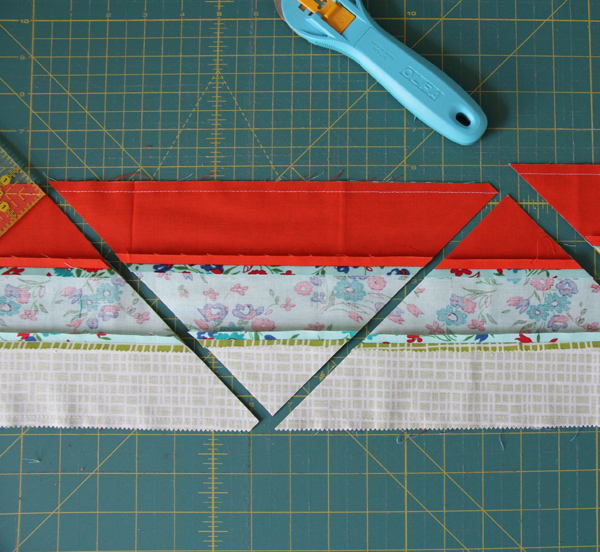
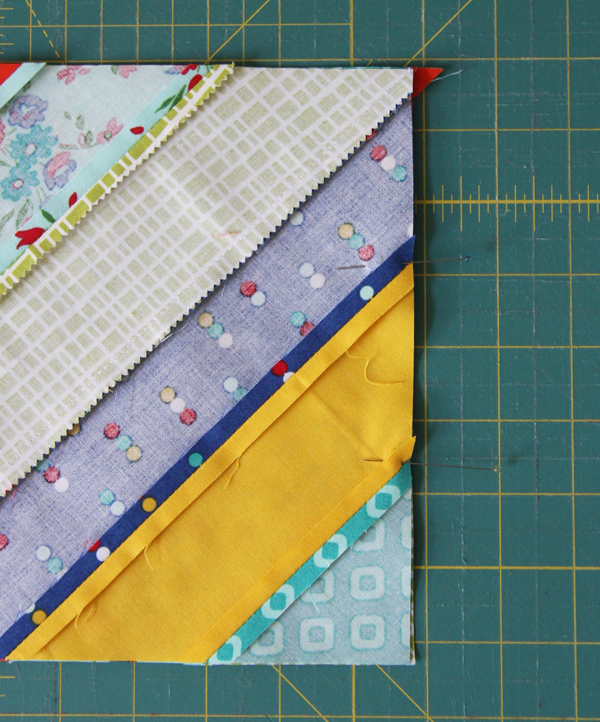
8. Continue lining the ruler up on the bottom and top, and making cuts until you've cut up the whole strip tube.
Each strip tube yields 6 triangles (blocks).
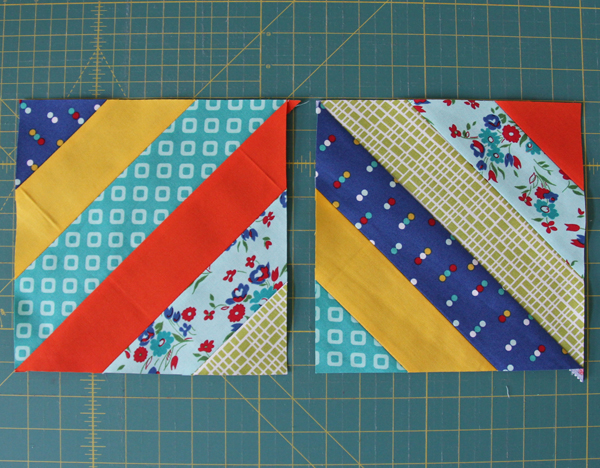
9. Gently open up the triangles, and press the center seams to the side or open. The edges are cut on the bias grain and are very very stretchy...so handle them gently and don't pull or push them with your iron. This tip is fabulous for getting these blocks extra flat without stretching them.
Each block measures 8 ¼" square. Actually mine were all just under 8 ¼"...but close enough.
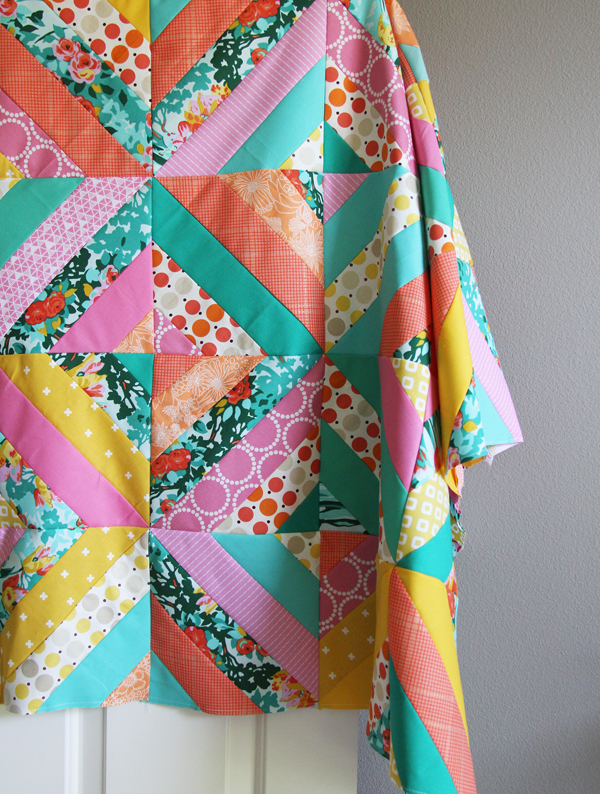
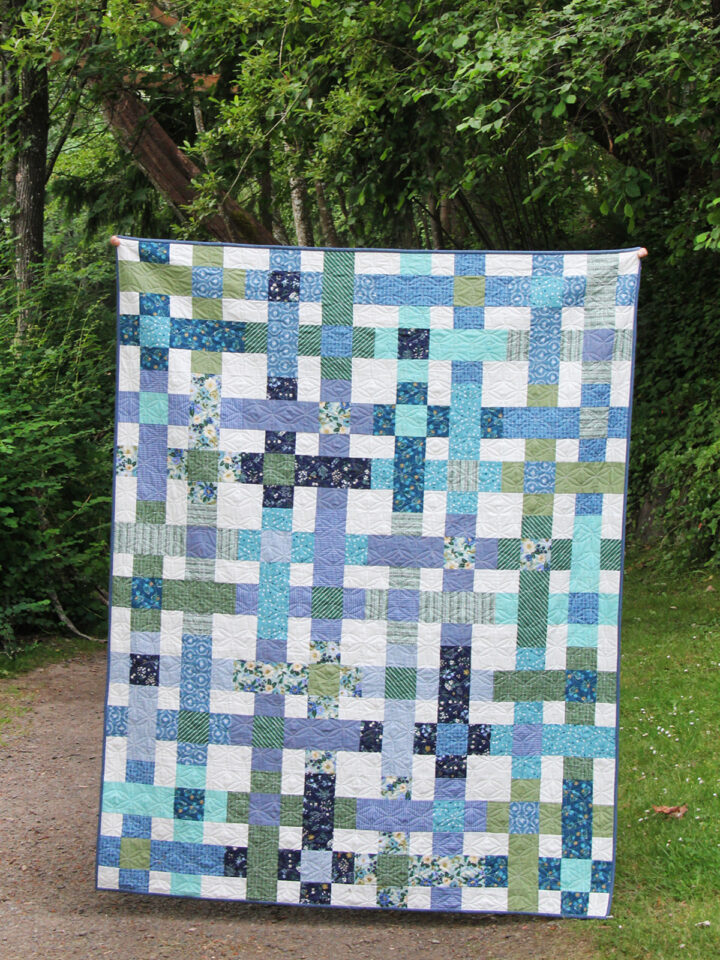
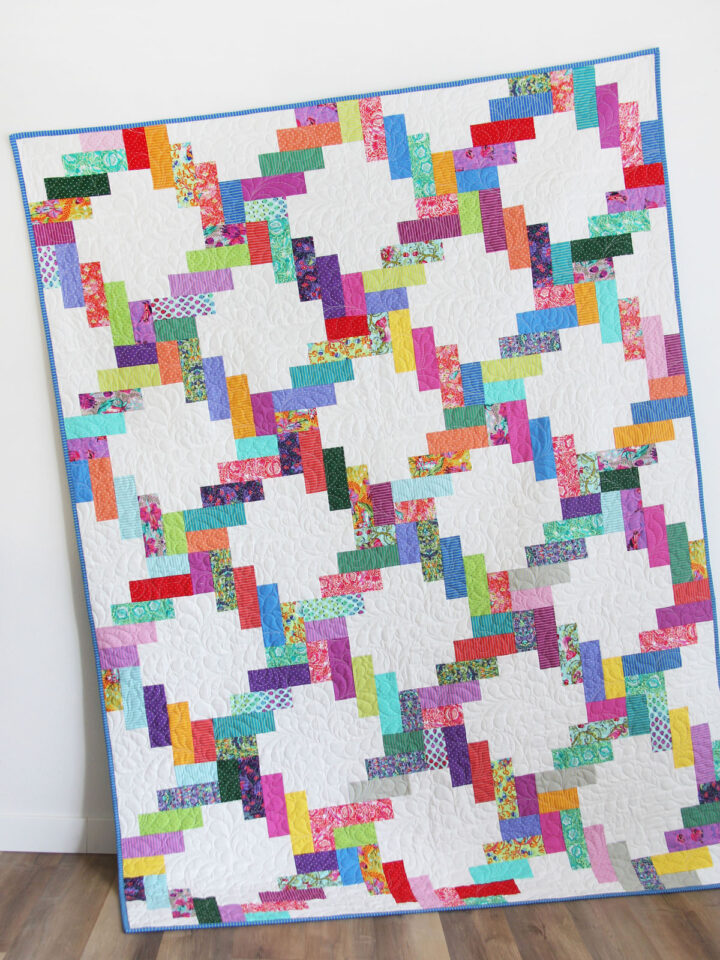
10. Repeat the steps above to make all of your blocks, and layout your blocks as desired. To sew the blocks together, place them right sides together and pin where the seams meet (or just hold the fabric in place like I do) and sew. Again, be gentle with the bias edges!
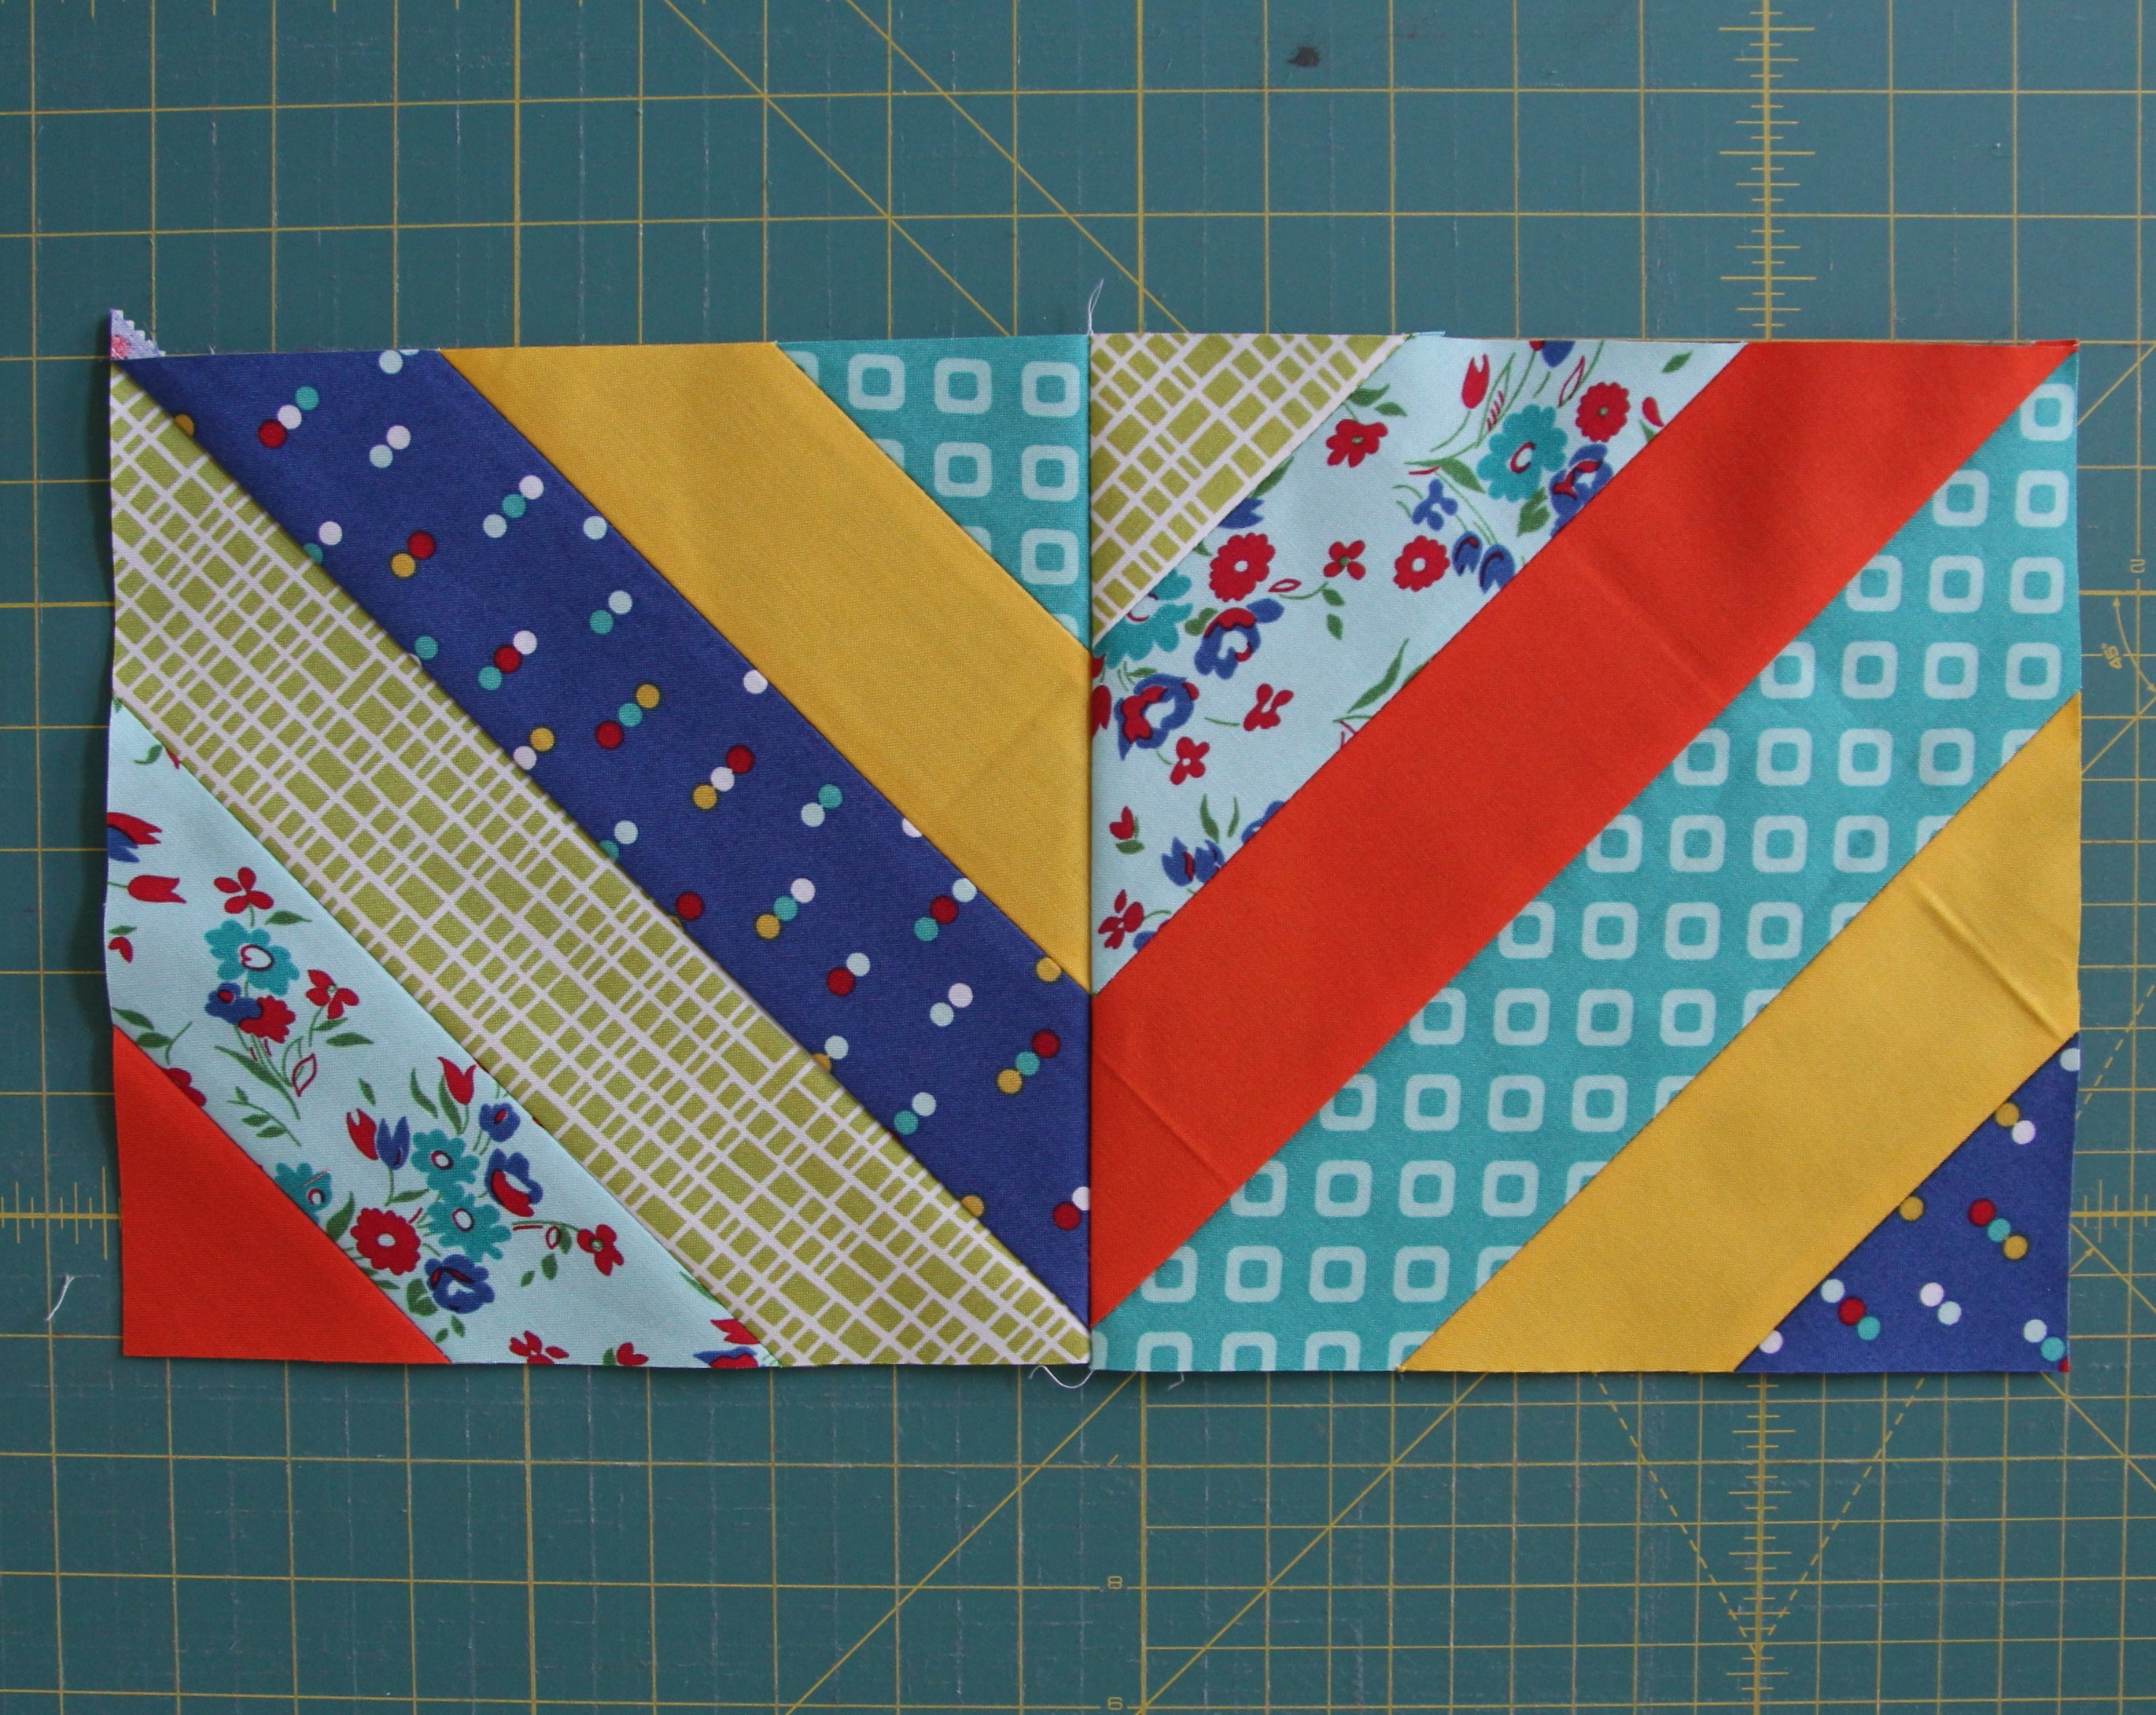
The points meet up without too much fuss if you cut them all correctly.
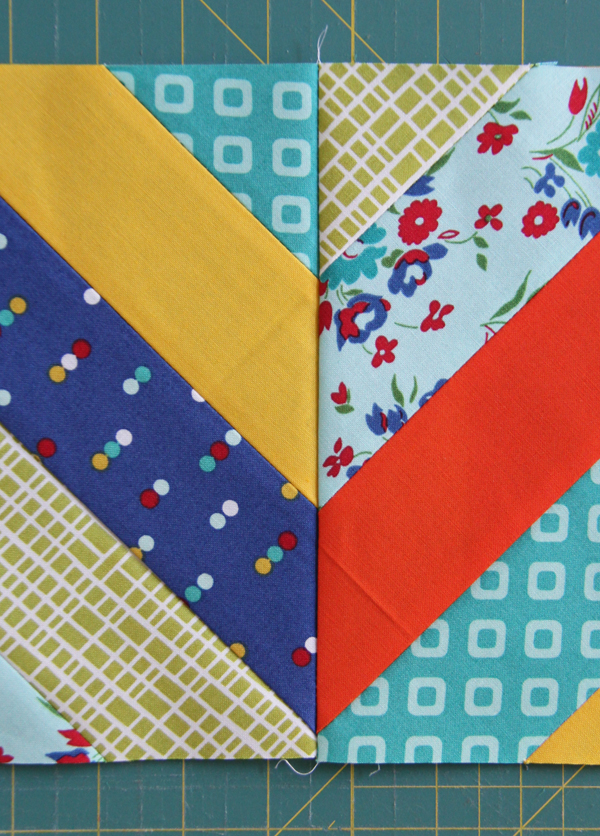
Once it's sewn into the quilt you can hardly tell some of the seams don't match up perfectly (some of mine were way off)! Don't sweat it too much.
After you are done making this quilt top I highly recommend stay stitching (normal stitches/stitch length is fine) around the edges to prevent them from stretching during finishing. I always add stay stitching to every quilt top!
| Size*: | Baby | Crib | Small Throw | Large Throw | Twin |
| 38 ½" x 46 ½" | 46 ½" x 54 ½" | 54 ½" x 69 ½" | 62" x 77 ½" | 69 ½" x 85 | |
| Number of Blocks: | 30 | 42 | 63 | 80 | 99 |
| Blocks Across x Down: | 5 x 6 | 6 x 7 | 7 x 9 | 8 x 10 | 9 x 11 |
| 2 ½" strips needed: | 30 | 42 | 66 | 84 | 102 |
| Tubes to make (6 blocks each): | 5 | 7 | 11 | 14 | 17 |
*This is assuming a finished block size of 7 ¾"...they may be a bit smaller than that. Also I didn't include queen and king sizes because honestly I don't recommend making this in anything bigger than a twin because of the stretchy edges and lots of seams to match. Also you'll die of boredom making all the strip set tubes.
I found a great video by MSQC showing this tube method here (after I'd written this tutorial...ugh). It helps to see it in action, and they add white in their version so you can make it with one jelly roll!
Put any questions in the comments and I'll try to answer them there. Happy quilting!
vanniVanni
Wow, very nice tips :-) Thanks for sharing!
charlotte m.
What a great and easy method. I have a jelly roll I have been wanting to use up.
Donna
What a beautiful and colorful quilt. I want to try this one so thanks for the tutorial and great photos.
Aleathia Braun
I can't see the whole chart for making different sizes. I can only see bsby and crib size. :( Do you have it in pdf?
Allison
If you pull it up on a computer it will work!
Katie S.
Thank you for doing all the work to make this tutorial 💝! I know it was a lot of work, and I wouldmuchrather have it to use than a video. I loveJennys videos on MSQS but they're so quick and abbreviated that I need to rewind them constantly to actually make anything using them. I would much rather have your super clear and orderly tutorials (or patterns, for that matter) to use. Your quilt is so bright and pleasing and inspiring I'm going to start today making a twin size like it just for ME using a couple jelly rolls--and I hope you have a really nice day, too, doing something fun (maybe styling Jane's hair (like playing Barbie dolls?)--Just teasing, of course ! Katie S.
Allison
Thank you Katie! And yes...styling Jane's hair is kind of like a barbie doll...one with the craziest hair ever. ;) Thank you and have a great day!
Sylvia
Can this be done in bigger blocks?? I would like my finished block to be 12”
MariaC
One of my very first quilts was using this tutorial from MSQC. A very effective design. Just love the fabrics you have used. http://veryspecialcreations.blogspot.com.au/2011/04/quilt-top.html
Allison
Oh I love the pink and white you used! Beautiful!
Jannie
Very pretty and instructions were very clear looking forward to using your method thank you for sharing
Little Quiltsong
Thank you for sharing - this is so neat! Love how you explained this method!
kathy o
What a cool way to construct a traditional pattern! I love how you design - both patterns and fabrics. Your instructions are always so clear and thought out. Thank you!
Christina in FL
Very fun! Thank you!! {Getting out my Accuquilt Go! and cutting strips today! :)))}
Sharlyn A
So cute! Maybe I will ignore my housework today. 😉
Susan Shaw
Thank you for the tutorial. I had not seen the block done this way. It sure is lots easier than paper piecing the blocks. I like having the strips the same size so that the points intersect, too. Some of the patterns that I have seen, have you use any width of fabric for the strips and then the points do not necessarily intersect. I love the diagonal in the blocks - keeps the eye moving.
Susan Buettner
Your tutorial is excellent, the one from MSQC is not for beginners.
ioleen kimmel
Thank you so much for this tutorial. Will be giving this a try.
Buffy
Love learning new cutting techniques! Its like learning a magic trick :) can't wait to try.... great tutorial, great instruction.
Pat S
This is such a pretty top. Thanks for sharing the technique. Tube quilts are fun to make. I just finished a Summer In The Park from MSQC so I'm a bit 'tubed out' right now but I do have a jelly roll that would be great for this.
Allison
I was "tubed" out after making this one.....all those strip sets is a bit BORING! ;)
Pat S
Yes, exactly what I meant by 'tubed out'. The result is fun but sewing all those long strips can make you nod off. :D
tisha @ quiltytherapy
I have been sitting on some jelly roll scraps and I think this would work well. The cutting technique is great. Tubes usually scare me that they would move, but the stitching, makes sense. Off to add this to my TO DO list.
Vicki W.
"Also you'll die of boredom making the strip set tubes ...". Hahaha!
Louisa @ Sewmotion
A great tutorial, and yet another brilliant use for jelly roll strips! Thanks for sharing, and I love your fabrics btw! :)
grandmagordy2
I love it! Thanks for sharing.
Anja @ Anja Quilts
Thanks for sharing. I haven't seen this technique before.
Helen Barrass
Thanks So much for sharing! Just starting out quilting and love how clear your tutorials are! :)
hellomellydesigns
I love how this quilt turned out! I've never made a strip quilt because I didn't want to foundation piece, but this is much simpler! Gotta have a good Netflix binge going for all those long strip seams ;) but a stunning result for all that effort!
Callie Winkle
What if you are using uneven number of strips. Like 5 or 7.
Tiffany
This is wonderful! Thanks for the tutorial.
Allison in Alabama
Nice method!! Thanks for sharing - great tutorial! Nice photography!!!
Sarah
oh man this is so awesome!! No waste!! Thanks so much for sharing. xoxo
beckyroberts
I have such a hard time with strips cut on the diagonal! What a great tutorial. Fantastic pictures and illustration of your method. Thanks for this!
Melanie
Thanks for the tutorial! I just finished my quilt with this pattern and am loving it!
Ann
I have made this quilt in numerous sizes, table runners and square table toppers. No matching if you use different width strips. I have never thought to use same width strips. Looks beautiful done with batiks.
Tracy Andrews
thanks for the tutorial! i am going to try this out to make a blanket for my baby girl due in december. if i want to make the crib size and plan on buying 6 different colors, how much yardage of each color do i need? i'm sure i could figure it out using the dimensions, but my pregnant brain is having a hard time working it all out. thank you!
Allison
Hi Tracy! You can get about 7 strips from each 1/2 yard, so you'd need 6 half yards if you want to use 6 fabrics. :)
Ellen Thompson
This is a case when bias is your friend. Thanks for the size chart.
Ingried von Minden
Hi Allison,
thank you for the tutorial, I love the multi-colored flower fabric. Can you tell me the name of it?
Allison
The print is by Amy Butler...I bought it at hawthornethreads.com and they still may have some! I can't remember the collection, I think it was from a year or so ago.
Ingried von Minden
Thank you Allison for your help. Lucky me, I snatched the last yard from a german fabric shop.
Kris Huber Van Allen
Great tutorial! And I am so happy you shared that not all of your seams match perfectly; I've told my family that I make my quilts to be used, loved, and frayed...not to be inspected!
S. Carter
EXCELLENT tutorial! I've never quilted before and I wanted something easy to start with. I read all of your instructions and studied the pictures and was able to make my first quilt ever in about 2 hours! I really appreciate that you took the time to post this tutorial.
joannep2012
I just completed the quilt top and wanted to find out what you suggest for the quilting. It's a crib size. I just love the design. I am an avid fan of your your website and your quilts!
Linda Wagman
Sitting on the porch this rainy Sunday, and found this! I'd seen the tutorial on MS, too, and loved it! So I have been screen shotting away! Thanks!
Kat mack
Im a new quilter.. I am making strips like this to do an appliqué pattern for my niece on a cooking apron! will be so cute!!!
Allison
That will be super cute!
Betty Grove
I have never done a quilt using tubes, but after 26 years of quilting you have given me the inspiration to try. Your tutorials are so easy to follow even I should be able to do it. You are just amazing and I love your patterns, guess I do as I have just about every one of them. Thank you so much!
Allison
Thank you Betty!
Niamh
Hello,
I was just wondering what type of material it is that you used, please? I know they're jelly rolls but they come in all sorts.
It looks really cool and I'd love to make one :)
Allison
Hi! This was just made from random material I already had, and I cut 2 1/2" strips from it.
Paula
Lovely! How many for a king?
Cathy
I know you say you don't recommend queen size but I'm a pain to the individual who makes my quilts and have gotten my mind set on this design because it looks awesome😂🤷♀️😂...I was told that I just have to do all the cutting and placing myself because it'll be so time consuming.
Would you have the information on a queen size by chance? I mean I can guess that I would need like 12 blocks across and 13 down (or 13x13 to add extra hang over) but as far as the strips, I can't quite figure that out...I see 102 for a twin and notice it goes up by like 22 with each size, so would that 146 be accurate? So roughly overall 11-12 yards of fabric to cut down myself...
Allison
Hi Cathy! Yes that sounds about right but I don't have the requirements figured out for a queen. You could start with the Twin size blocks, and make enough blocks for the Throw size or Crib size also depending on how large you want it. It would be a big one to tackle but beautiful!
Catherine Burgos
Your tutorial is clearly stated and easy to follow. I was wondering if units of strips are sewn in the same order for each tube unit, or did you mix it up?
Allison
I mixed it up!
Amy Carolyn Schrock
I'm planning to make a baby quilt with this design, and your chart is so helpful as I plan it out! Thanks for the great tutorial!
Allison
I'm so glad it's helpful to you!!
Ursula Jones
This is a much better method than my early attempts. I made a long strip of fabric with up to 8 strips, which got very out of square because of the edges not being stay stitched, + ironing. So I lost a lot of fabric through needing to constantly square up. A good lesson in what not to do!
Allison
I'm glad this worked better for you!
bewtjwgmailcom
love it
Allison
Thank you!
Dana
How many different pieces of material were used to make this?
Darla Voyce
Your descriptive tutorial was well written. You gave easy to understand wording and left helpful hints. Thank you. A good way to use up my jelly roll.
Allison
I'm glad you found it helpful Darla!
Dava Esman
Newbie here...A little late to the party, but I have a few questions: If I want to only use the one jelly roll I have, which is 40 2.5" x 42" strips of fabric, what size finished product will I get? How many squares? I was hoping for a small throw. And for that, how much backing will I need? Thanks for your help.
Kelley
Super late to conversation. Thank you for the clarity on this. The only real difference I see between your tutorial and the MSQC tutorial is that you iron the seams open and she nests them. Can you explain the reasoning for each? Not sure which would be easier - making this as my first quilt, so obsessively curious. Thank you!
Allison
I haven't watched her tutorial, but unless she's nesting all of the seams and rotating them in different directions when she sews the blocks together, it's easy to get seams that sit on top of one another when you sew the blocks together. It makes the seams bulky, and hard to match up...so I just prefer ironing them open. Also when you are strip piecing, it's easy to have the seams and strips naturally get a bit wonky when pressing (mine always do no matter what I try!) and pressing seams straight always help a lot...anytime you are sewing long strips together. Either works great!
Kaylen
I just finished my quilt top today following this tutorial. I had already watched MSQC video but for some reason it didn’t quite catch me Luke their other videos. I stumbled upon this through a google image search looking for inspiration and TA DA! My niece will have a nice quilt for Christmas. Oh! And this was my first time ever sewing a quilt. Thanks so much!! Now off to my next quilt project!
Allison
That's awesome! This is a hard quilt for a first quilt...everything else will feel easy!!
Bre
If I buy a bundle of fat quarters, will the strips be long enough?
Allison
No, but you could use half strips and use the same method, you'll just need to make double the amount of strip sets. The fat quarter strips you'll cut will be 2 1/2" x 21", and you can cut 7 strips from each fat quarter.
marilyn cotsamire
I think I have read that using spray starch on your fabric (before cutting your fabric strips) will help keep bias edges from stretching.
Also, for the "overachievers" that want to make queen and king sizes I would recommend making 4 or more of the smaller quilts, dong the stay stitching around each one like she described, and then joining them together to make the size you want for your quilt. you could even put a contrasting strip around each smaller quilt, which would also maybe help fight the stretch monster, and give a different look to your quilt. I finally remembered that it is called sashing. It would also help give your eye a confined or corraled place for your eyes to rest since a king might get a little busy using this pattern. I have a lot of geometric and /or "repetetive shape" style fabrics: circles, straight lines, wavy lines, stars etc., that I think would be great for this pattern. thanks for your tutorial.
Allison
I’m not a quilter but this looks amazing!
Even with the bias edged it’s such an easy technique! Boring but easy!!
I just had to jump in and say hi cos we spell our name the same 😆 first time in years I’ve seen that if ever...
Thanks for an easy to follow and very clear tutorial! I don’t even feel like I need to watch the video.
Allison (Allie)
👍😄
Brookelyn
Where did you get the jelly roll material you used in this example? Love it
Brookelyn
Hi again!!! The bright pink fabric in the first photo- do you know where that is from? Sorry- thank you!!!
Phyllis
What else can I say, feeling the same as all the above remarks, Great tut you have worked up.. Thanks so very much, Keep us in stitches ,,,,,,,,,,,,
Michelle
I made a square today from this pattern! Oh goodness I love it! So easy to follow. Thank you!!! I’ll fire sure use this pattern for a quilt soon.
Libbi
Should I sew the strips in the same color order every time or switch it up?? Looking forward to trying this out 😁
Libbi
Okay one more question: should I "square up" blocks before sewing together? I did a pretty good job with accuracy / avoiding stretching but want to check before I start sewing the quilt top together!
Allison
No you don't need to! I would just pin at the seams as you need and ease and stretch the fabric slightly as needed to make the blocks fit together! I hardly ever square my blocks!
march
i have not a ruler like that so can you write please the inches of the triangle ? thanks
Margaret
Thank you. I just printed this to use for a humanitarian quilt.
Jessica Davis
I know you posted this YEARS ago, but I am so excited to make this quilt for a couple of my friends who are getting married. I love how versatile jelly rolls are and they are my favorite way to quilt.
Allison
Yes they are a fun way to make a quilt! Thanks!
Susan L.
Thank you for your tutorial. I agree that a written tutorial with pictures is so much better than a video. The tube method seems like a neat way of creating a quilt block.