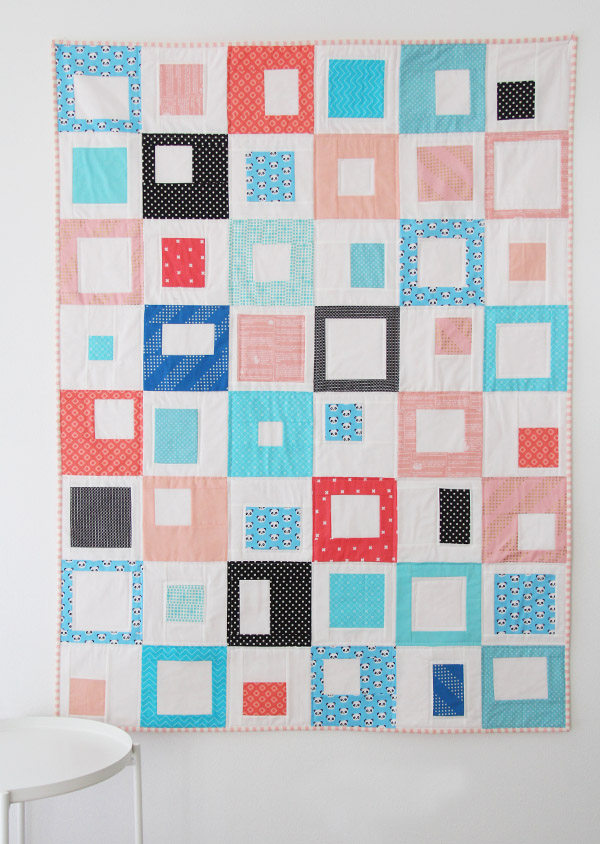
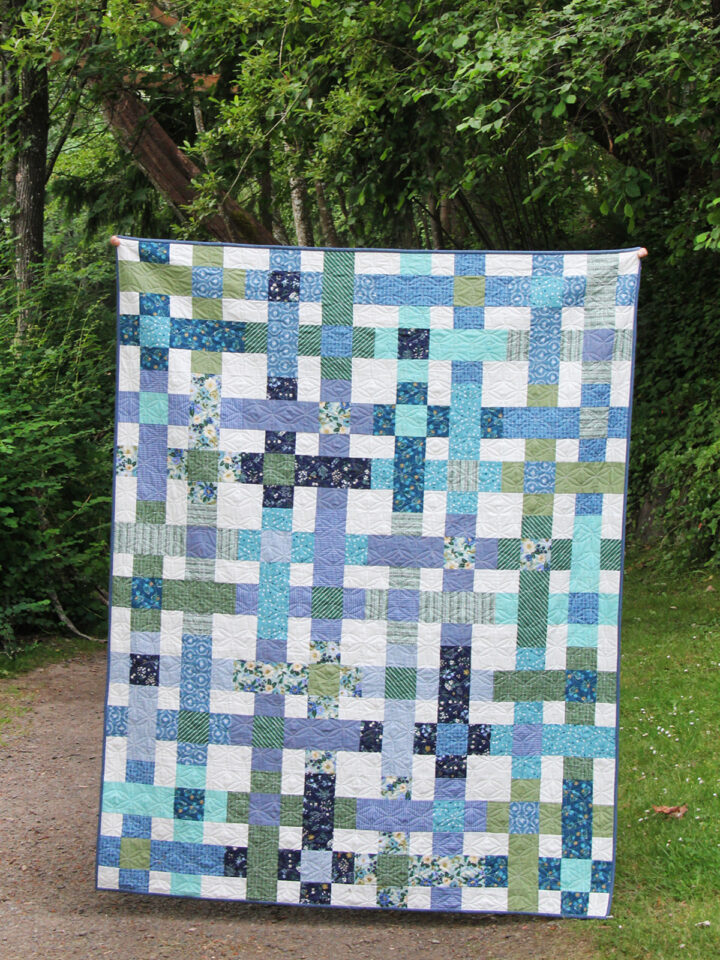
This same type of quilt is exactly what brought me to quilting 12 years ago. Simple, modern looking patchwork like this will always be my first love.
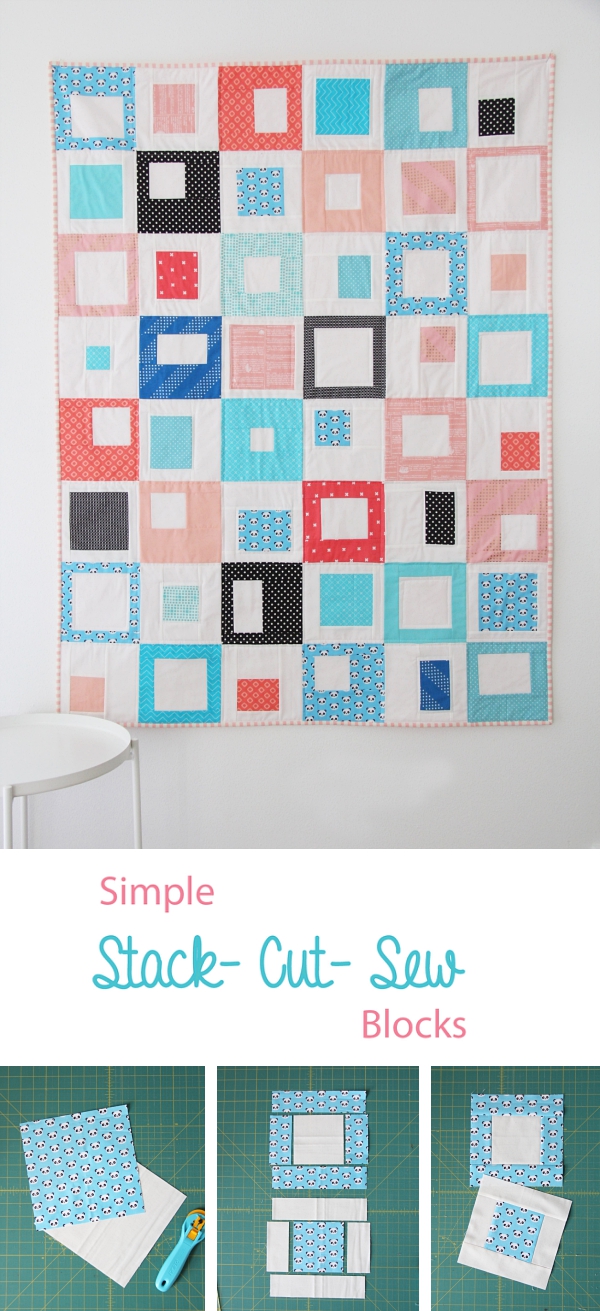
I wrote a tutorial for these type of "Stack and Whack" blocks way back when...so this is an update to that tutorial with some variations for you to try. There are pros and cons to this type of block construction, but overall this is a great method for beginners, or if you want to make an easy quilt without having to think too much. Which is me...always. It's also a perfect way to dip your toes into improv piecing.
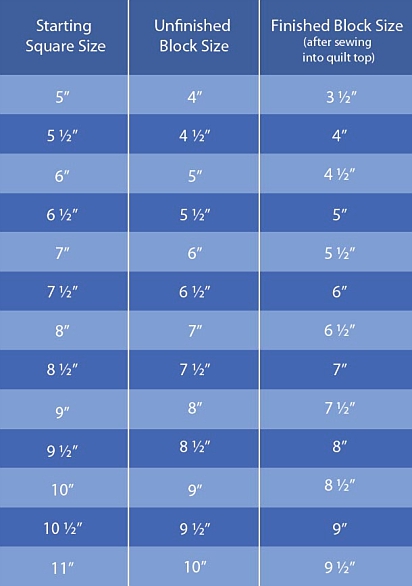
To start: Figure out what size of blocks you want to make. My starting squares in my quilt are 8 ½". That's my favorite size because you can cut 4 squares out of a fat quarter or ¼ yard. Your finished blocks will be 1 ½" smaller than your starting squares. Here's a simple chart if it gets confusing:
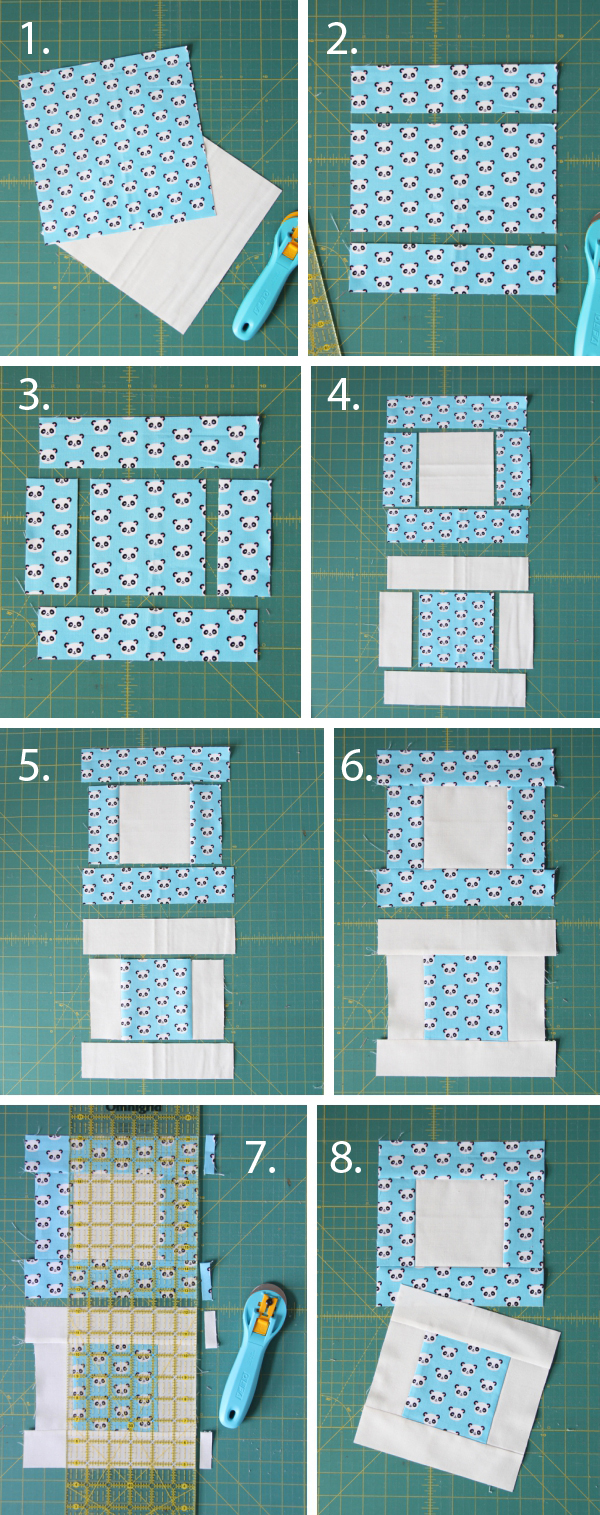
- Layout 2 of the squares to make two blocks. I used a white and a print square, but you can use two prints or any combination. Place them on top of each other right sides up, matching up all of the edges.
- Cut a horizontal straight line along the top, in my example I cut 2" down from the top edge. Repeat on the bottom edge, again my example I cut 2" up from the bottom edge.
- Cut a vertical line on the center portion, in from the right edge, and repeat with the left. I cut 2" in from the right edge, and 2" in from the left edge. This will create a square, or rectangle in the center depending on how wide or narrow you cut your edge strips.
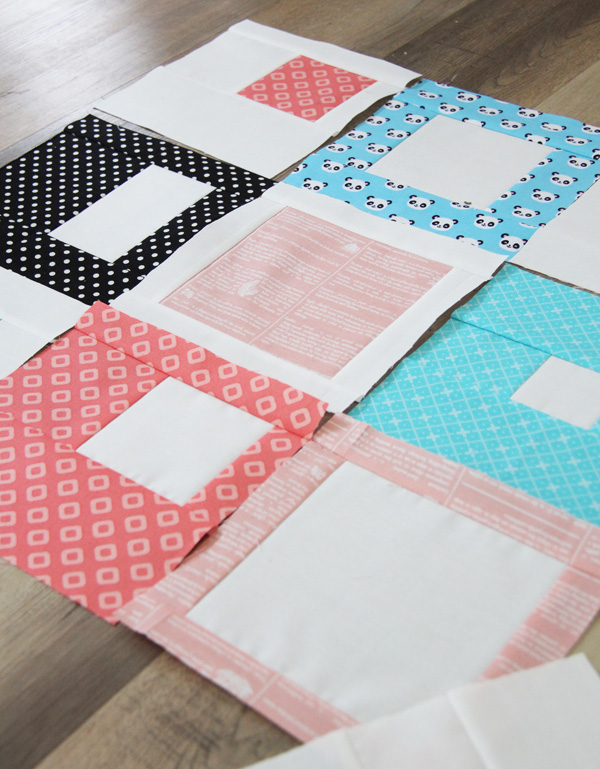
- Layout the pieces from the two cut squares as shown.
- Sew the side pieces to the new center square, right sides together, press seams out.
- Sew the top and bottom pieces to the center units, right sides together, press seams out. Don't worry about the overhang, or matching up the edges, you'll trim that next.
- Align the block on the cutting mat, and trim off the excess top/bottom strips to straighten the sides.
- The two blocks will measure 1" smaller than your starting squares (mine are 7 ½").
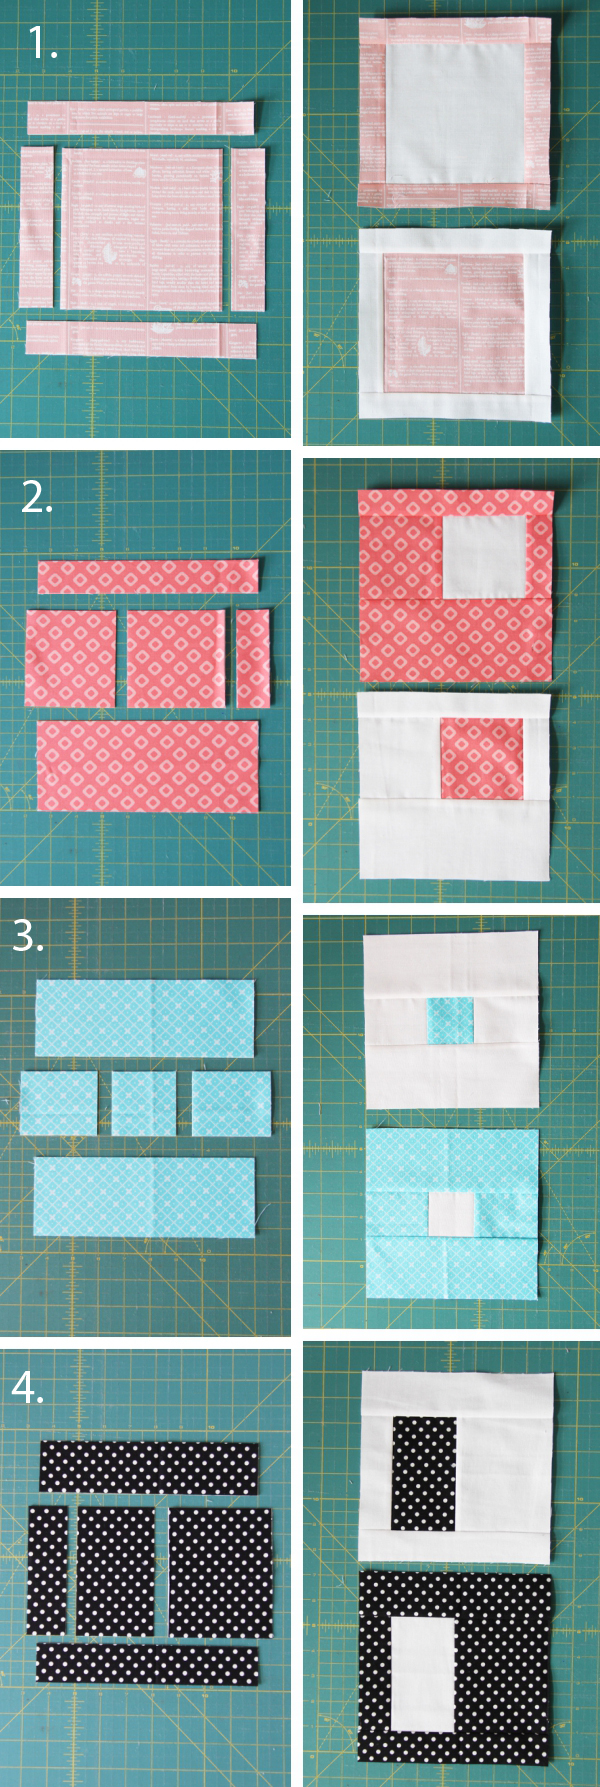
My favorite part about making blocks using this method, is that they are easily changed and customizable without doing any tricky math.
Below are some examples of different blocks made with the same 8 ½" squares by cutting the strips different sizes. You can use these as a guide and make up your own...you don't need any specific measurements, just eyeball how wide or narrow you want your strips and cut. You can't mess these up...so have fun playing with them!
- Top, bottom, and sides strips are all cut 1 ¼" in from the edges.
- Top strip is 1 ¼", bottom strip is 3 ½". The right edge strip is 1 ¼", and the left side is 3 ½".
- Top, bottom, and sides strips are all cut 3" in from the edges.
- Top is 2", bottom is 1 ½". Right side is 4", left side is 1 ½".
If you are making a lot of blocks, you can stack and cut four squares at a time, and make four blocks at a time to speed things up. I kept a stack of my 8 ½" square on my cutting mat, and when I had a free 10 minutes or so I'd go cut 4 more squares and quickly sew up 4 blocks.
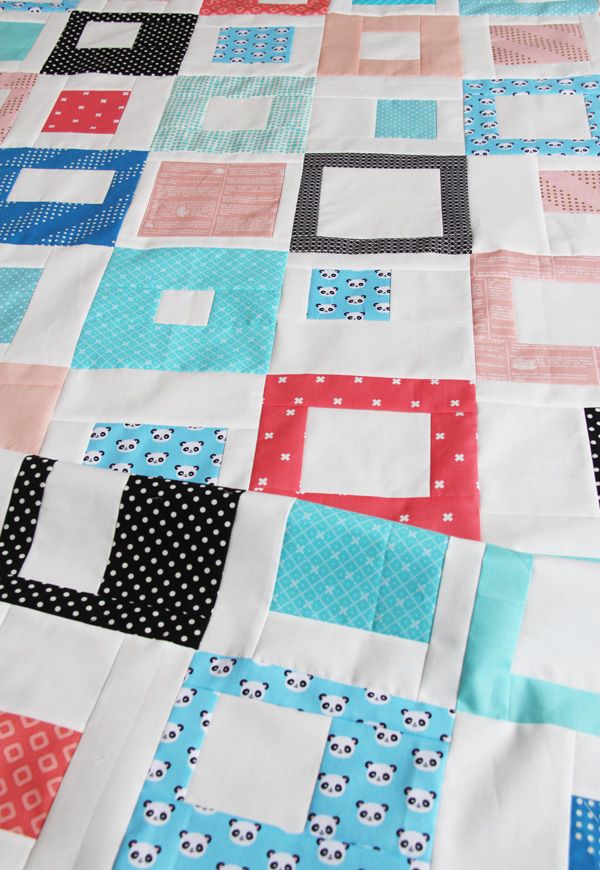
Layout the squares and rotate blocks to avoid adjacent seams if there are any, then sew the blocks into rows, and sew the rows together to make the quilt top.
Here is a handy chart if you want to make a different quilt size using the 8 ½" squares like I did:
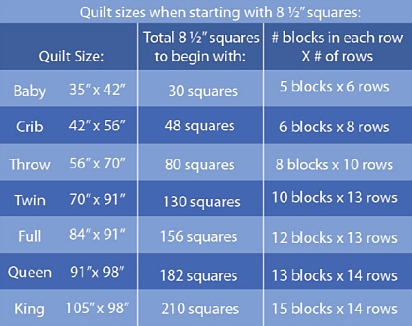
Keep in mind that for my quilt, I used half white squares and half print squares. So for example the Crib size requires 48 squares, so I cut 24 print 8 ½" squares, and 24 white 8 ½" squares. You don't have to use white...you can do this with all prints or any background fabric as long as you start with the required number of squares.
Remember that you can get 4 - 8 ½" squares from each fat quarter or ¼ yard (maybe even 5 squares if your yardage is wide enough). You can get 16 squares out of a yard of fabric, maybe even 20 squares if your yardage is wider than 42 ½".

If you've never made a quilt this way I highly recommend doing it at least once, and if you know someone who wants to learn how to quilt, this is a great method to start them off with.
Happy stacking, cutting, and sewing!

CarlaJean
Thank you for this tutorial. Looks like a fun quilt, especially for a beginner like me. I’m excited to try this! 😀
Carol Wingo
I enjoy your quilt tutorials. I am a beginner and you have such helpful hints! Can’t wait to try this one.
Ellen F Thompson
You thought of everything in this tutorial!
Allison
Haha...I try to think of everything someone will ask me and answer them first! ;)
Pat S
Thanks. This is very appealing and you make it easy.
Colleen
Thank - you so much !
Pam
Thanks so much for this! I love how modern/ 60s it looks and EASY ;)
Candy
Thanks for the tutorial Allison! I love your style and always love your posts! This is definitely a fun, quick quilt that I’ve added to my to do list!!
Material Girl Quilts
This is such a cute quilt and love the way you put it together. Thanks for an awesome tutorial!
Amanda
Janice
Great tutorial! Can't wait to try it. Thanks so much for posting!
Darlene
I love this. Your explanation was so well written. This quilt would come togather quickly. Thank you for your tutorial.
Tracey
Great quilt! I have some flannel fat quarters in my stash and I was looking for a pattern that had both bigger pieces to show off the fabrics and less seams so that I don't build up bulk. This could easily be the pattern I'm looking for! Thanks for sharing with us and have a great weekend!!
Allison
This would be fabulous in flannel!!!!
Doris
Thank you, this looks like fun to sew!
happyquiltingmelissa
This is so fun and I can't believe I have not made a quilt like this before!! I am bookmarking it to make one with my daughter just as soon as she finishes up the patchwork quilt she is working on. I think she will really like this ;) And I have so many layer cakes, prints and white solids, so this will be perfect for those!!!
Allison
This is a perfect one for sewing with your daughter!
Lu
Allison thank so much for this tutorial. I just love this quilt and your quick posting of the tute. Blessings sweetie.
Dawn york
I've never quilted before and I'm wanting to learn really bad because I'd love to make my girls and my mom and myself a quilt.
Allison
This is a PERFECT place to start learning! You can't go wrong with this type of block...just be patient with yourself and make some test blocks! You can do it!
Rosemaryflower
this looks so super dee dooper adorable. I am gonna make one right away!!
Pam
Very creative and simple. Thanks for sharing.
Lesley Gilbert
Thank you for a very interesting and easy to follow tutorial :)
Clare Baker
I think this would look great with some sashiko fat quarters and vintage linens that have been passed down to me. Thank you!
Allison
That would look great in this! This type of quilt looks good in everything...you can't go wrong!
Anorina Morris
I absolutely love this idea. What a wonderful tutorial. Thank you.
cocoya
Thanks. This is very appealing and you make it easy.
ไพ่ออนไลน์
Gclub
Ann
Love this! Thanks.
Diane
Thanks Allison, this looks like a fun quilt to make, and would be so fun with a buddy/sister/daughter!
Allison
Yes! A great one for teaching kids to sew...or sewing with friends while your chatting (since you can't mess this one up!) ;)
Lynn White
Great quilt and tutorial, thanks so much for this.
Melanie C
Thanks for the fabulous tutorial! I can’t wait to try it!
susanmp14
Thanks, a fun quilt to do with my teenage granddaughter who has recently gotten the quilting bug!
Allison
This is a perfect one for her! Quick and easy and modern looking!
connie
Pretty and interesting. Thank you for the tutorial; I might just have to give this pattern a try :)
Happy Quilting!
Connie :)
kaholly
You are a genius! Thank you 'Sew’ much for sharing!
Rachel Hauser
How have I never made a quilt this way! Thanks for the simple tutorial. I need to play with this =)
Kris Jarchow
I just love this tutorial. I have made a couple already and plan to do more very scrappy ones.
Allison
I'm so glad you've liked it!!
Susan S.
This looks like fun.... I am not a big fan of white BUT I like the look of the white and prints in your quilt pattern. I am looking forward to trying this with seasonal prints.... looks fun. Thank you!
JanC
Looks like a fun quilt! Is there a way to make it printer friendly?
Pineapple Fabrics
Great tutorial - sharing on our Pinterest page!
Kalpana Mallya
Wonderful tutorial for a beginner like me. Thanks a lot.
Therese
Thank you for this tutorial. I've been wanting to make a quilt from my son's old shirts. Cutting this way, the striped and print shirt blocks will line up nicely. May have to add a few of DH's solid shirts for more contrast. And I love the idea for a flannel quilt! I have lots of odds and ends of flannel. This will be fun!
Allison
What a great idea for these blocks!!
Allison
No PDF, but you can right click and save it as a PDF with your printer files.
Cathy Zacher
Thank you for such a great idea!
Elizabeth Kelbaugh
I look forward to trying this pattern. Thanks for sharing
Kathleen Humann
So happy to have found this pattern. Easy Modern baby quilt idea for a gift I need to make! Thank you for another way to use up some of my stash. Also thinking of teaching this at our Winter TX home Bee next fall!